Table of Contents 1. Overview and Role Hierarchy 2. User Operations 2.1 User List | 2.2 Creating a New User | 2.3 Editing a User | 2.4 Password Reset 3. Co-Administrator Management 4. User Groups 5. Permission Policies 6. Resource Quota 7. API Keys 8. Task History (Tasks/Logs) 9. Best Practices
1. Overview and Role Hierarchy
User management in the Narbulut ECS platform is based on the Tenant → Co-Administrator → User hierarchy. Each role has a different permission level, and access permissions are controlled on a policy basis.
Role
Description
Permission Scope
Tenant
Primary administrator account
Full access (within tenant)
Co-Administrator
Assistant administrator
Policy-based
User (Member)
Standard user
Limited access
Figure 1 — Role hierarchy diagram
Access flow: After the Tenant account is created, the administrator can create Co-Administrator and User accounts as needed. Co-Administrators can participate in platform management within the scope of permission policies, while Users can only access the resources assigned to them.
2. User Operations
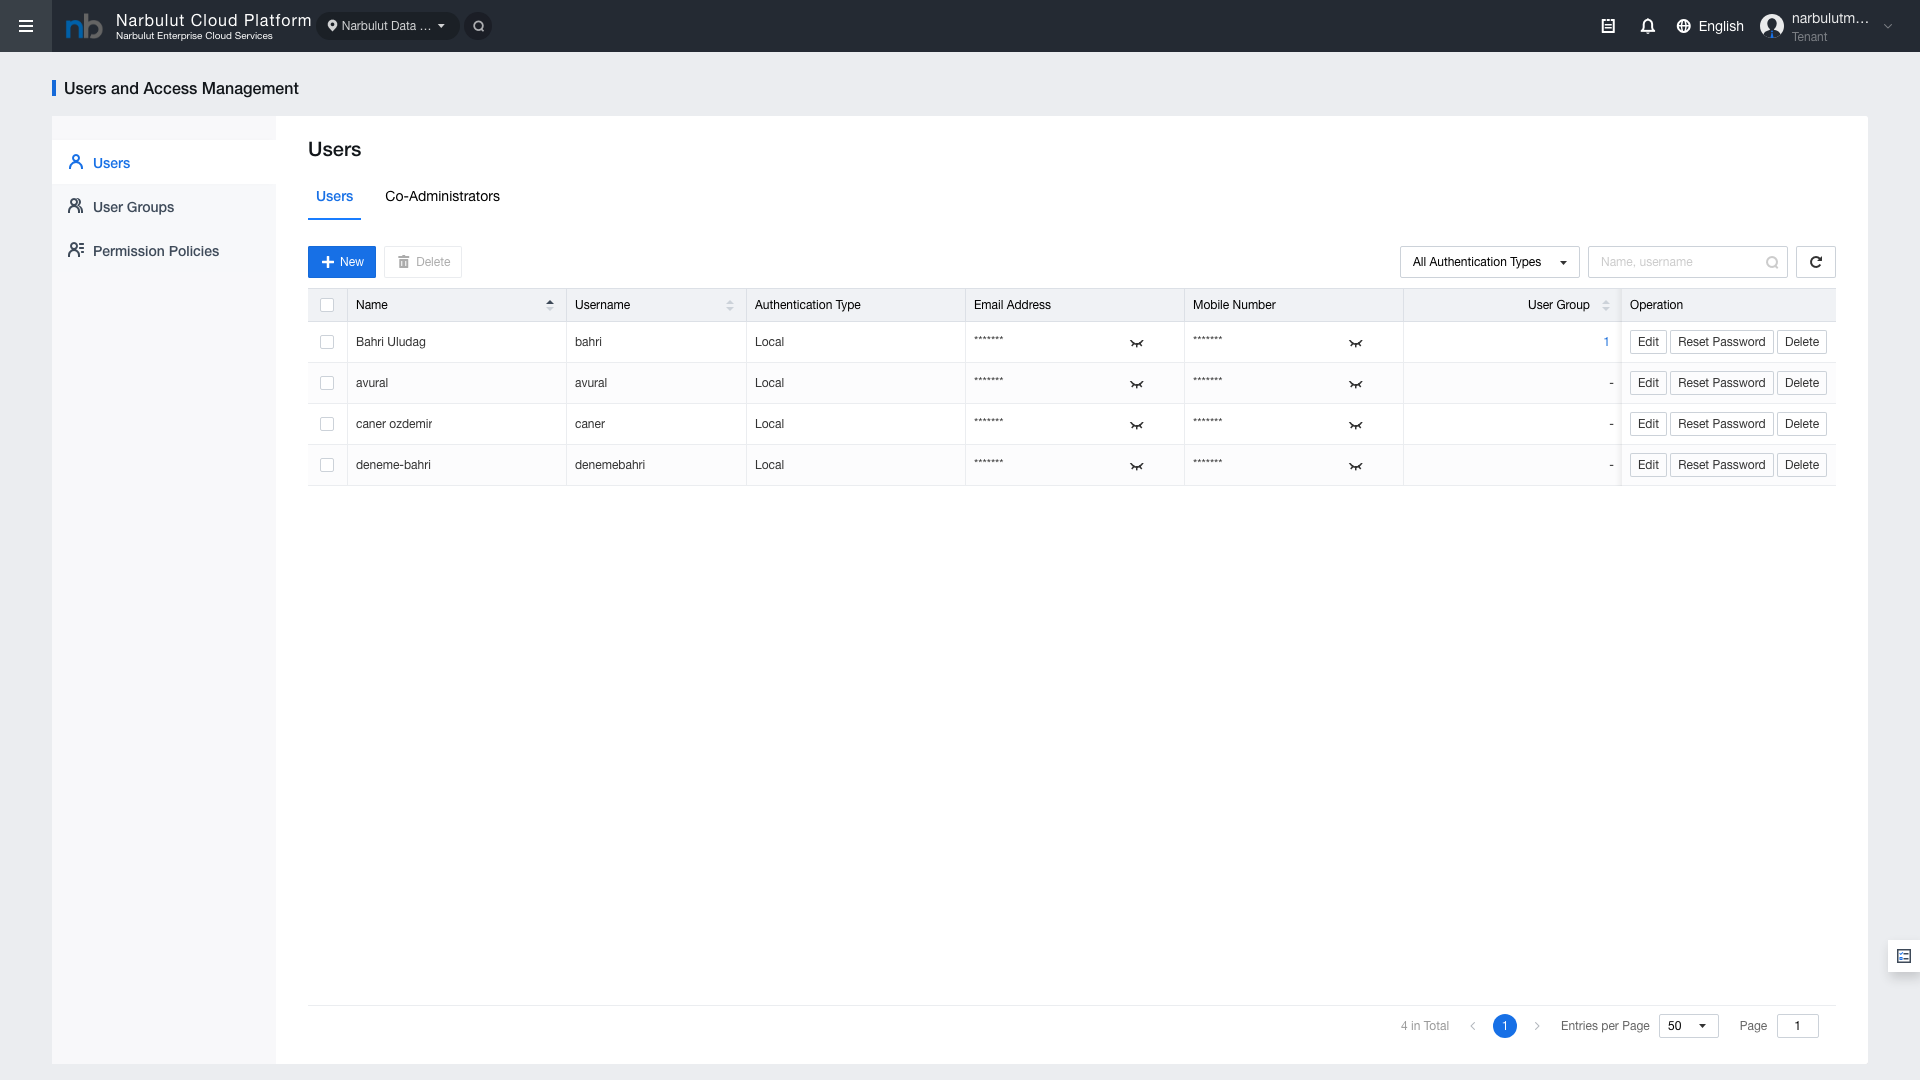
2.1 User List
Click Identity > Users from the left menu to access the user list. This page displays all users and their basic information.
Figure 2 — User list page
Column
Description
Name
Full name of the user
Username
Username used for login
Auth Type
Authentication type (Local / LDAP)
Email
Email address
Mobile
Mobile phone number
User Group
Group the user belongs to
Operation
Action buttons for edit, delete, etc.
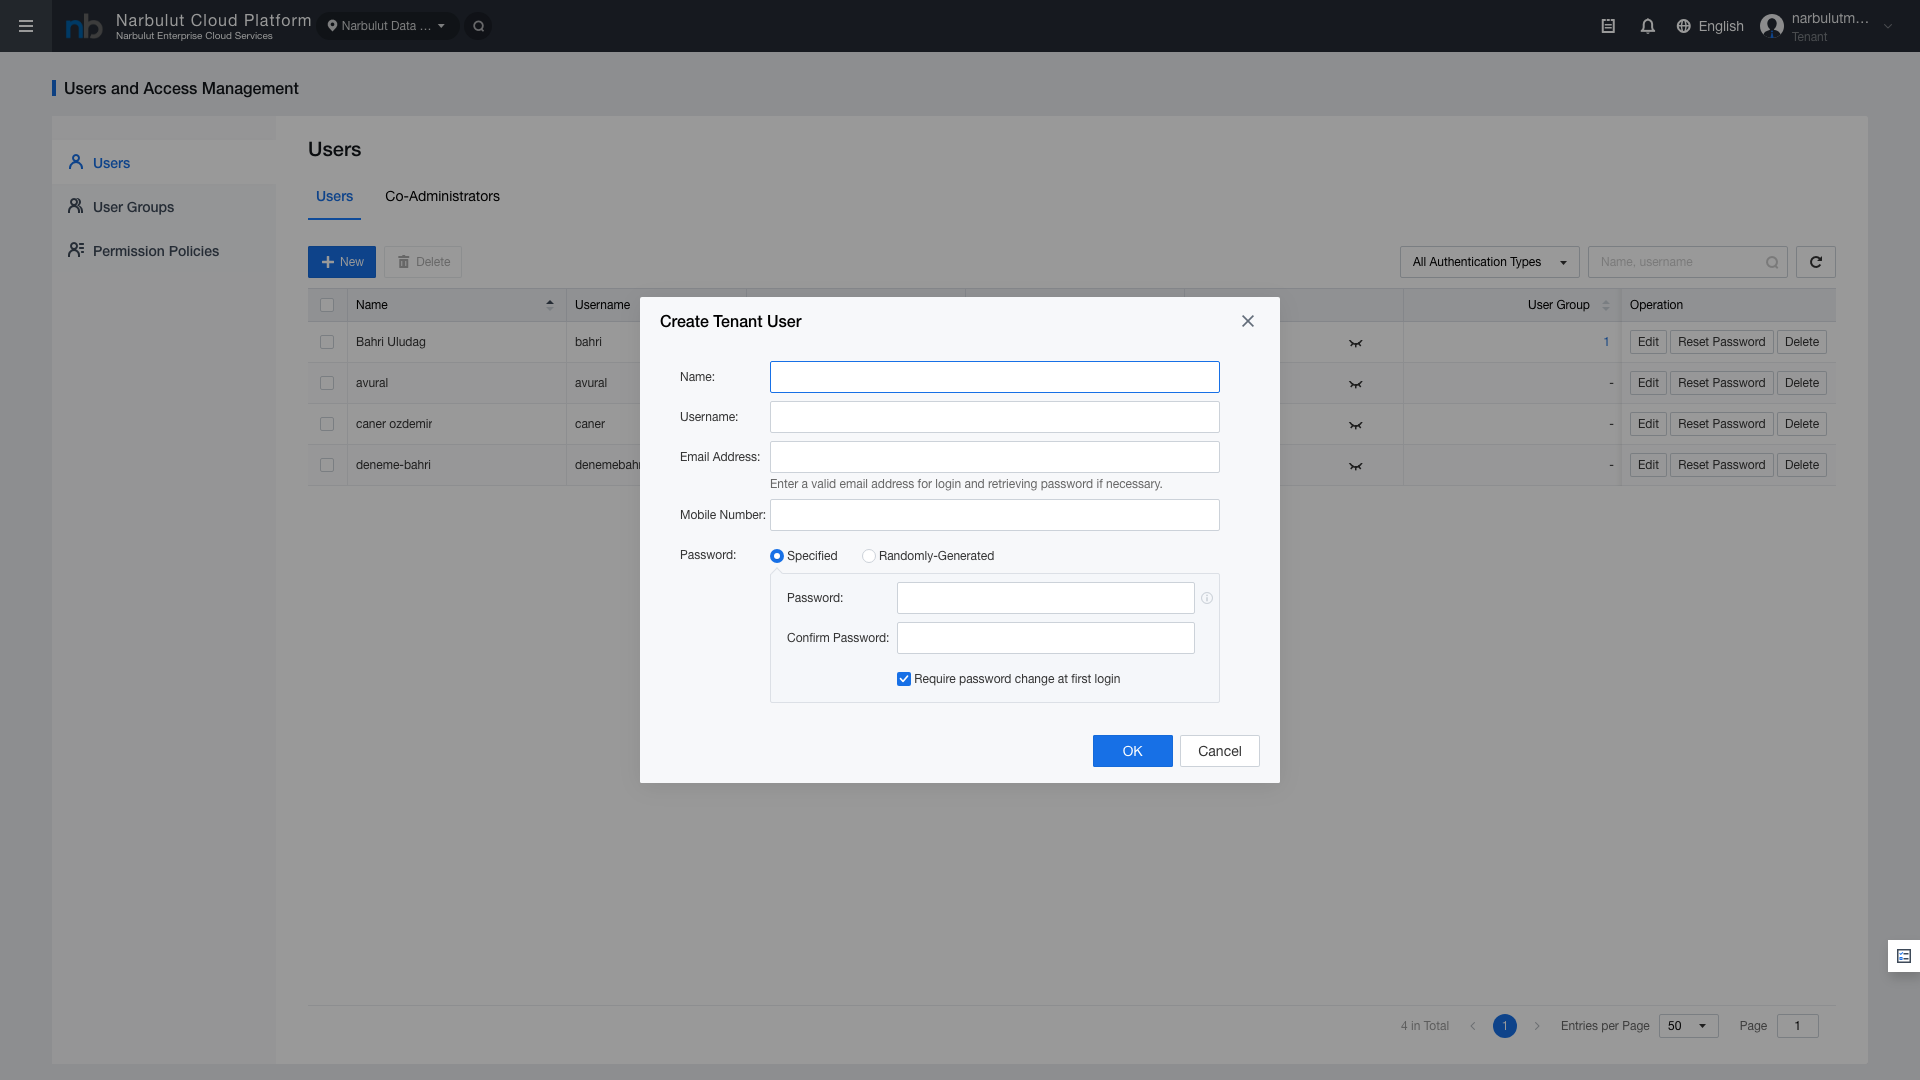
2.2 Creating a New User
Click the “New” button on the user list page to open the new user creation form.
Figure 3 — New user creation form
Field
Description
Required
Name
Full name of the user
Yes
Username
Username for login
Yes
Email Address
Email address
No
Mobile Number
Mobile phone number
No
Password
Specified or Randomly-Generated options
Yes
Tip: Use the "Randomly-Generated" option in the password field to automatically create a secure password. The generated password will be sent to the user via email.
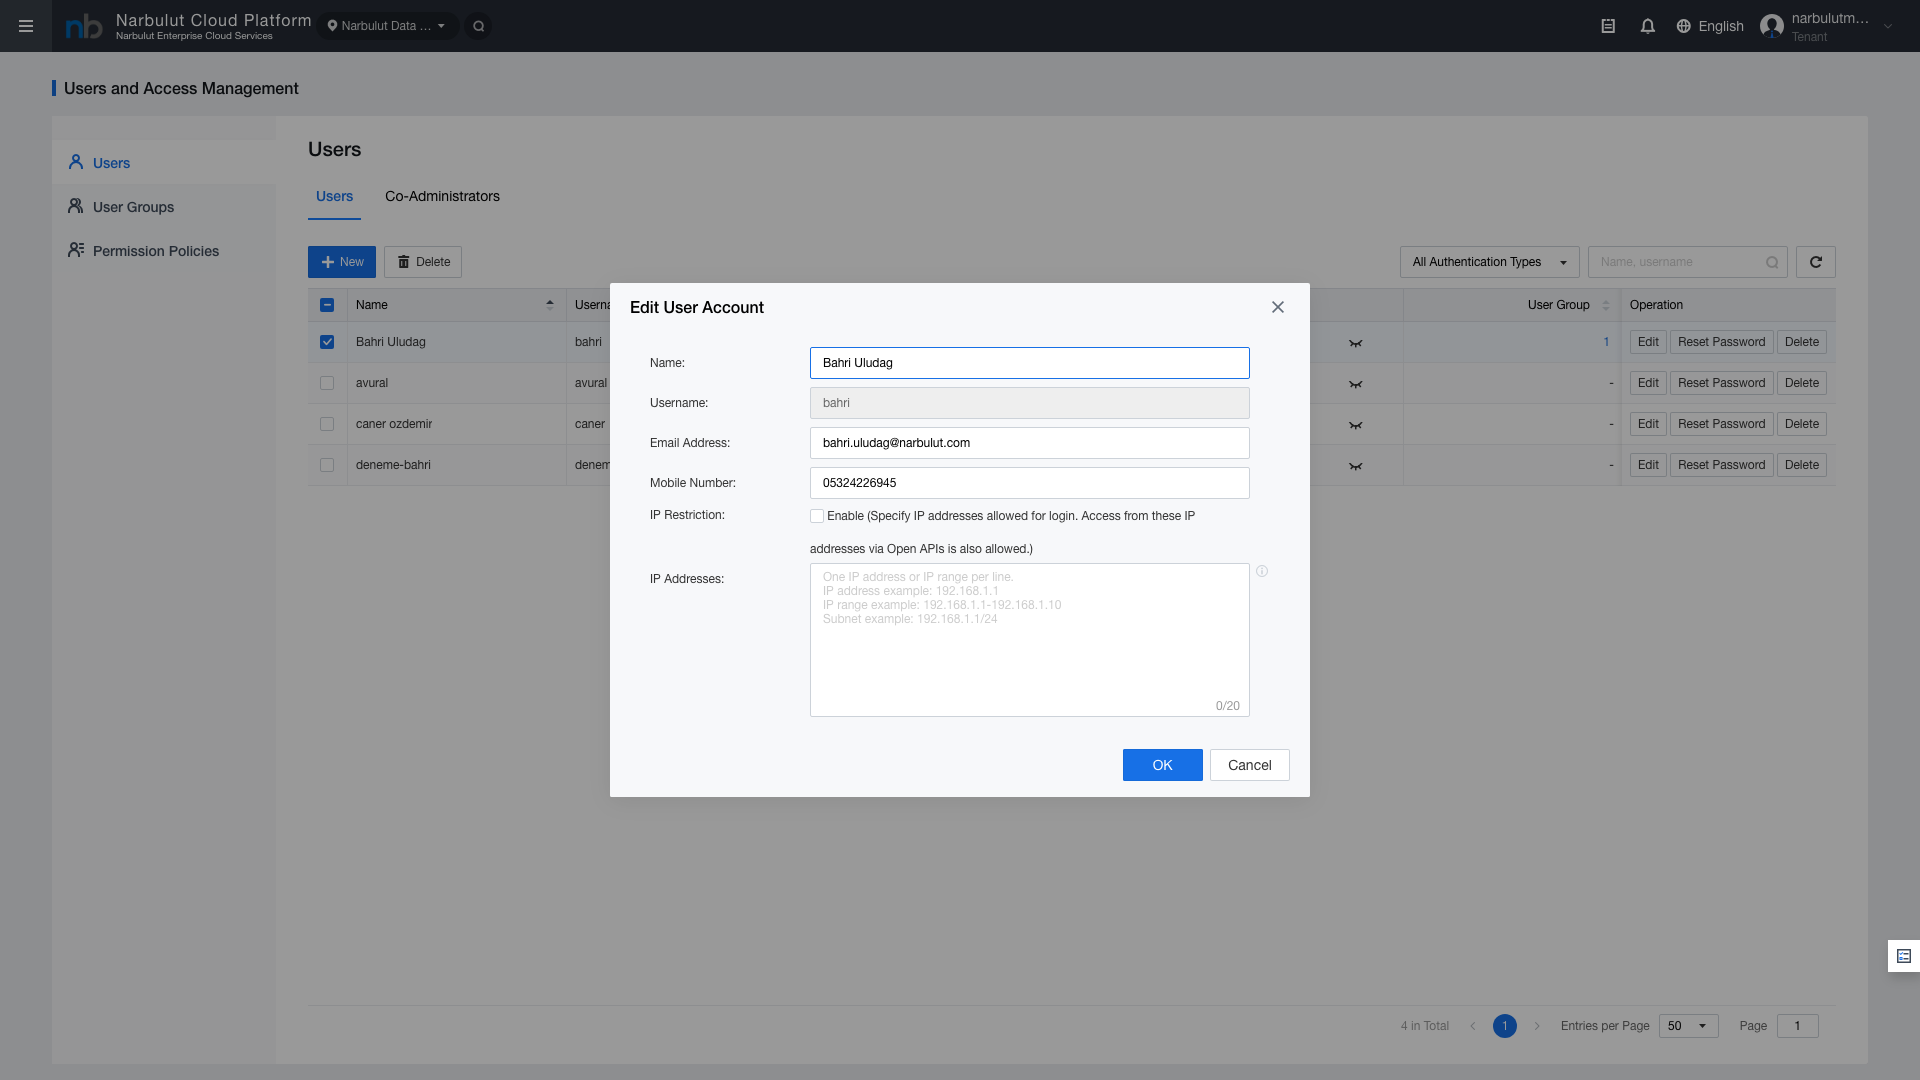
2.3 Editing a User
Click the edit icon for the relevant user in the Operation column of the user list.
Figure 4 — User edit form
Field
Description
Editable
Name
Full name of the user
Yes
Username
Login username
No (read-only)
Email
Email address
Yes
Mobile
Mobile phone number
Yes
IP Restriction
Allowed IP addresses for access
Yes
Note: The Username field cannot be changed after creation. Use the IP Restriction field to allow the user to access only from specific IP addresses.
2.4 Password Reset
Password reset can be performed from the user edit page or from the action menu in the user list.
Figure 5 — Password reset
Password reset methods:
Specified: New password set by the administrator
Randomly-Generated: Secure password automatically generated by the system
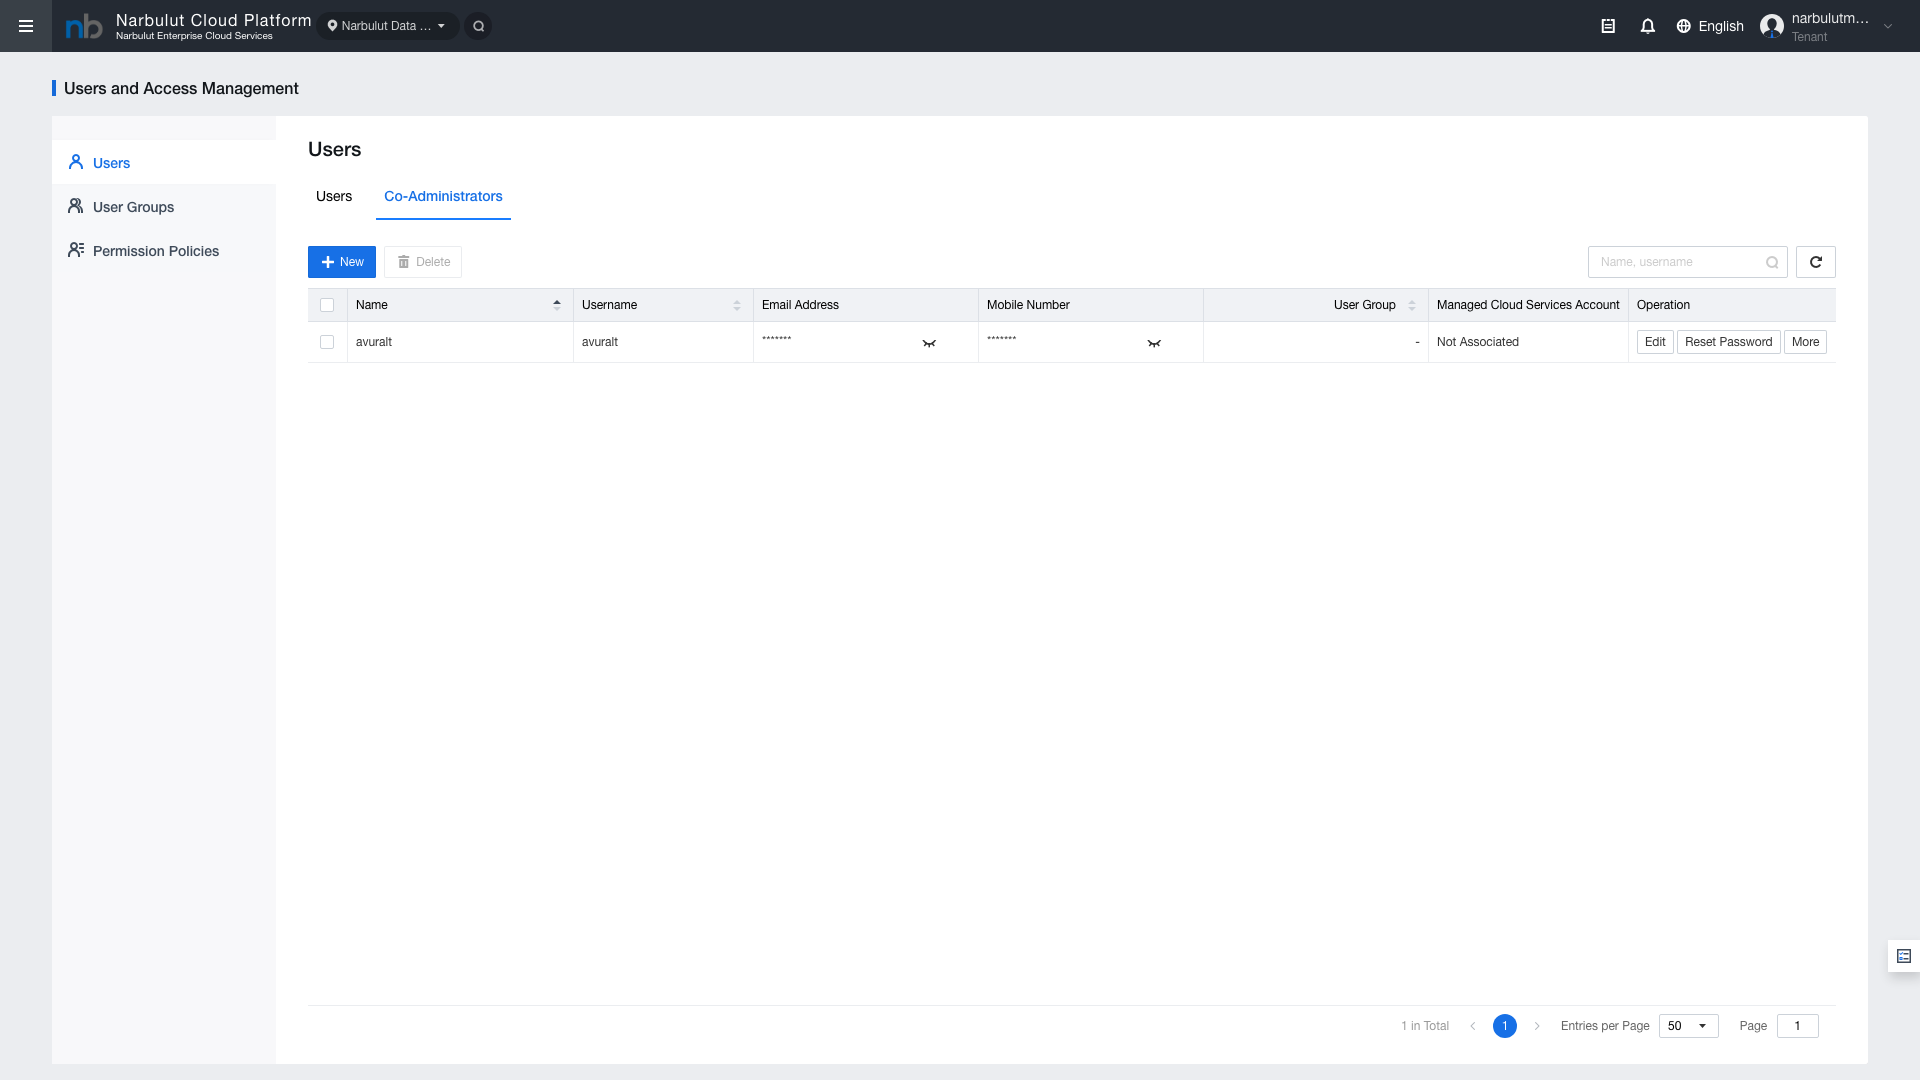
3. Co-Administrator Management
Co-Administrators are assistant administrator accounts authorized by the Tenant administrator. They can participate in platform management within the scope of permission policies.
Click Identity > Co-Administrators from the left menu to access the Co-Administrator list.
Figure 6 — Co-Administrator list
Column
Description
Name
Co-Administrator name
Username
Login username
Auth Type
Authentication type
Email
Email address
Policy
Assigned permission policy
Operation
Edit, delete actions
Co-Administrator vs User comparison:
Feature
Co-Administrator
User (Member)
Management Authority
Platform management within policy scope
Own resources only
Resource Creation
Yes, if policy allows
Limited
User Management
Within policy scope
No
Policy Assignment
Required
Optional
Tip: Always assign a permission policy when creating a Co-Administrator. Without a policy, the Co-Administrator cannot perform any operations.
4. User Groups
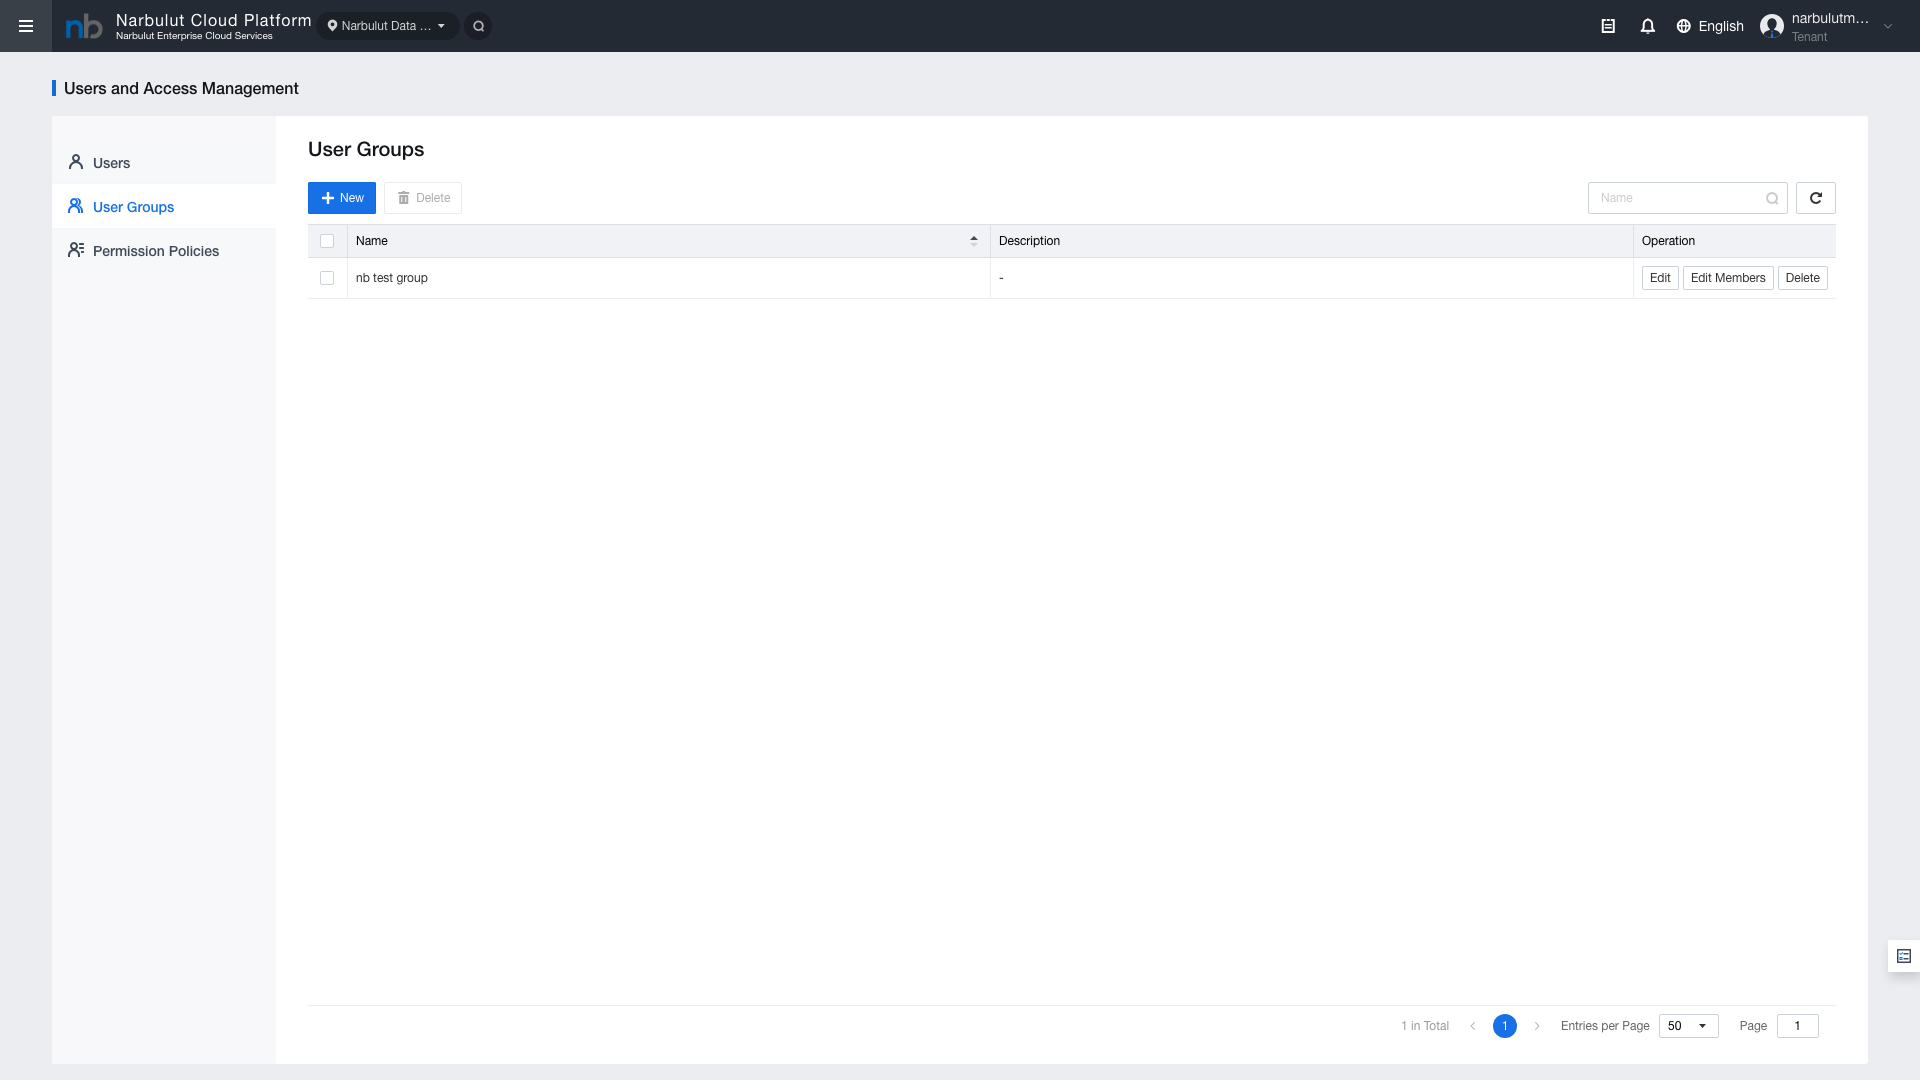
4.1 Group List
User groups are used to organize users with similar permission and access requirements. Click Identity > User Groups from the left menu.
Figure 7 — User groups list
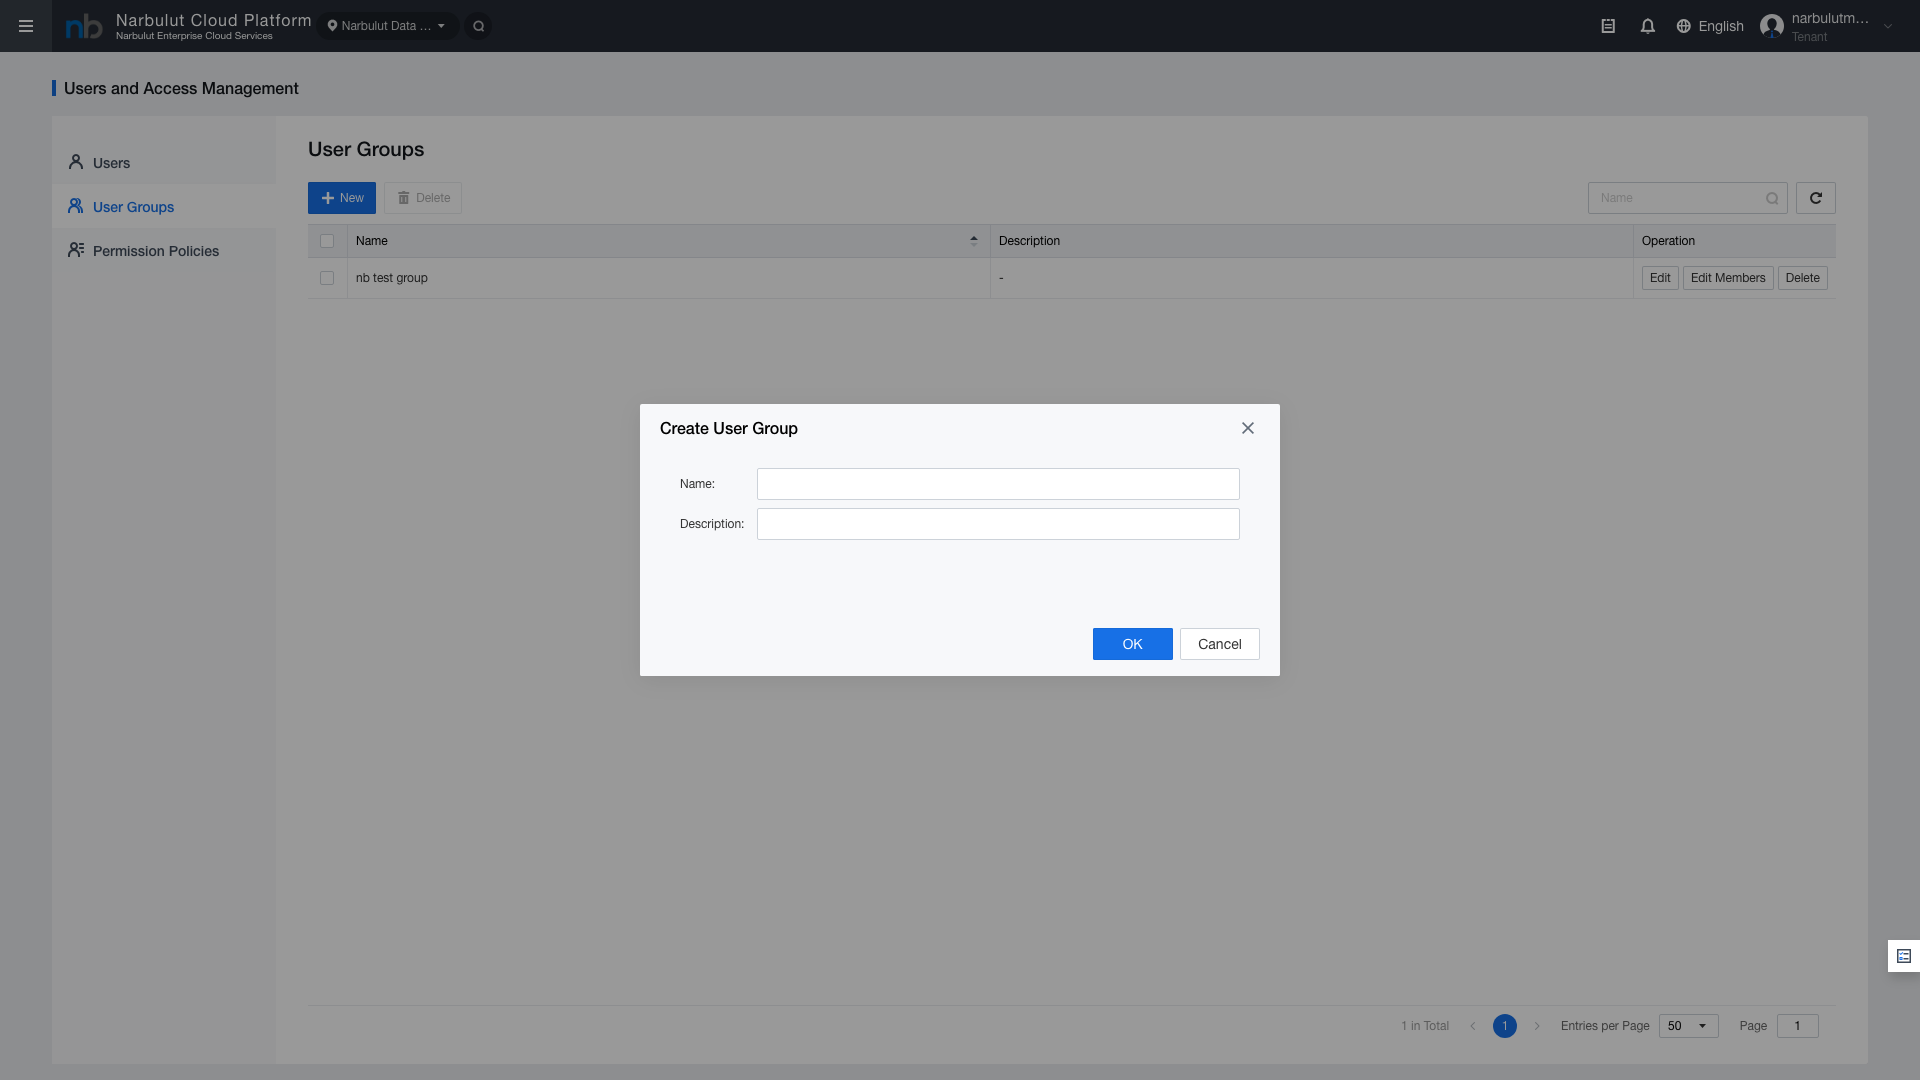
4.2 Creating a New Group
Click the “New” button to create a new user group. Define the group by entering a group name and description.
Figure 8 — New group creation form
4.3 Adding Members to a Group
After creating a group, you can add existing users to it. Click the “Add Members” button on the group detail page to open the user selection window.
5. Permission Policies
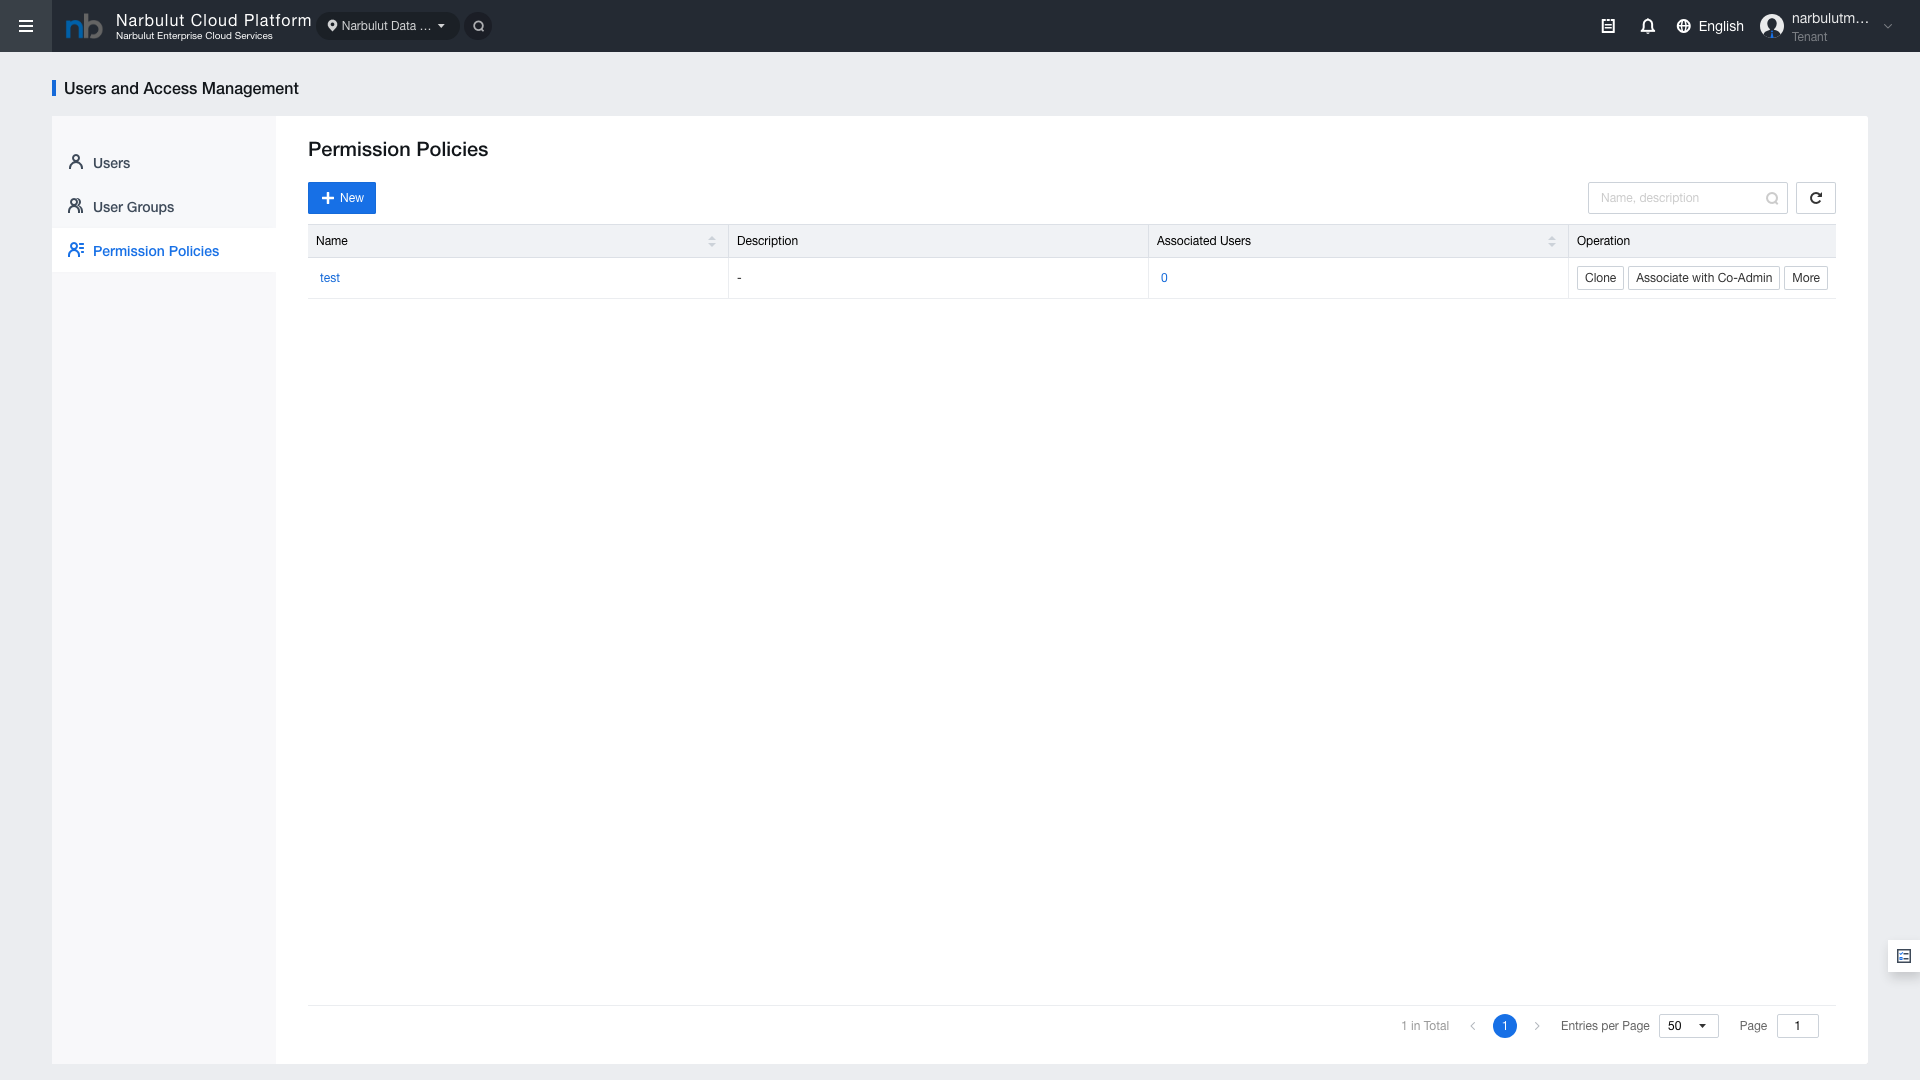
5.1 Policy List
Permission policies determine what operations users and Co-Administrators can perform on the platform. Click Identity > Policies from the left menu.
Figure 9 — Permission policy list
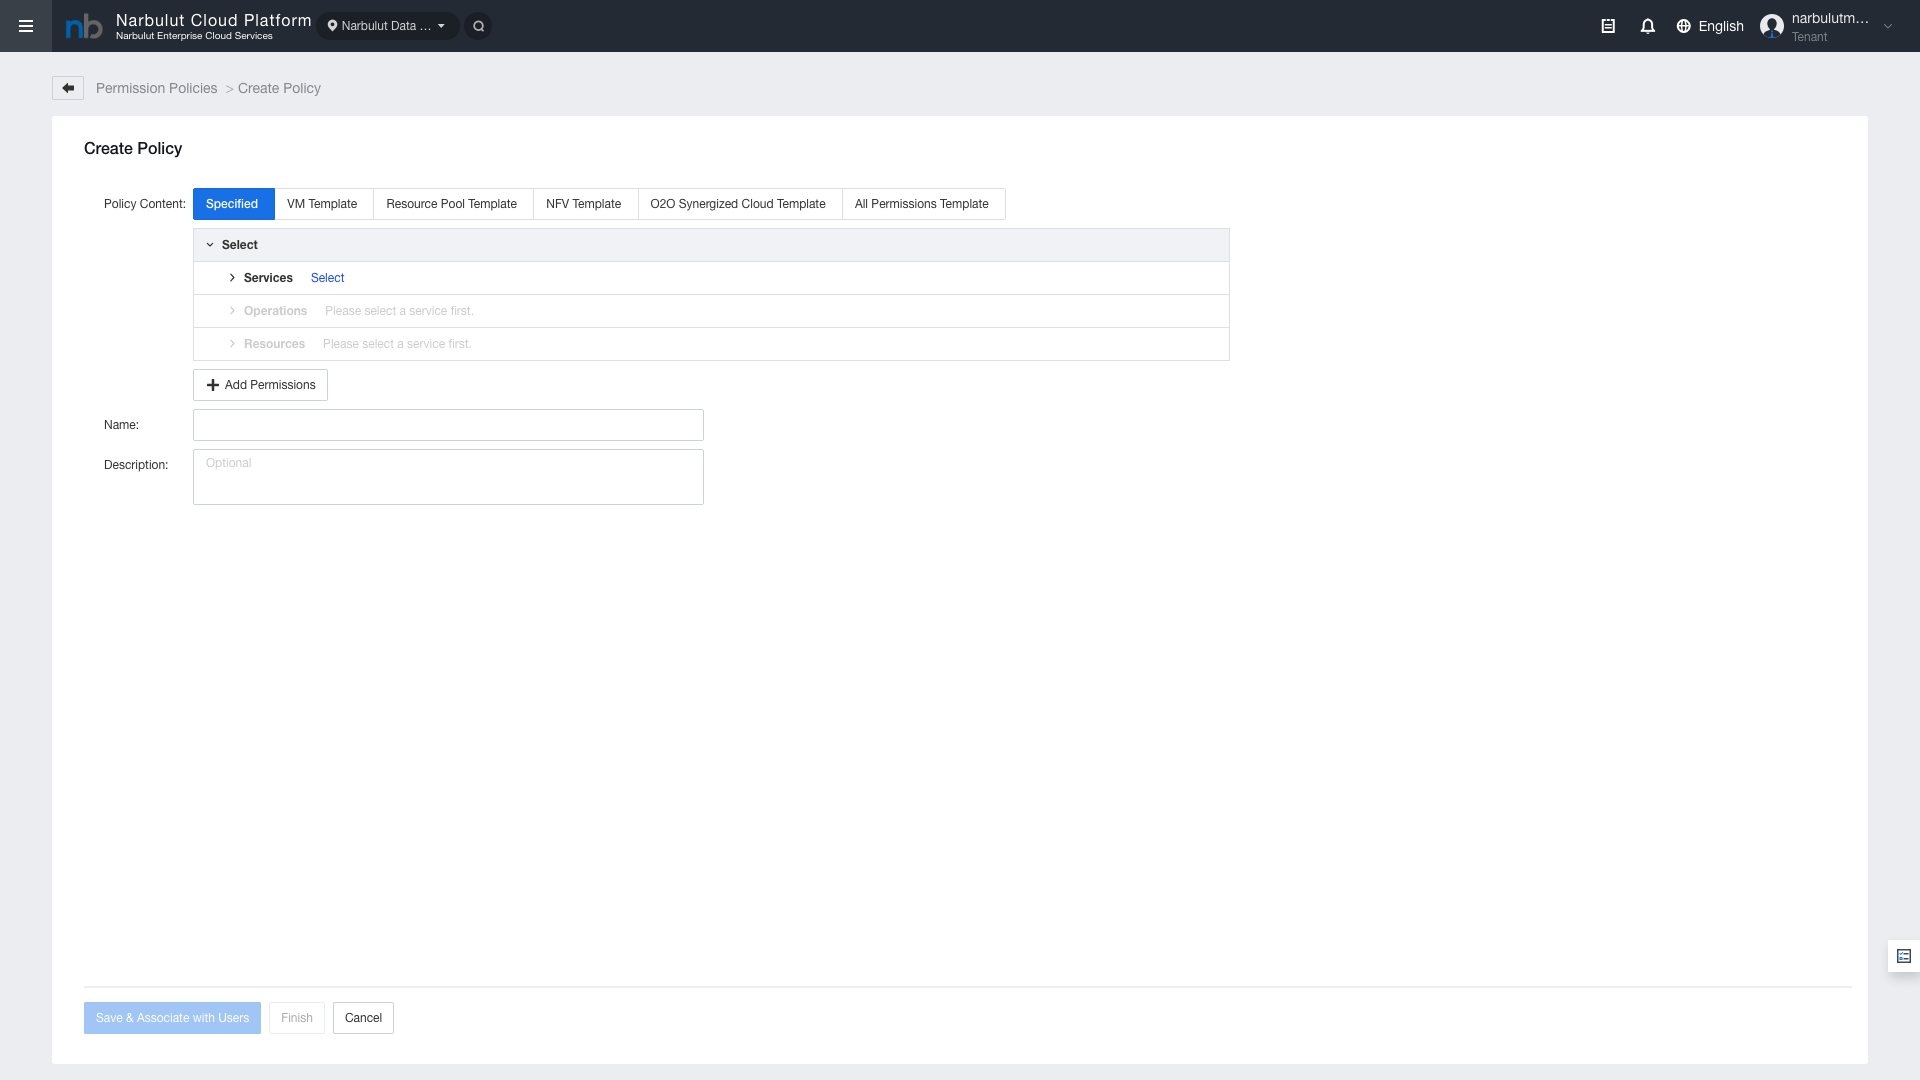
5.2 Creating a New Policy
Click the “New” button to create a new permission policy. Configure the following components when creating a policy:
Policy Name: Policy name (e.g., “VM-Admin-Policy”)
The ECS platform provides ready-made policy templates for common use cases:
ReadOnlyAccess: View all resources (read-only)
FullAccess: Full access to all resources
ComputeFullAccess: Full access to the Compute module
NetworkFullAccess: Full access to the Network module
You can create custom policies based on templates or use them directly.
Note: Policy changes take effect immediately. When editing a policy, the permissions of all users associated with that policy are automatically updated.
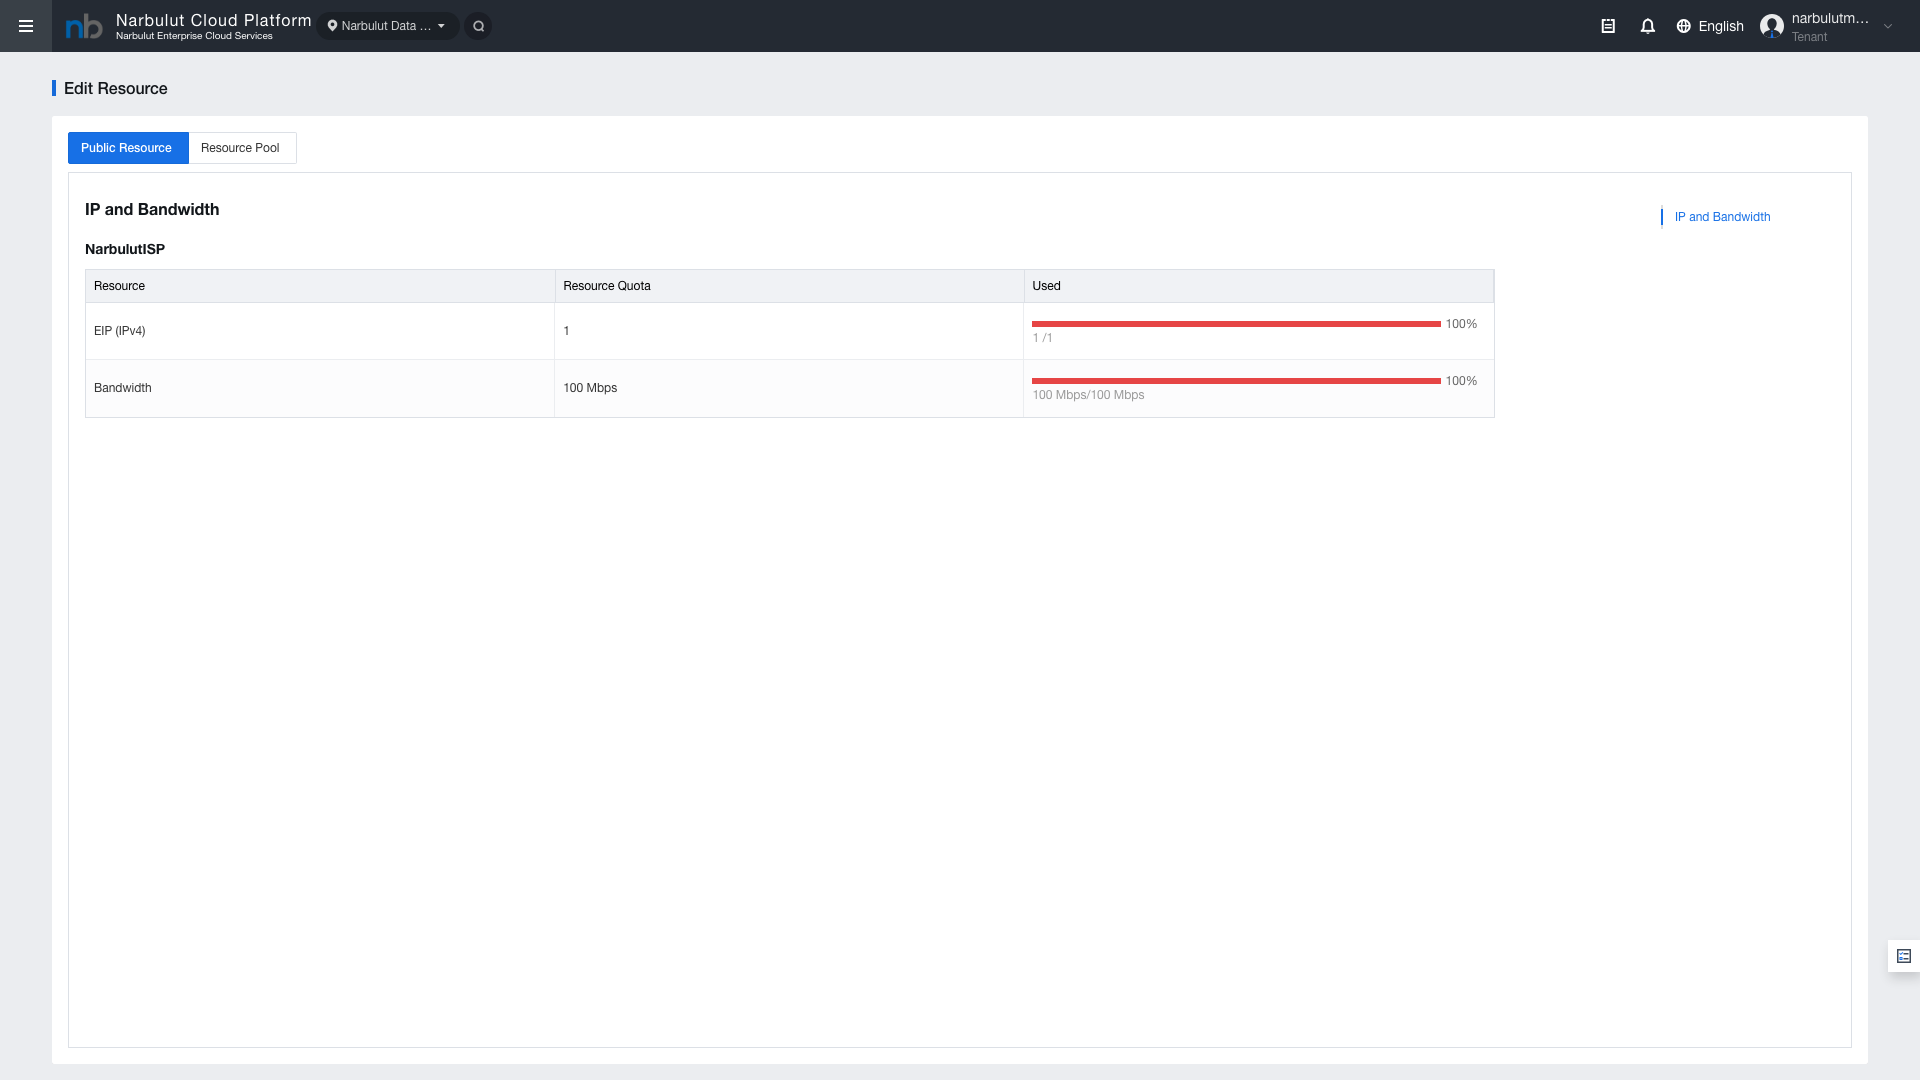
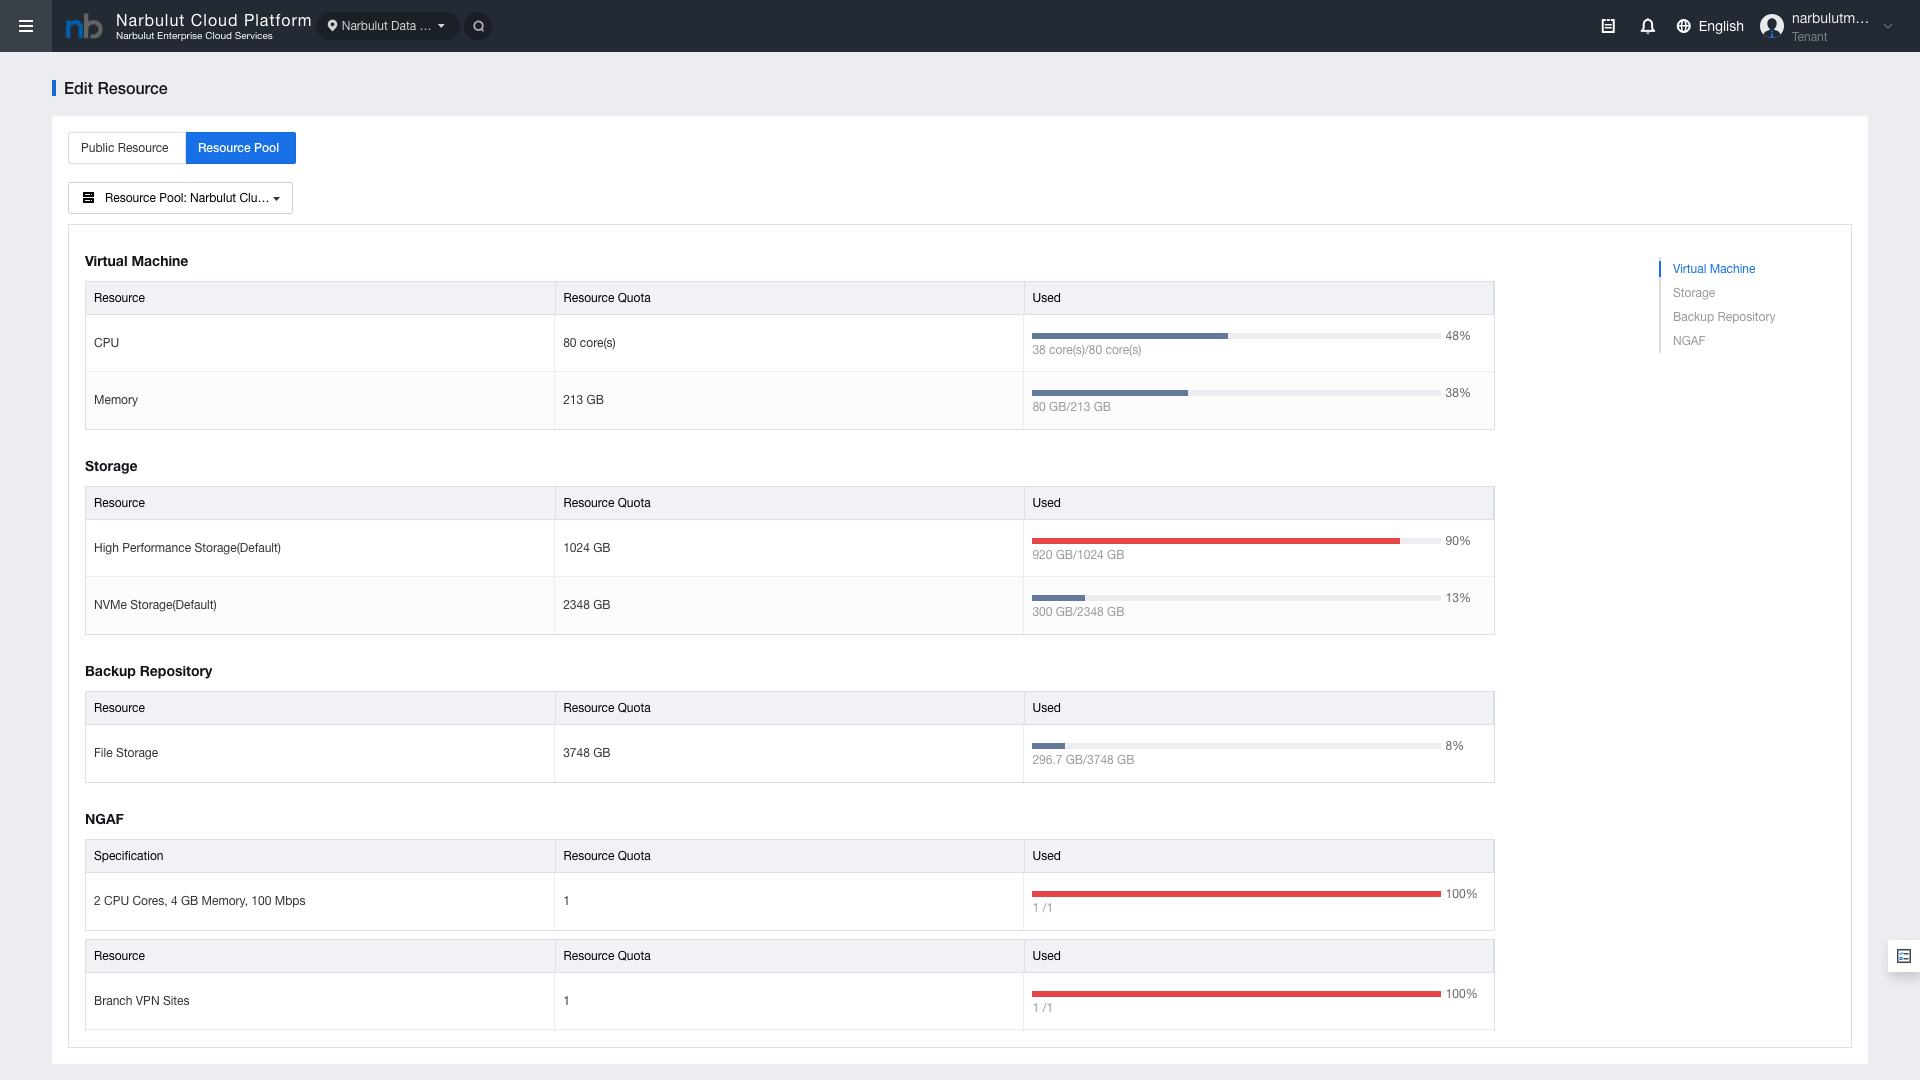
6. Resource Quota
Resource quota defines the maximum amount of resources that users and groups can consume. This feature prevents a single user from consuming all available resources.
Click Identity > Resource Quota from the left menu.
Figure 11 — Resource quota page
Quota configuration fields:
vCPU: Maximum number of virtual CPUs
Memory: Maximum RAM amount (GB)
Storage: Maximum storage space (GB)
VM Count: Maximum number of virtual machines
Elastic IP: Maximum number of Elastic IPs
VPC: Maximum number of VPCs
Tip: You can define resource quotas on a per-user or per-group basis. Group quotas limit the total consumption of all members in the group.
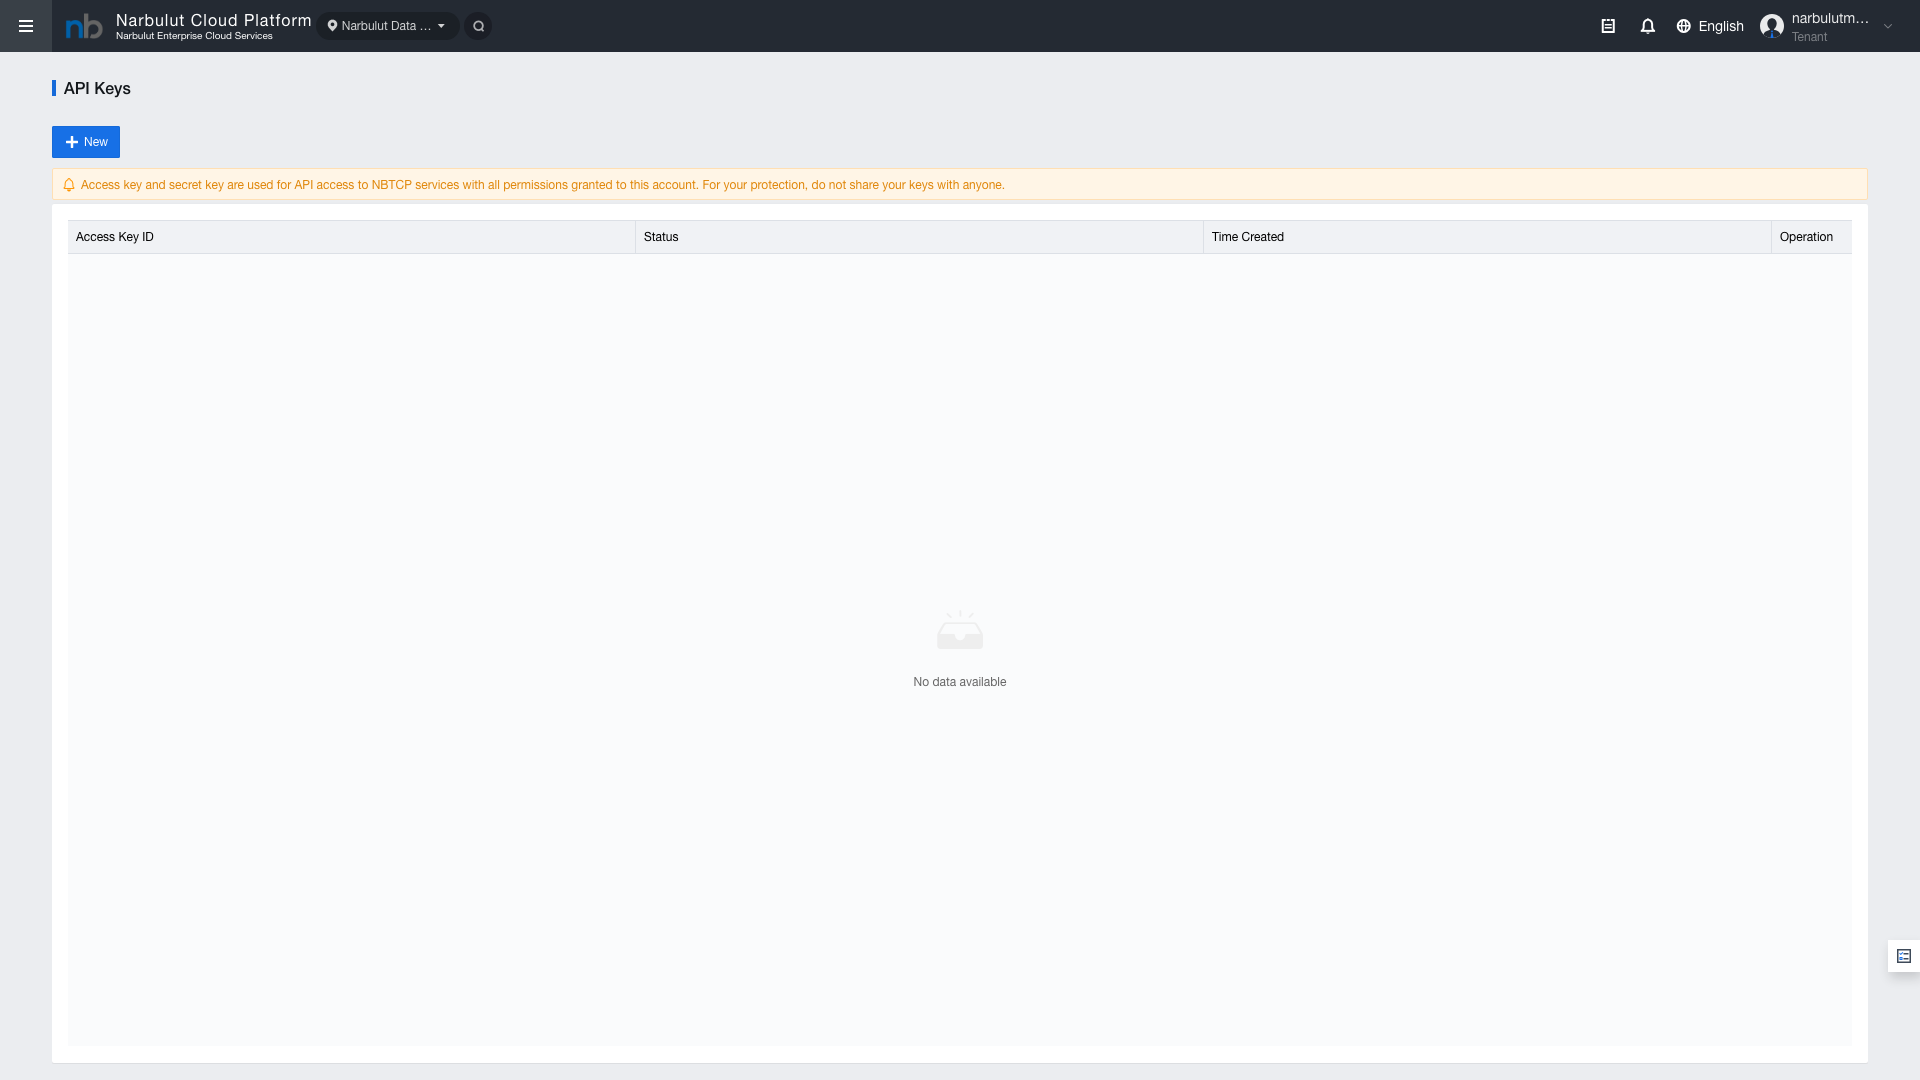
7. API Keys
API keys are used to provide programmatic access to the ECS platform. Each user can create and manage their own API keys.
Steps to create an API key:
Click API Keys from the user profile menu
Click the “Create API Key” button
Enter the key name and create it
Save the Access Key ID and Secret Access Key in a secure location
Warning: The Secret Access Key is only shown at the time of creation. If you lose it, you will need to create a new key.
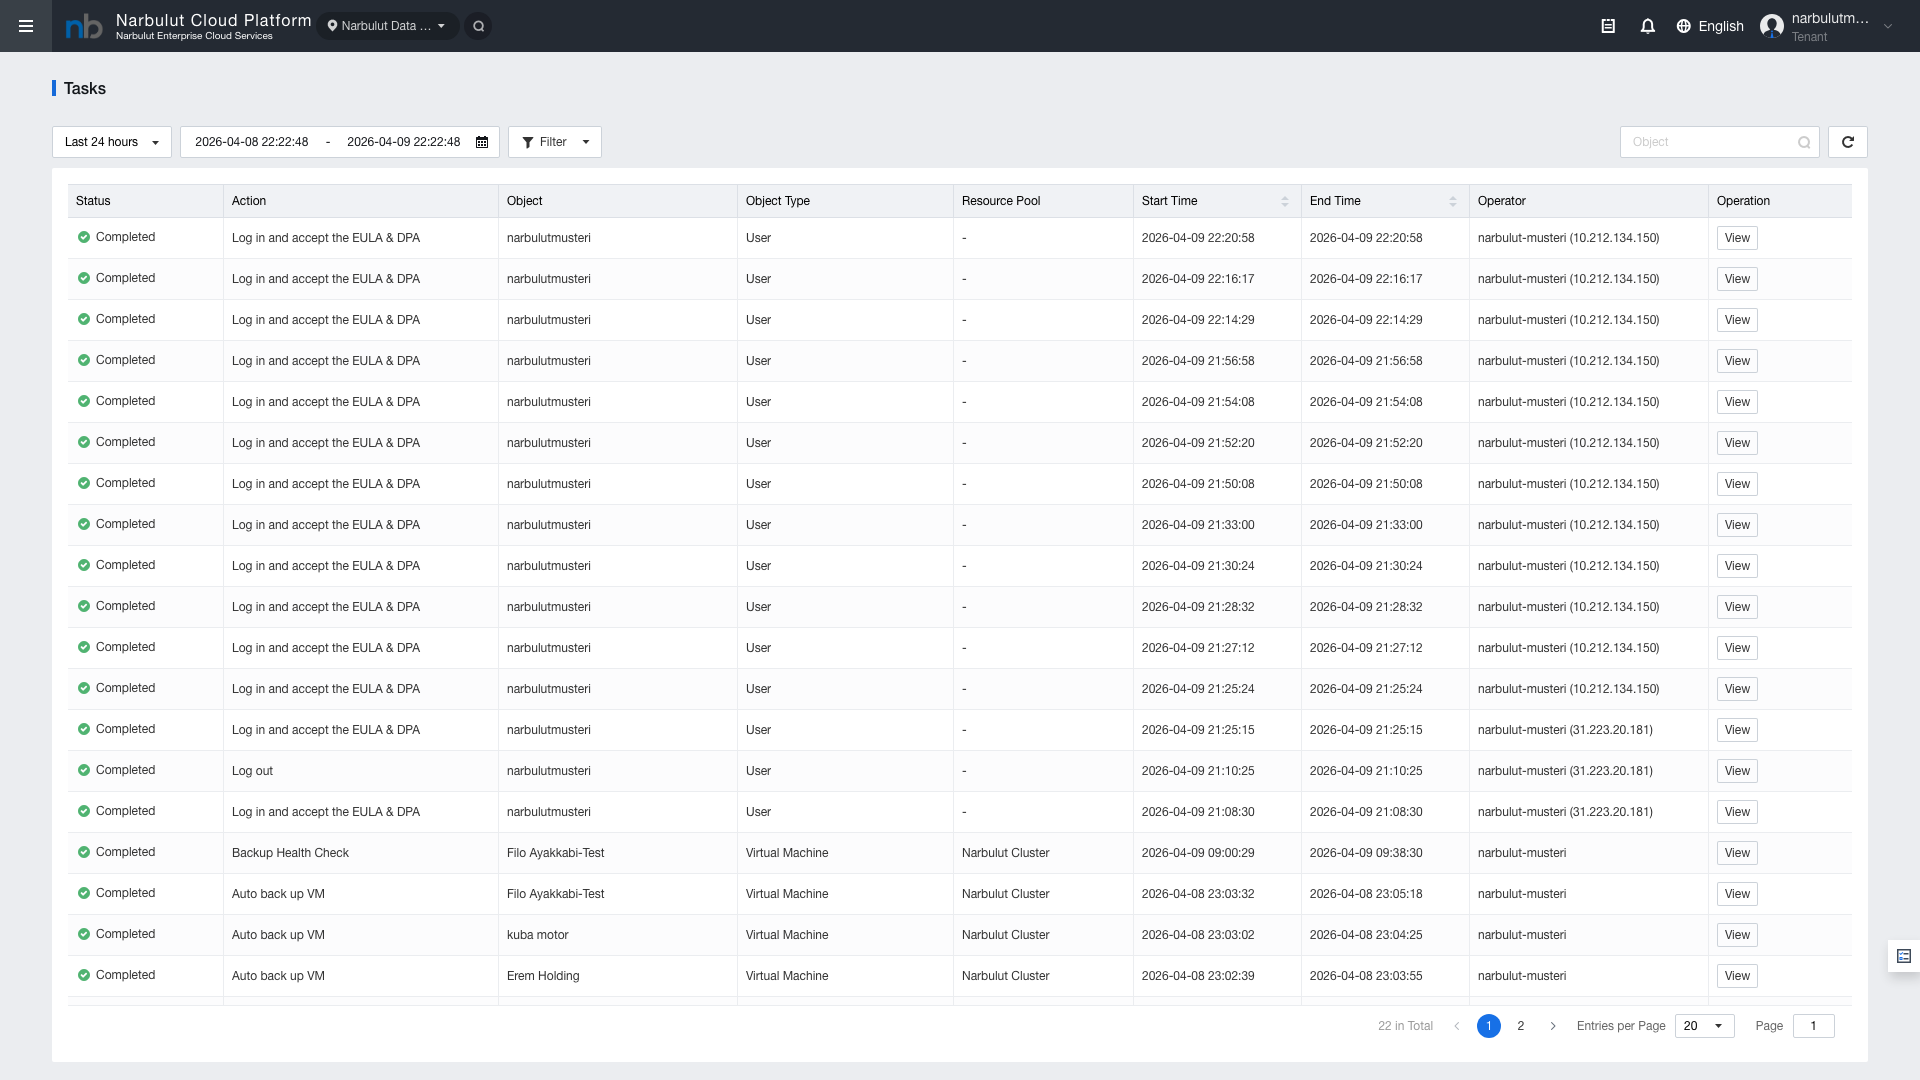
8. Task History (Tasks/Logs)
The task history page allows you to track all operations performed by users. This page is used for auditing and troubleshooting purposes.
Figure 12 — API keys / Task history
Information displayed in task history:
Task ID: Task identification number
User: User who performed the operation
Action: Action taken (Create, Delete, Update, etc.)
Resource: Affected resource
Status: Operation status (Success, Failed, In Progress)
Time: Date and time of the operation
9. Best Practices
Follow these recommendations to maintain secure and efficient user management on the ECS platform:
Principle of Least Privilege: Grant users only the minimum permissions they need. Avoid granting unnecessary full access.
Group-Based Management: Organize users into groups and assign permission policies at the group level. Prefer group management over individual policy assignments.
Password Security: Enforce a strong password policy. Use the Randomly-Generated option to create secure passwords.
IP Restriction: Use the IP Restriction feature for critical administrator accounts to limit access to specific IP addresses.
Resource Quotas: Define resource quotas for each user and group to ensure controlled resource usage.
API Key Security: Rotate API keys regularly. Disable unused keys.
Regular Auditing: Review the task history periodically. Detect abnormal activities.
Co-Administrator Usage: Use Co-Administrator accounts for daily management tasks. Reserve the Tenant account only for critical configurations.
Summary: User management is the cornerstone of platform security. By properly configuring the role hierarchy, permission policies, and resource quotas, you can create a secure and scalable environment.