
- Company
-
Products
Products
New ProductCloud Server
Fully managed virtual server infrastructure. Setup in minutes, hourly billing and 24/7 expert support so you can focus on your business.
Try Now -
Solutions
Backup & Security
Data SecurityRansomware & encryptionSilent Ransom: TDEProtection against TDE abuseCloud BackupSecure backup to data centersImage BackupFull disk image + fast recoveryOff-Site BackupOff-site disaster recoveryMobile BackupiOS & Android photos/contactsRansomware ProtectionAgainst ransomware attacksTwo-Factor Auth2FA account security - Plans
- Resources
- Partners
- Blog
How to Back Up a Microsoft SQL Database?
Databases are among the most critical digital assets of any organization. From customer information to financial records, from production data to sales history — all the vital information that keeps a business alive is stored in databases. Hardware failure, software errors, cyberattacks, or a simple user mistake — the loss of this data can lead to irreversible consequences.
That is why a regular and properly configured SQL backup strategy is one of the primary responsibilities of every system administrator and database administrator (DBA). In this guide, we will cover every aspect of backing up databases in Microsoft SQL Server: backup types, backing up through the SQL Server Management Studio (SSMS) interface, automated backups with T-SQL commands, and best practices.
The Importance of SQL Server Backups
The SQL Server backup and restore component is the most fundamental mechanism provided to protect the critical data stored in your databases. An effective backup strategy should clearly answer these three questions:
- How much data loss can you afford? (RPO — Recovery Point Objective)
- In the event of a disaster, how quickly must you bring systems back online? (RTO — Recovery Time Objective)
- Where will you store backups and for how long will you keep them? (Retention policy)
These questions shape your backup strategy. Now let’s look at the backup types SQL Server offers.
SQL Server Backup Types
SQL Server has three fundamental backup types. The right strategy is usually a combination of all three.
Full Backup
A complete, end-to-end copy of all data in the database. It is the foundation of every backup strategy; other backup types are built on top of the Full Backup. Advantage: It alone is sufficient to restore the entire database. Disadvantage: It consumes significant time and disk space on large databases.
Differential Backup
A backup of the data that has changed since the last Full Backup. It runs much faster than a Full Backup and takes up less space. During restore, the Full Backup is applied first, followed by the latest Differential Backup.
Transaction Log Backup
A backup of all transactions (insert, update, delete) in the database. This backup type enables point-in-time recovery. In other words, you can restore the database to its state at, say, 2:37 PM yesterday. It can only be taken on databases running in the Full or Bulk-Logged recovery model.
Before You Start: Checking the Recovery Model
Your database’s recovery model determines which backup types you can take. There are three options:
- Simple: Only Full and Differential backups can be taken; Transaction Log backups cannot. Suitable for test and development environments with a high tolerance for data loss.
- Full: All backup types are supported and point-in-time recovery is possible. Recommended for production environments.
- Bulk-Logged: Similar to Full but optimized for bulk operations (bulk insert, etc.).
To change the Recovery Model through SSMS, right-click the database and go to Properties → Options.

Step-by-Step Database Backup with SSMS
SQL Server Management Studio (SSMS) is Microsoft’s free graphical management tool. It is the easiest way to perform a backup and is especially ideal for manual backups.
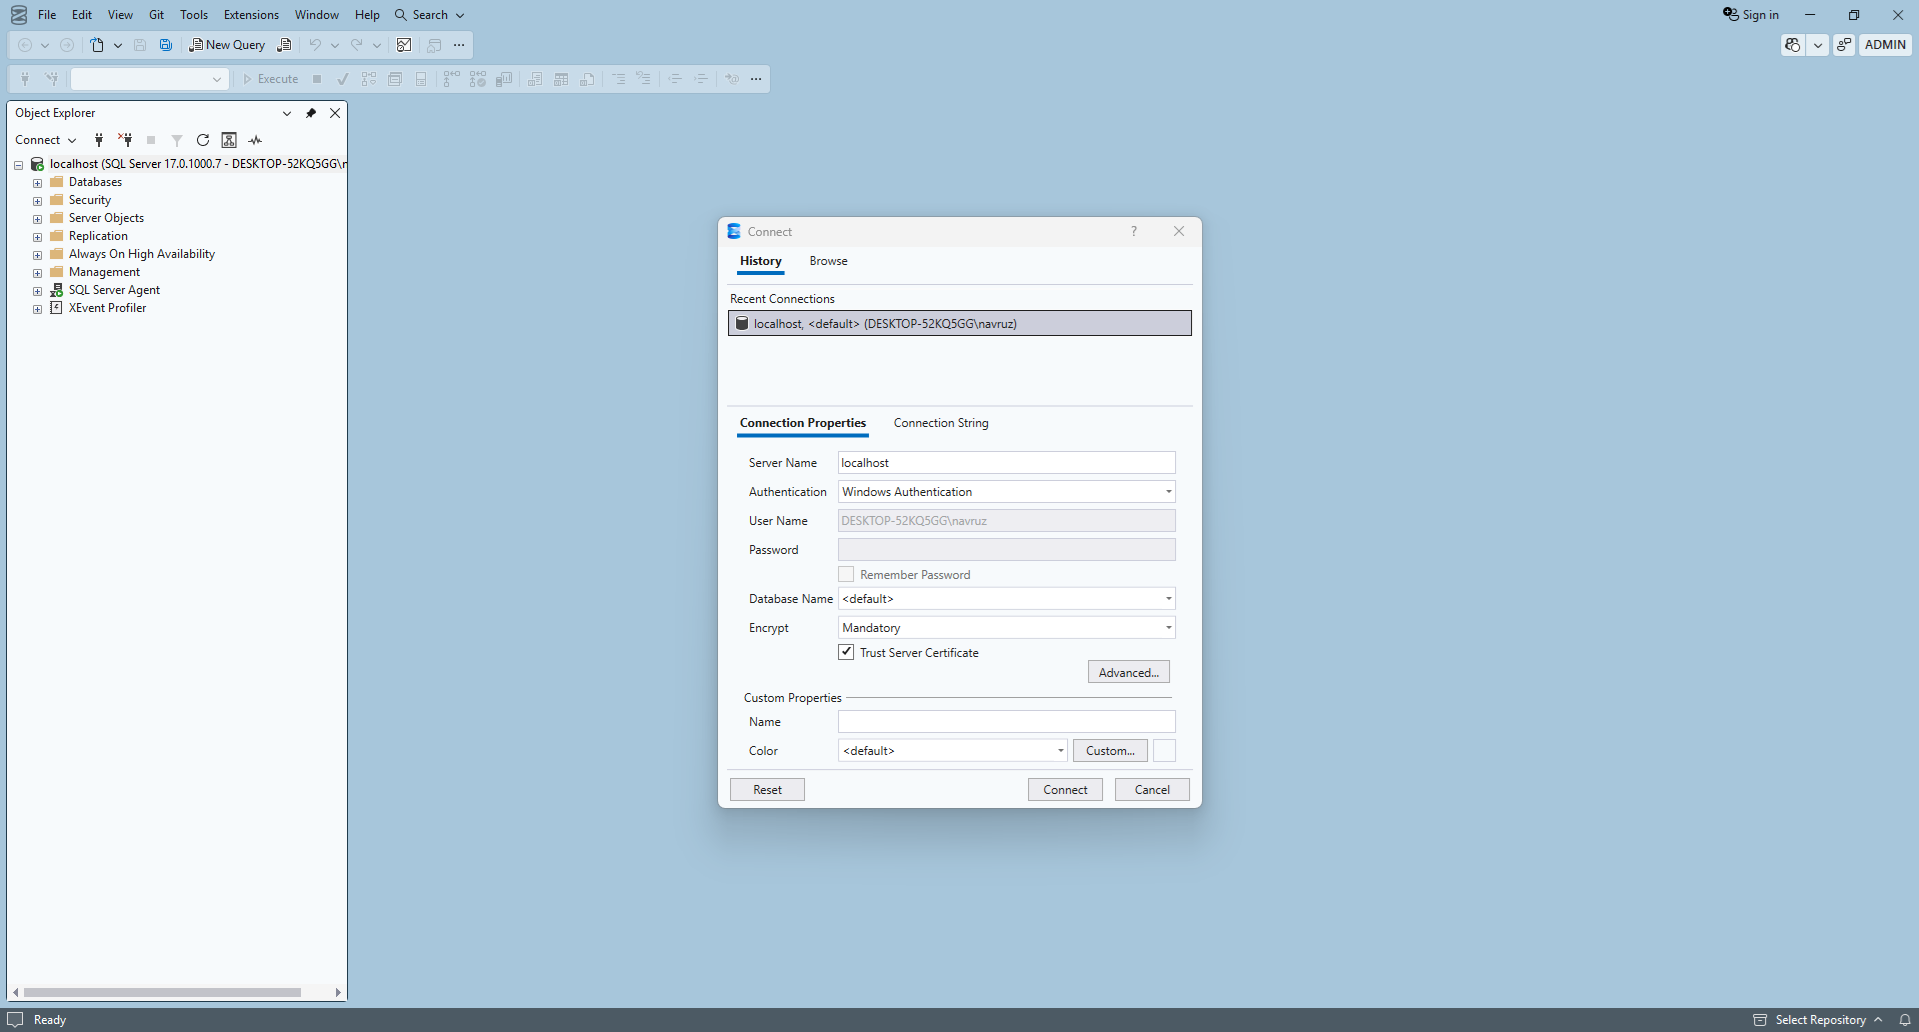
Step 1: Connect to SQL Server
Open SSMS and connect to the SQL Server instance you want to back up. Enter your connection details (server name, authentication type, username/password).
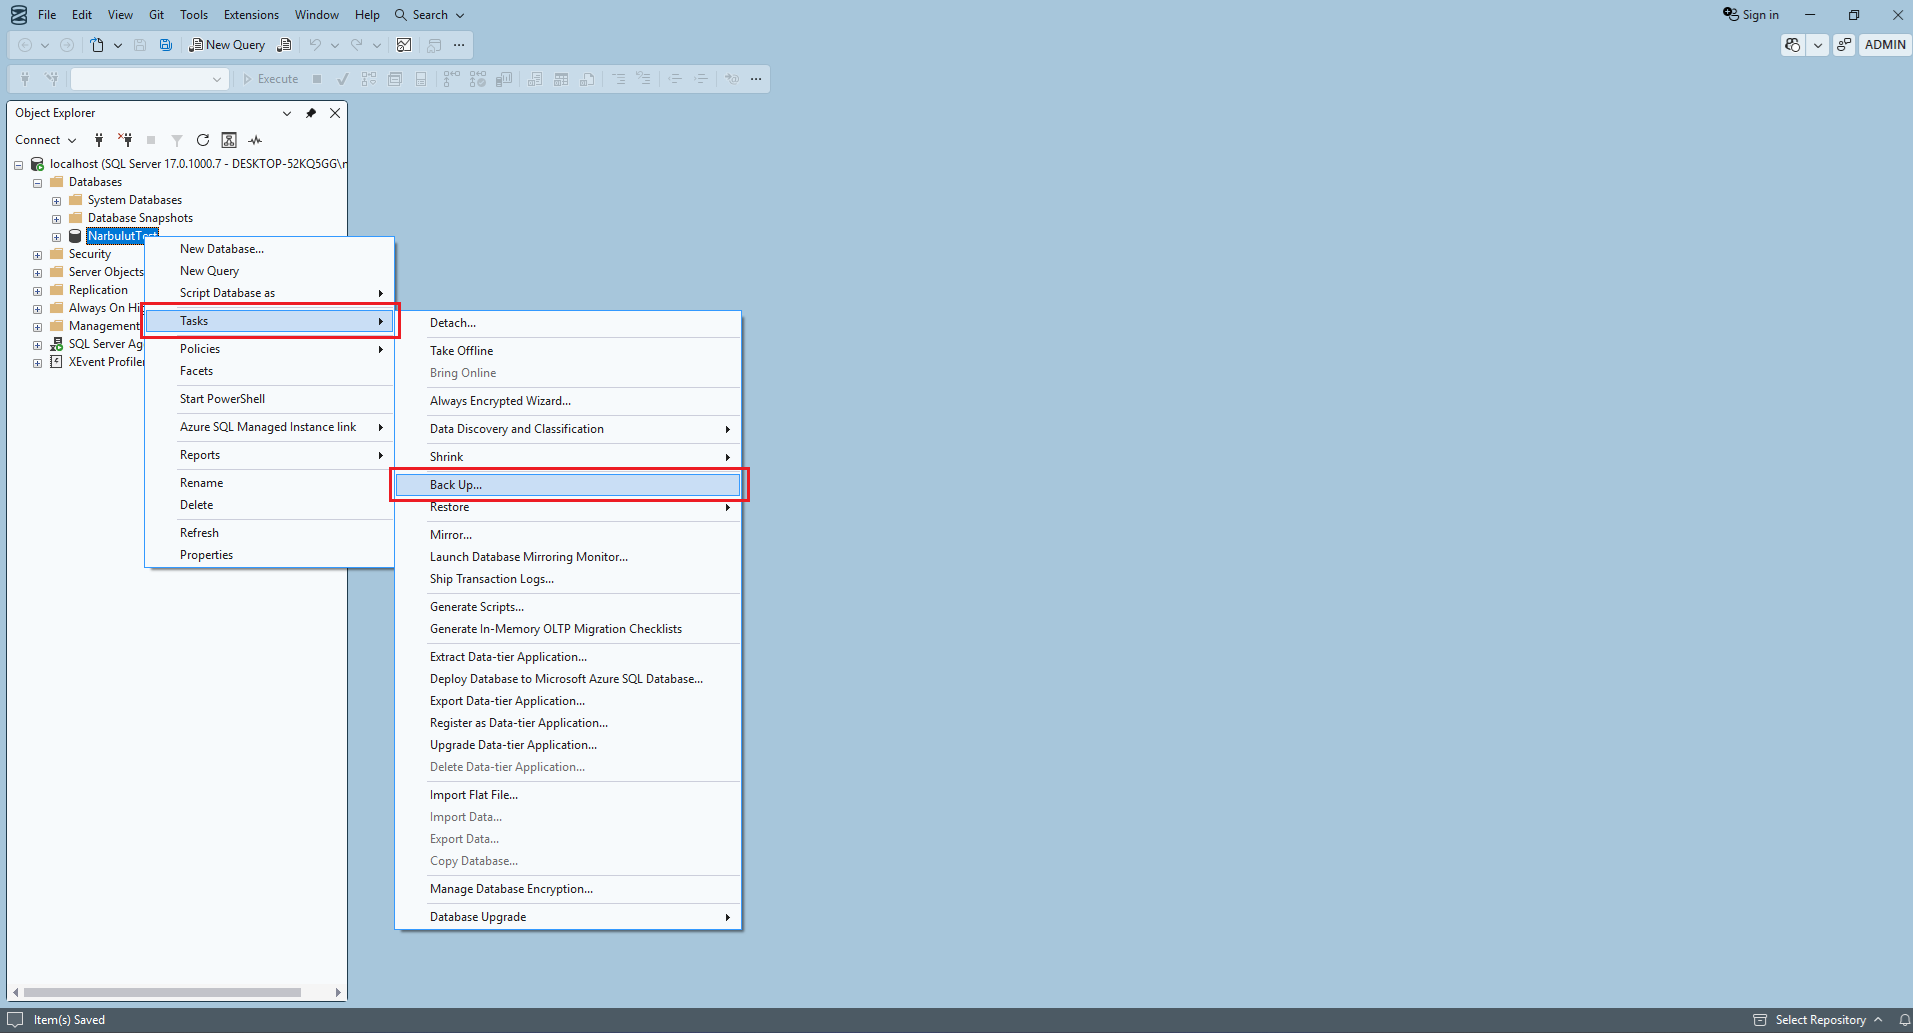
Step 2: Select the Database and Open the Backup Menu
In Object Explorer, expand the Databases folder. Right-click the database you want to back up and select Tasks → Back Up… from the menu.
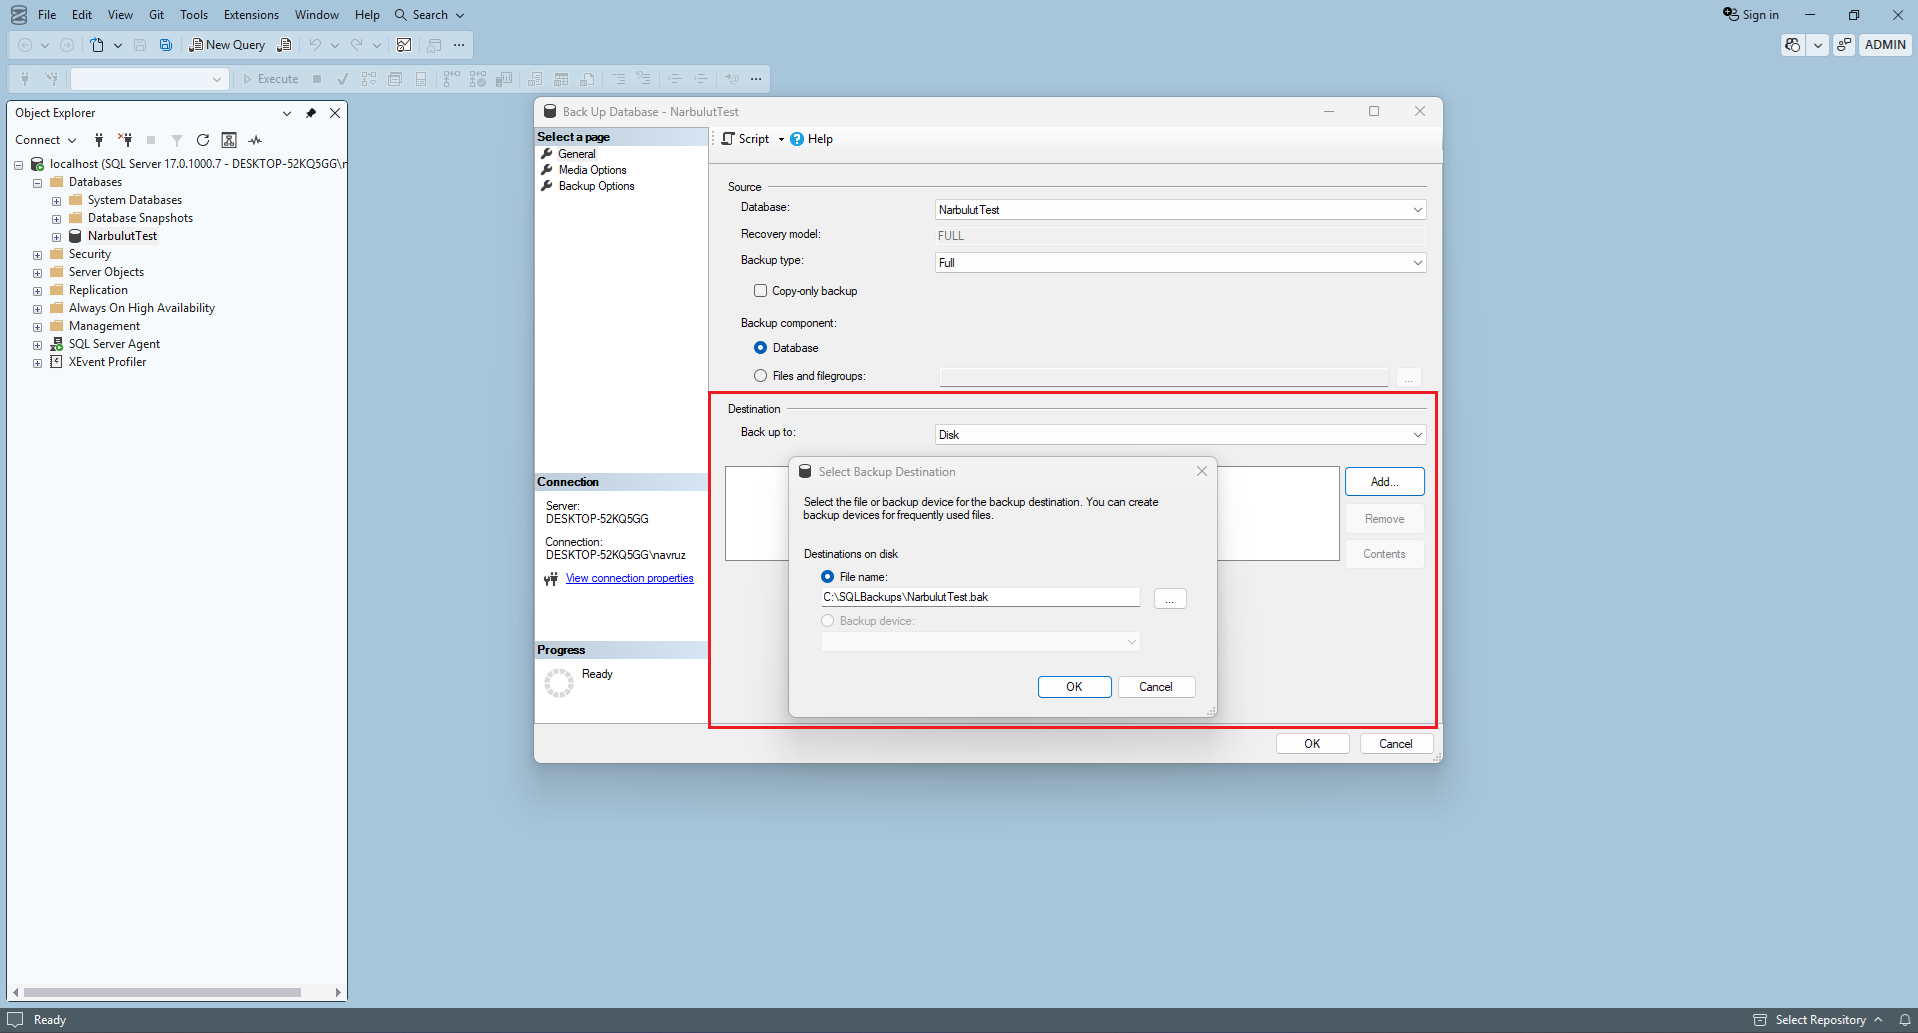
Step 3: Configure the Backup Settings
In the Back Up Database window that opens:
- Database: The database to be backed up is selected automatically.
- Backup type: Choose Full, Differential, or Transaction Log.
- Backup component: Select Database (entire database) or Files and filegroups.
- Destination: Specify where the backup will be saved (disk or tape). By default, the backup is saved to the Backup folder under the SQL Server installation directory. To use a different location, you can add a new destination with the Add button.
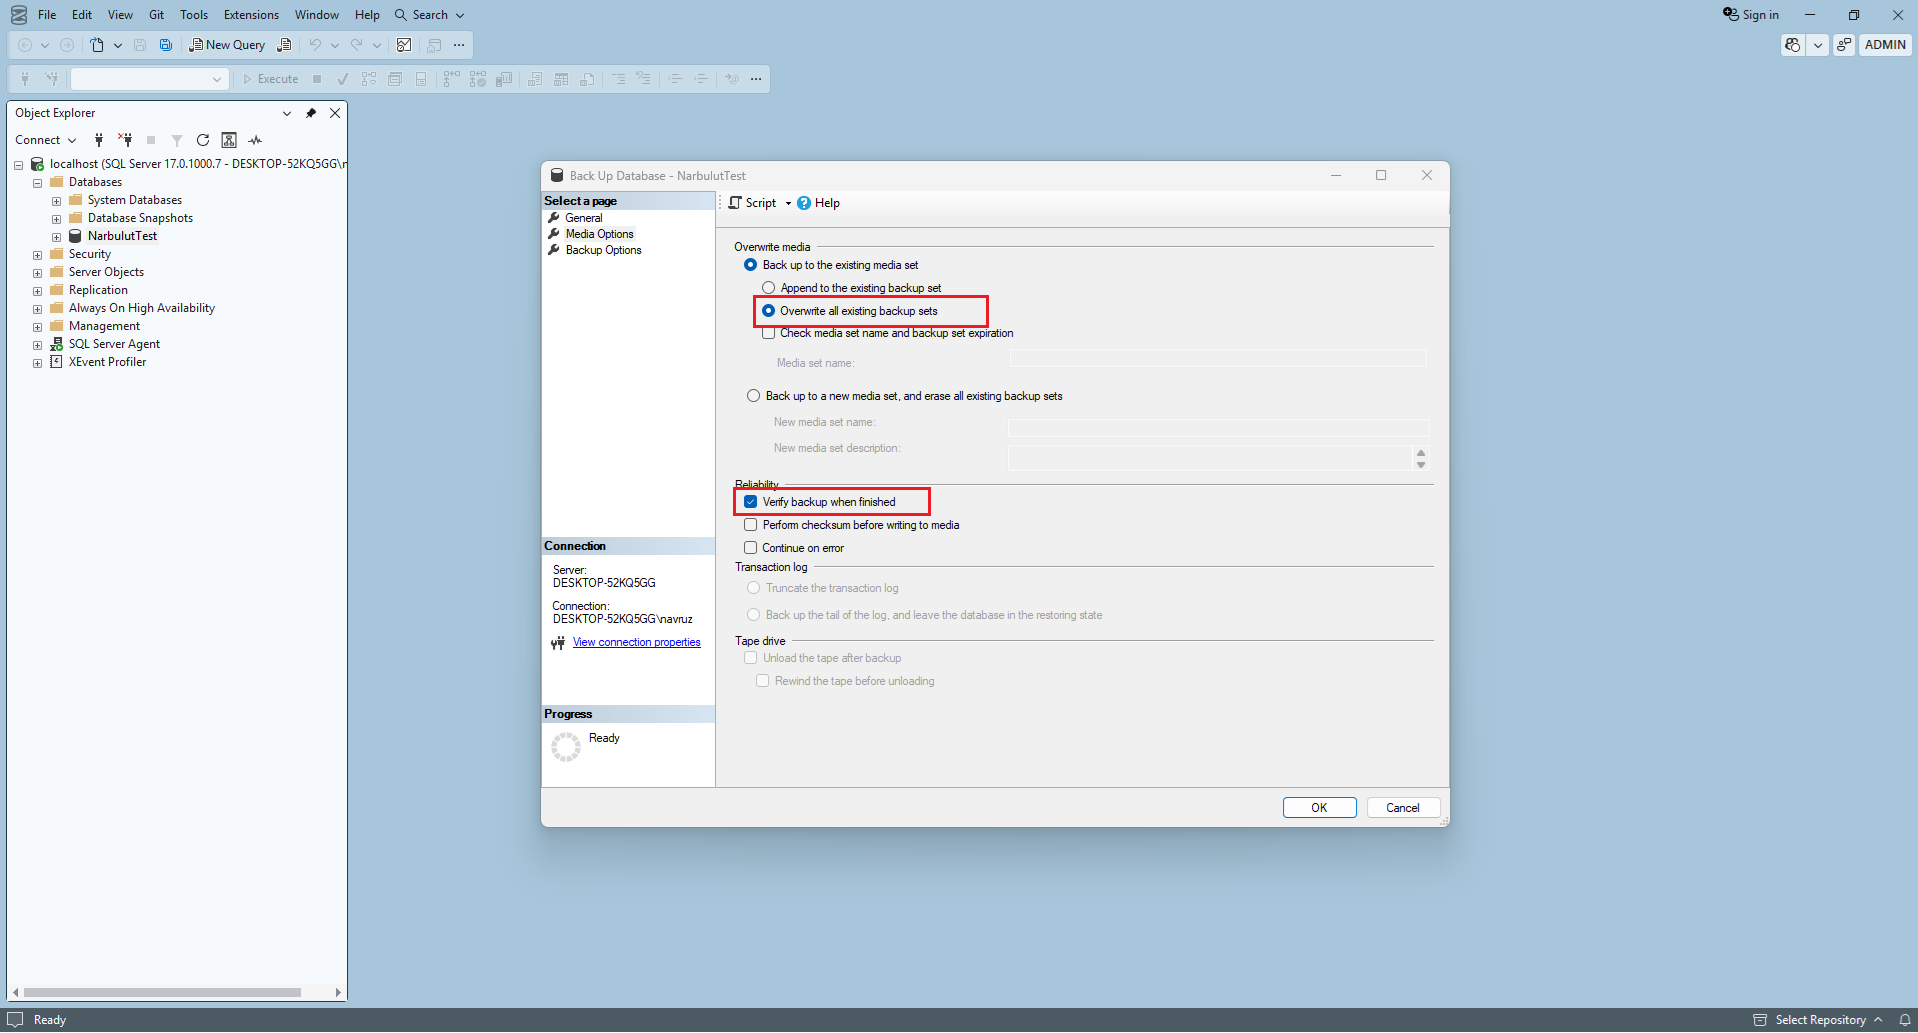
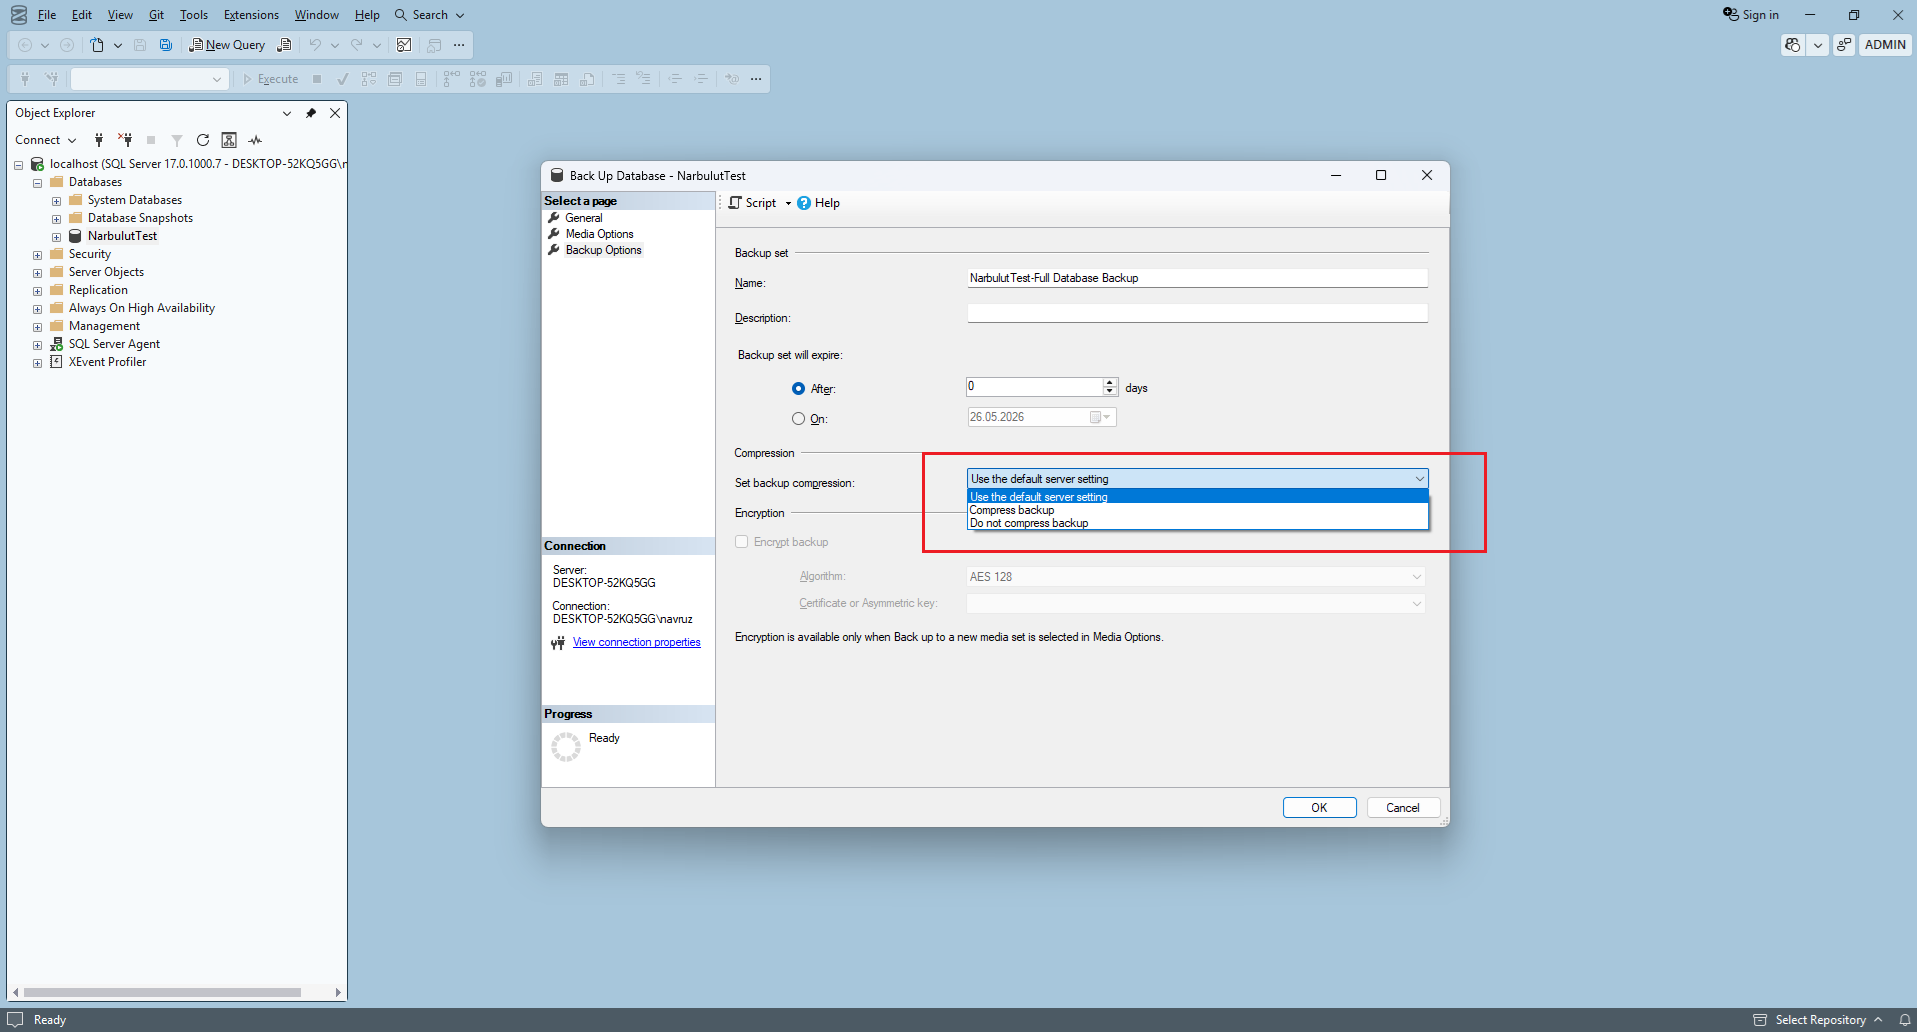
Step 4: Set Advanced Options (Optional)
You can configure advanced settings from the Media Options and Backup Options tabs in the left menu:
- Overwrite existing media set: Determines whether the existing backup file is overwritten.
- Verify backup when finished: Performs verification after the backup completes.
- Set backup compression: Compresses the backup (recommended for saving space).
- Encryption: Encrypts the backup (critical for sensitive data).
Step 5: Start the Backup
Once all settings are complete, click the OK button. The backup process will begin and may take anywhere from a few seconds to a few hours depending on the database size. A confirmation message is displayed when the operation completes successfully.

T-SQL Backup Commands
For automated and script-based backups, T-SQL commands are the most powerful method. Using commands directly instead of the SSMS interface is both faster and ideal for scheduled tasks.
Full Backup
BACKUP DATABASE NarbulutTest
TO DISK = N'C:\SQLBackups\NarbulutTest_Full.bak'
WITH
    FORMAT,
    INIT,
    NAME = N'NarbulutTest-Full Database Backup',
    COMPRESSION,
    STATS = 10;
GO
Differential Backup
BACKUP DATABASE NarbulutTest
TO DISK = N'C:\SQLBackups\NarbulutTest_Diff.bak'
WITH
    DIFFERENTIAL,
    INIT,
    NAME = N'NarbulutTest-Differential Backup',
    COMPRESSION,
    STATS = 10;
GO
Transaction Log Backup
BACKUP LOG NarbulutTest
TO DISK = N'C:\SQLBackups\NarbulutTest_Log.trn'
WITH
    INIT,
    NAME = N'NarbulutTest-Transaction Log Backup',
    COMPRESSION,
    STATS = 10;
GO
You can use the RESTORE VERIFYONLY command to check the integrity of the backup you’ve taken:
RESTORE VERIFYONLY
FROM DISK = N'C:\SQLBackups\NarbulutTest_Full.bak';
GO
Let’s briefly explain the main parameters in the commands:
FORMAT— Creates a new media set (overwrites the existing file).INIT— Initializes the backup set.COMPRESSION— Compresses the backup to save disk space.STATS = 10— Prints progress information for every 10% completed.NAME— Gives the backup set a descriptive name.
Automating Backups
Manual backups may be sufficient for small environments, but automation must be used in production environments. SQL Server offers two fundamental methods for this:
SQL Server Agent
This component, included in the Standard, Developer, and Enterprise editions, allows you to create scheduled backup jobs. In Object Explorer, right-click SQL Server Agent → Jobs and define a new task with the New Job option. The job is assigned a Step containing your T-SQL command and a Schedule (for example, every day at 2:00 AM).
Maintenance Plan
For those who want to create a backup plan with a visual wizard without writing code, this is the Maintenance Plan Wizard offered by SSMS under Management → Maintenance Plans. With this wizard, for multiple databases you can define:
- Full + Differential + Transaction Log backup plan
- Automatic deletion of old backups (Cleanup Task)
- Index and statistics maintenance
- Email notifications
…all in a single plan.
sqlcmd utility and run it via Windows Task Scheduler, or use third-party backup solutions for automation.
SQL Server Backup Best Practices
Here are a few golden rules distilled from the problems we’ve encountered in the field over the years:
Apply the 3-2-1 Rule
You should have 3 copies of your important data, on 2 different media, with 1 of them in a different location (offsite). This rule is the strongest defense against ransomware attacks.
Don’t Back Up to the Same Disk
Backing up to the same disk where the database files (.mdf, .ldf) reside is one of the most common mistakes. If the disk fails, you lose both your data and your backup.
Test Your Restores
An untested backup is not a backup. Periodically validate your backups by restoring them to a different server. In SQL Server, you can check backup integrity with the RESTORE VERIFYONLY command.
Watch Out for Version Compatibility
A backup taken in a newer version cannot be restored to an older version of SQL Server. This limitation is a critical issue that must not be overlooked during version migrations.
Define a Backup Retention Policy
“Keeping all backups forever” is both costly and unnecessary. A typical policy: daily backups for 7–14 days, weekly backups for 4–8 weeks, monthly backups for 12 months, and annual backups for 5–7 years depending on legal obligations.
Encrypt Your Backups
Backups containing sensitive data should be encrypted. Otherwise, anyone who gains physical access to the backup disk can access all your data.
Cloud-Based Backup: A Modern Approach
While traditional disk or tape backups are still in use, the majority of modern businesses are moving to cloud-based backup solutions. The main reasons are:
- Offsite storage is provided automatically (the “1” in the 3-2-1 rule is satisfied)
- No hardware investment required
- Scalable — storage easily expands as data grows
- Geographic redundancy supports disaster recovery
- Professional-level encryption and access control
The cloud backup solution we offer at Narbulut allows you to back up your SQL Server databases directly to the cloud, retain older versions, and quickly restore in the event of a disaster. When local disk backup and cloud backup are used together, you achieve a fully comprehensive data protection strategy.
SQL Server Backup with Narbulut
All the methods we’ve described in this guide — manual backups with SSMS, T-SQL commands, and automation with SQL Server Agent — are effective solutions when applied correctly. However, to make the backup process even more secure, automated, and manageable in enterprise environments, a professional cloud backup solution makes a big difference.
Narbulut Backup Now is an enterprise-grade data protection solution that lets you back up your SQL Server databases directly to the cloud:
- Automatic scheduling: Automatically takes Full, Differential, and Transaction Log backups at the intervals you define.
- Cloud storage: Your backups are stored on secure cloud infrastructure — the offsite leg of the 3-2-1 rule is automatically covered.
- Centralized management: Monitor and manage all your SQL Server instances from a single panel.
- Encryption: Your backups are encrypted end-to-end during transfer and storage.
- Fast recovery: Restore your databases quickly in the event of a disaster to maintain business continuity.
Remember: the best backup is one that has been tested and can be restored. Don’t just set up your backup strategy — test it regularly and update it when necessary.
Take Your SQL Backup Processes to a Professional Level
If you need a professional cloud backup solution for your SQL Server backup processes, you can get in touch with the Narbulut team.
Explore the MSSQL Backup Solution