
- Company
-
Products
Products
New ProductCloud Server
Fully managed virtual server infrastructure. Setup in minutes, hourly billing and 24/7 expert support so you can focus on your business.
Try Now -
Solutions
Backup & Security
Data SecurityRansomware & encryptionSilent Ransom: TDEProtection against TDE abuseCloud BackupSecure backup to data centersImage BackupFull disk image + fast recoveryOff-Site BackupOff-site disaster recoveryMobile BackupiOS & Android photos/contactsRansomware ProtectionAgainst ransomware attacksTwo-Factor Auth2FA account security - Plans
- Resources
- Partners
- Blog
How to Back Up a MongoDB Database?
Your data is the most valuable asset of your business. A hardware failure, an accidentally deleted collection, or a ransomware attack can destroy years of accumulated data in seconds. If you use a modern, flexible database like MongoDB, a regular and proper backup strategy is not a preference but a necessity.
In this guide we cover the three core methods of backing up MongoDB — from simple to advanced — in language anyone can understand: logical backup (mongodump), physical backup (snapshot), and cloud-based managed backup. We’ll also help you decide which one is right for you.
First, the Basic Concepts
When choosing a backup method in MongoDB, two things are decisive: the size of your database and your deployment type (single server, replica set, or sharded cluster). While the simplest method is enough for a small database, large and distributed systems require different approaches.
Backup methods are broadly divided into three:
- Logical backup: Exports the data into a readable/portable format. Flexible but slow on large data.
- Physical backup: Takes a direct copy of the database files. Very fast, ideal for large data.
- Cloud / managed backup: Delegates the backup job to a service. No setup hassle, fully automatic.
Method 1: Logical Backup with mongodump
This is the most common method and the most suitable one to start with. The mongodump tool connects to your running database and exports the data into files in BSON format; mongorestore then restores these files. You can back up the entire server, a single database, or even a single collection.
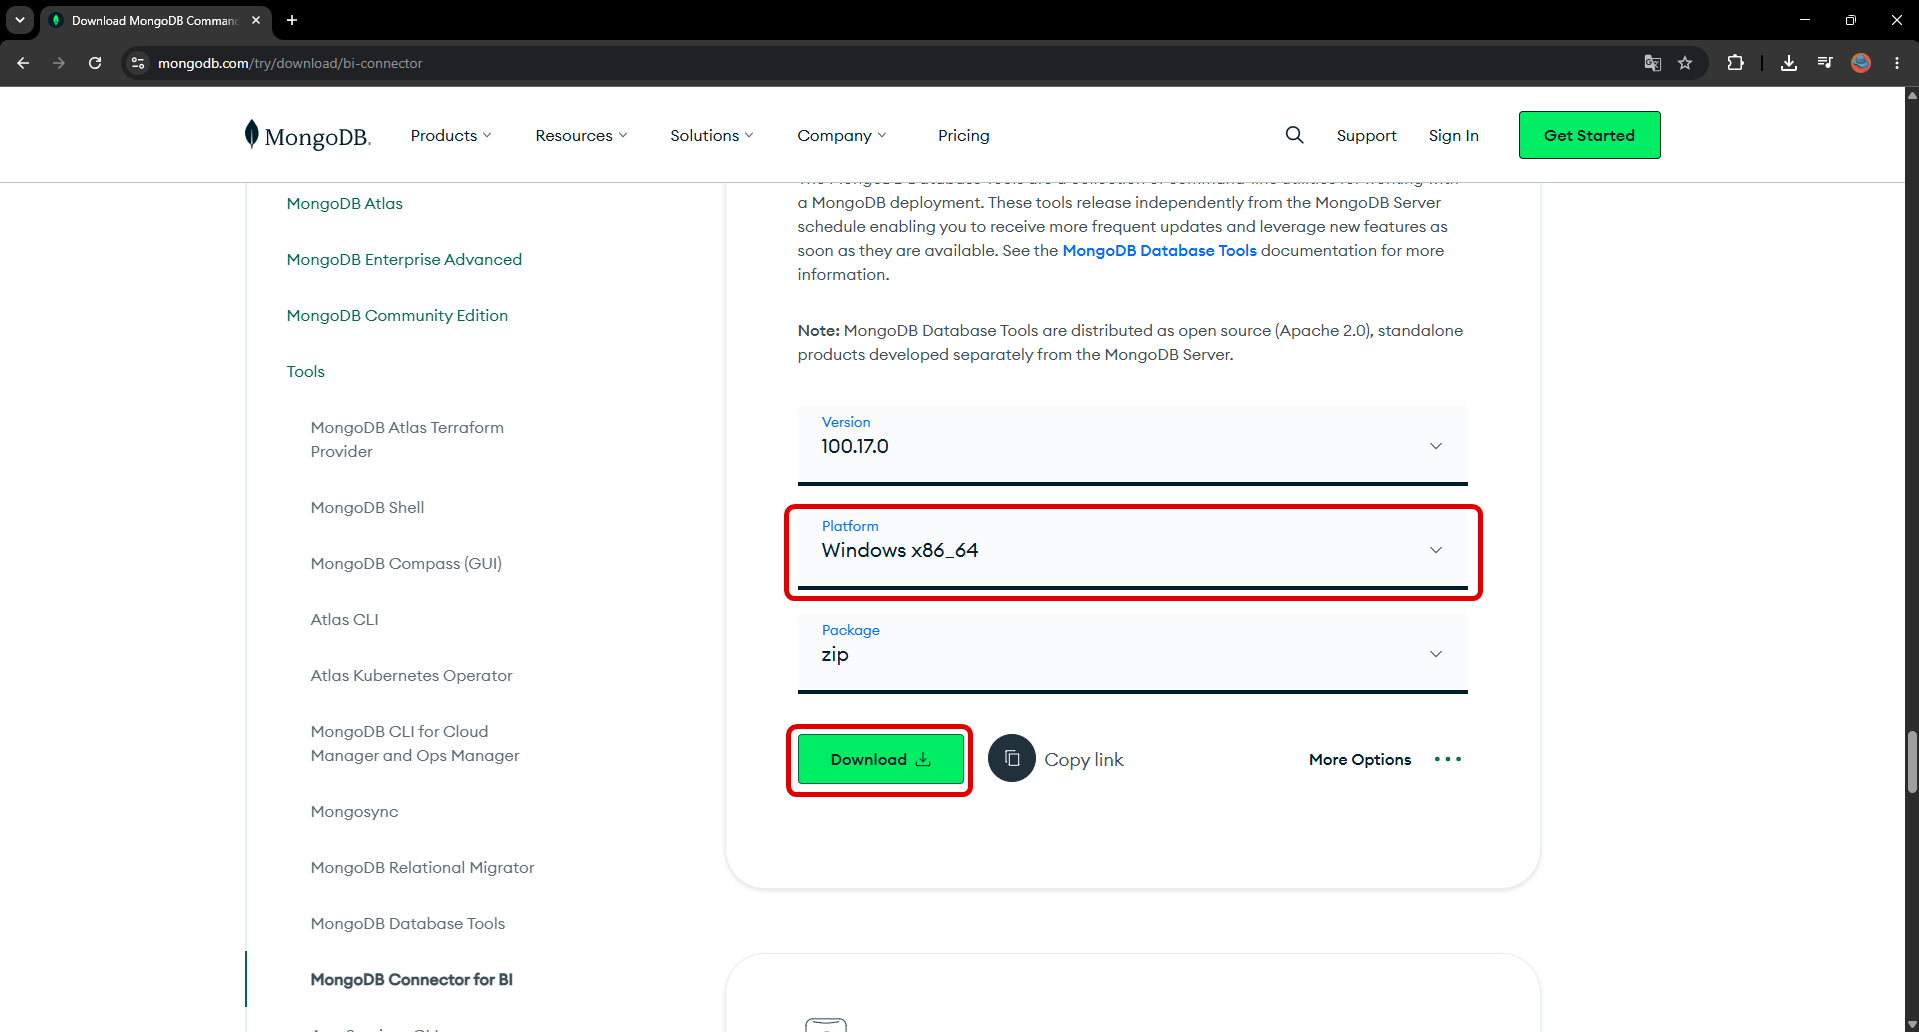
Installing the Tools
mongodump and mongorestore come with MongoDB’s “Database Tools” package. You can download and install the version suitable for your operating system from the official MongoDB site.
Basic Backup Command
To take a backup in its simplest form:
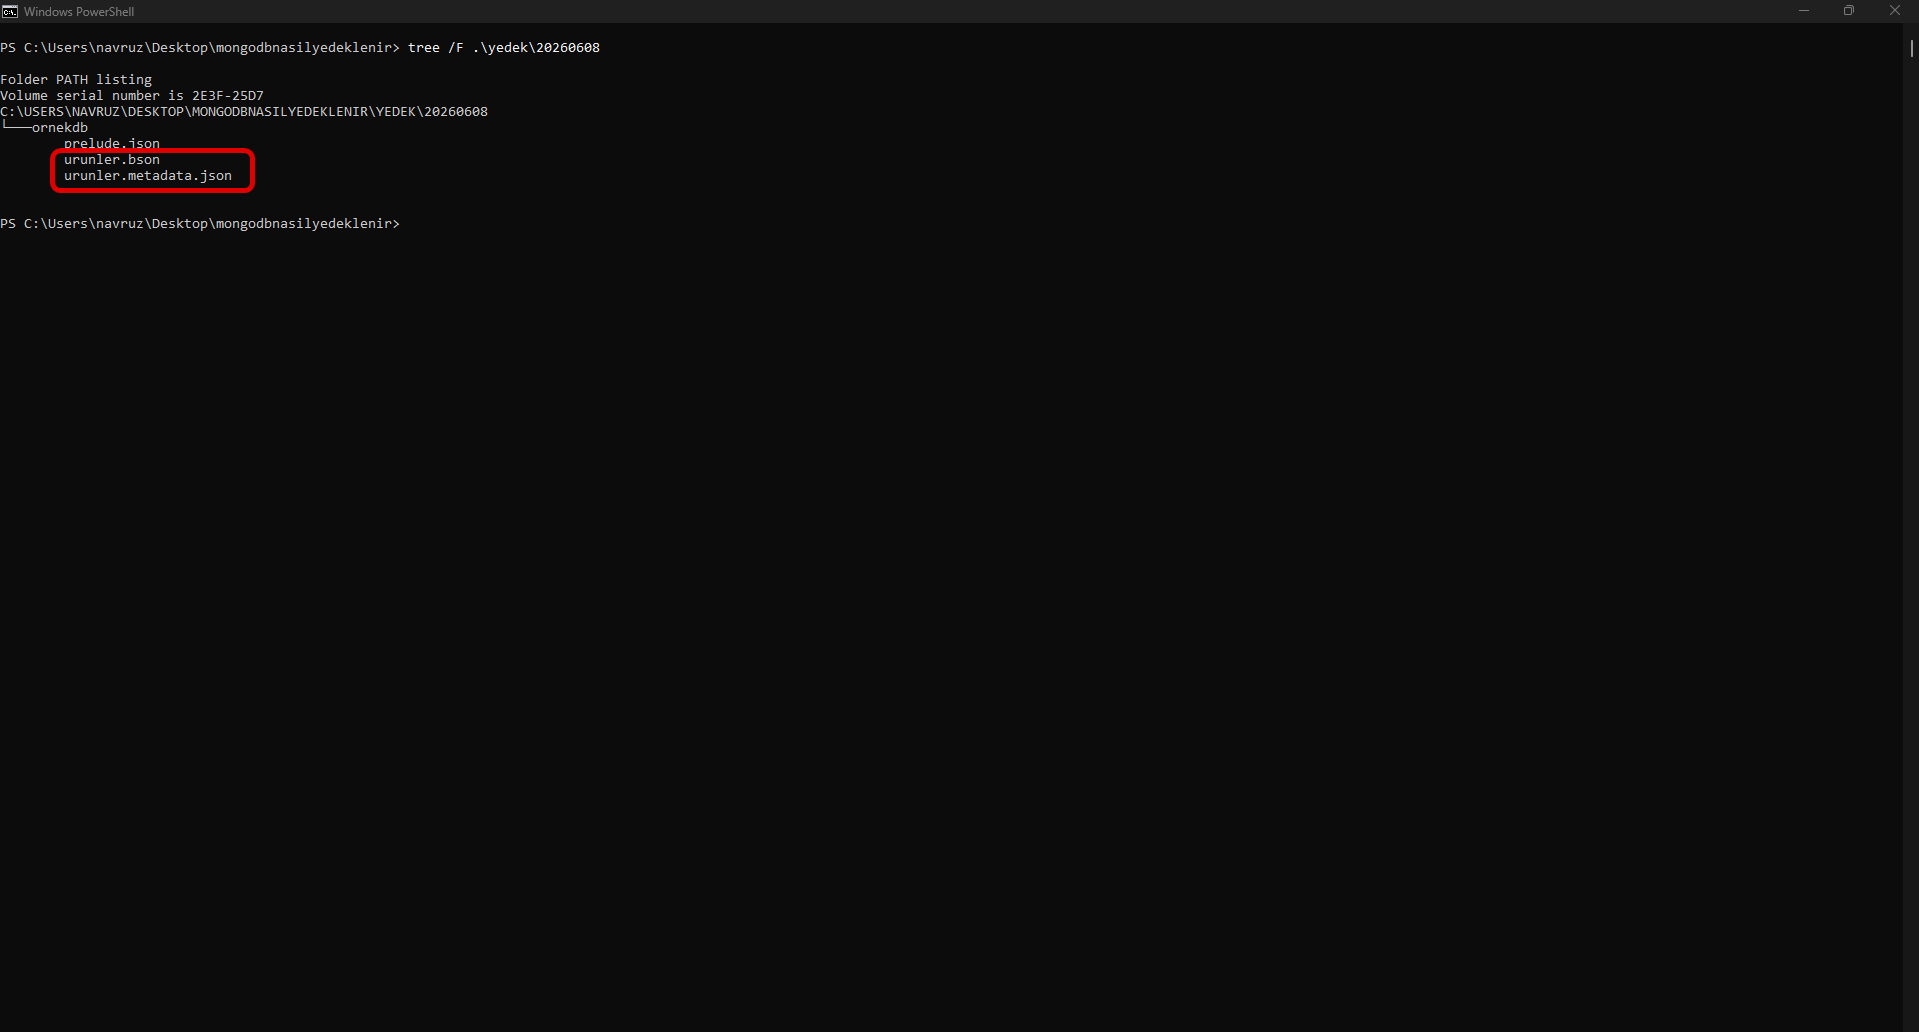
mongodump --uri="mongodb://localhost:27017" --out=/yedek/20260608When the command runs, separate folders and BSON files are created under the folder you specified, one for each database.
--username USER --password PASS --authenticationDatabase admin.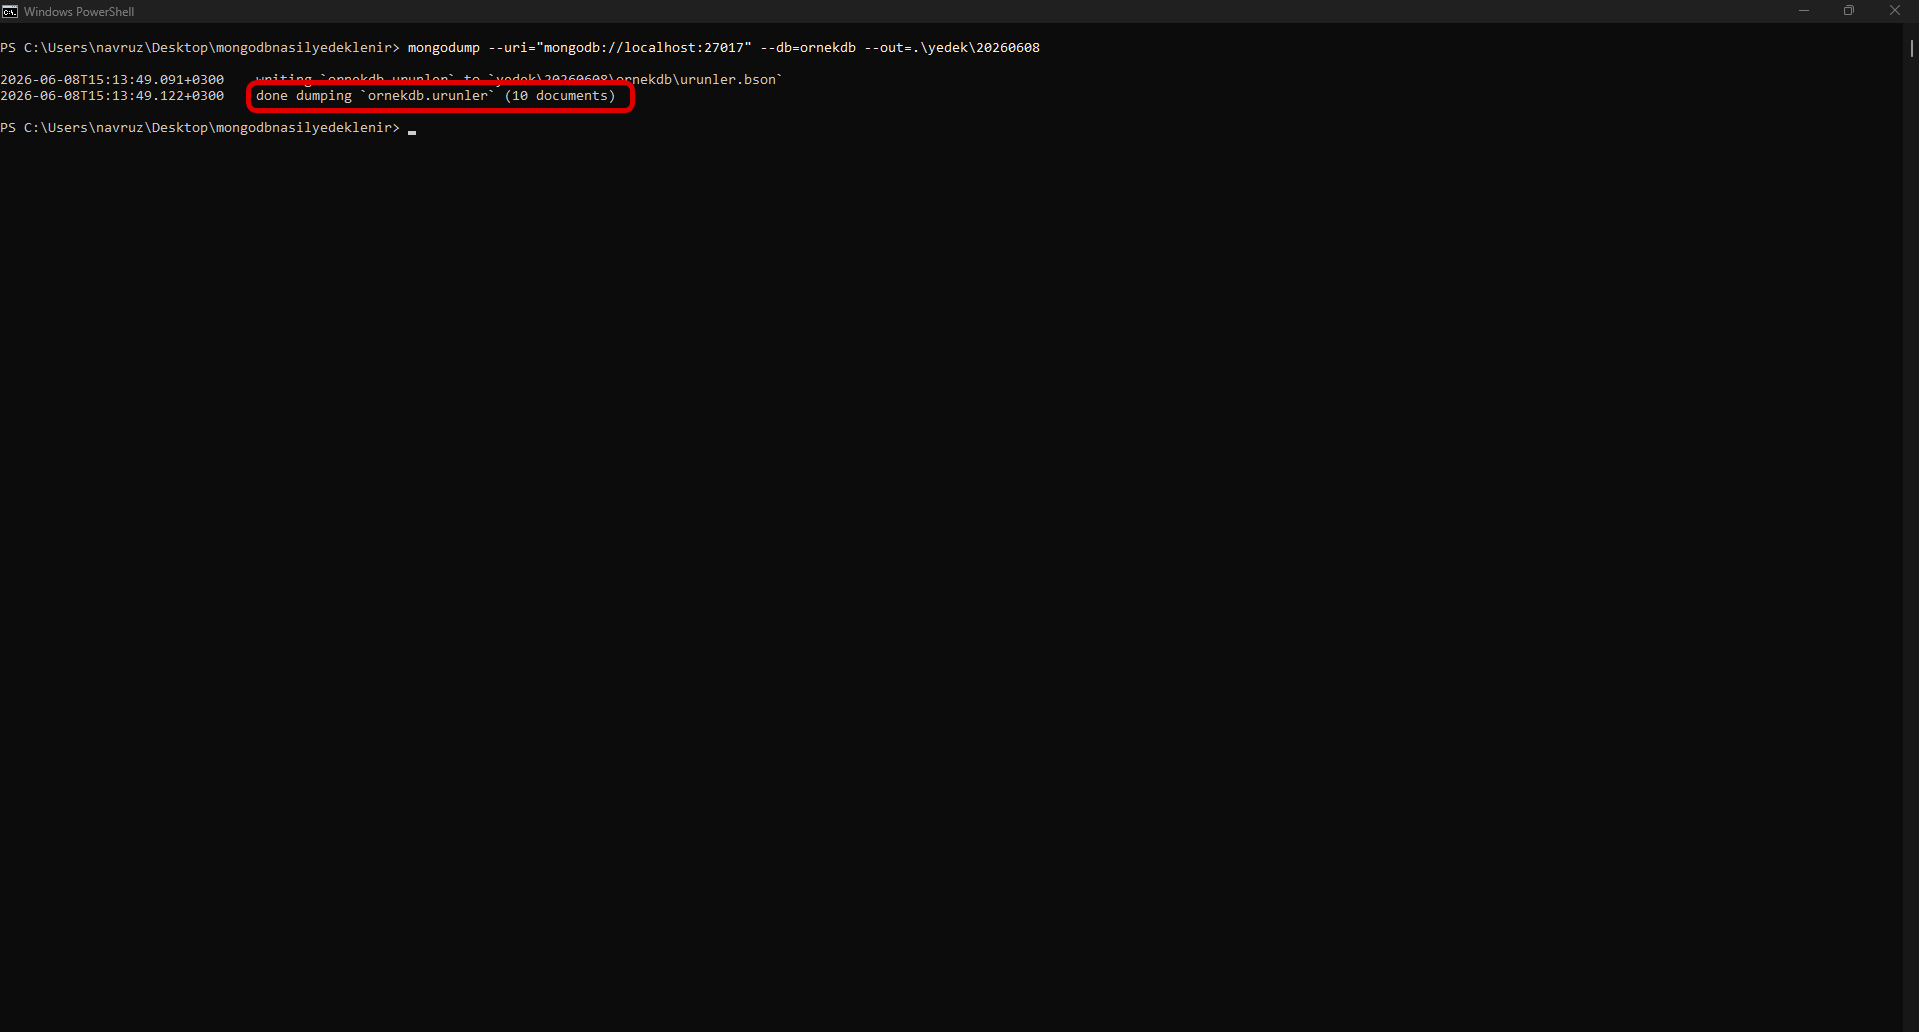
–oplog for a Consistent Backup
If your database is actively receiving writes during the backup (for example, a replica set), it is recommended to use the --oplog option so the backup is consistent. This option also captures the changes that arrive while the backup is running and enables point-in-time recovery:
mongodump --oplog --gzip --out=/yedek/tam--gzip compresses the backup to save space.
--oplog works only on a full-server dump (all databases); it cannot be combined with a single --db.Restoring
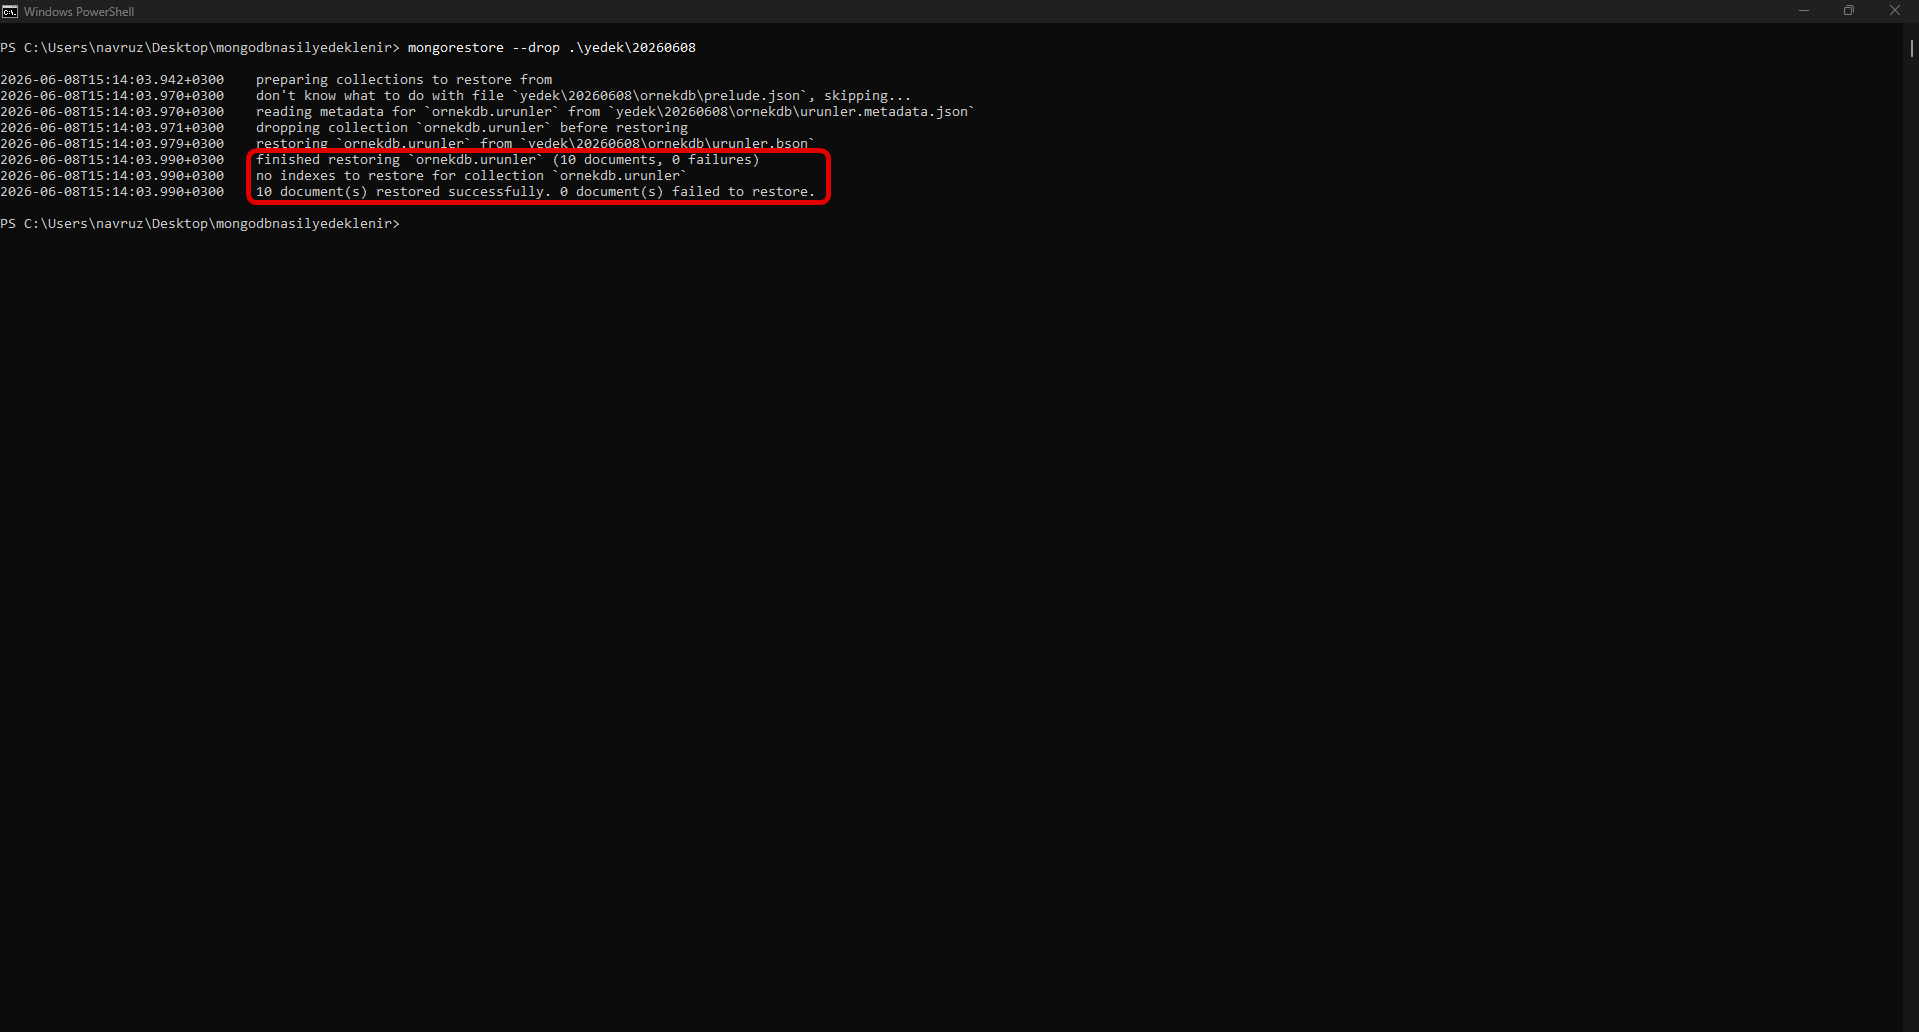
To restore the backup, mongorestore is used:
mongorestore --drop --oplogReplay /yedek/tam--drop clears the existing collections before restoring, providing a clean state.
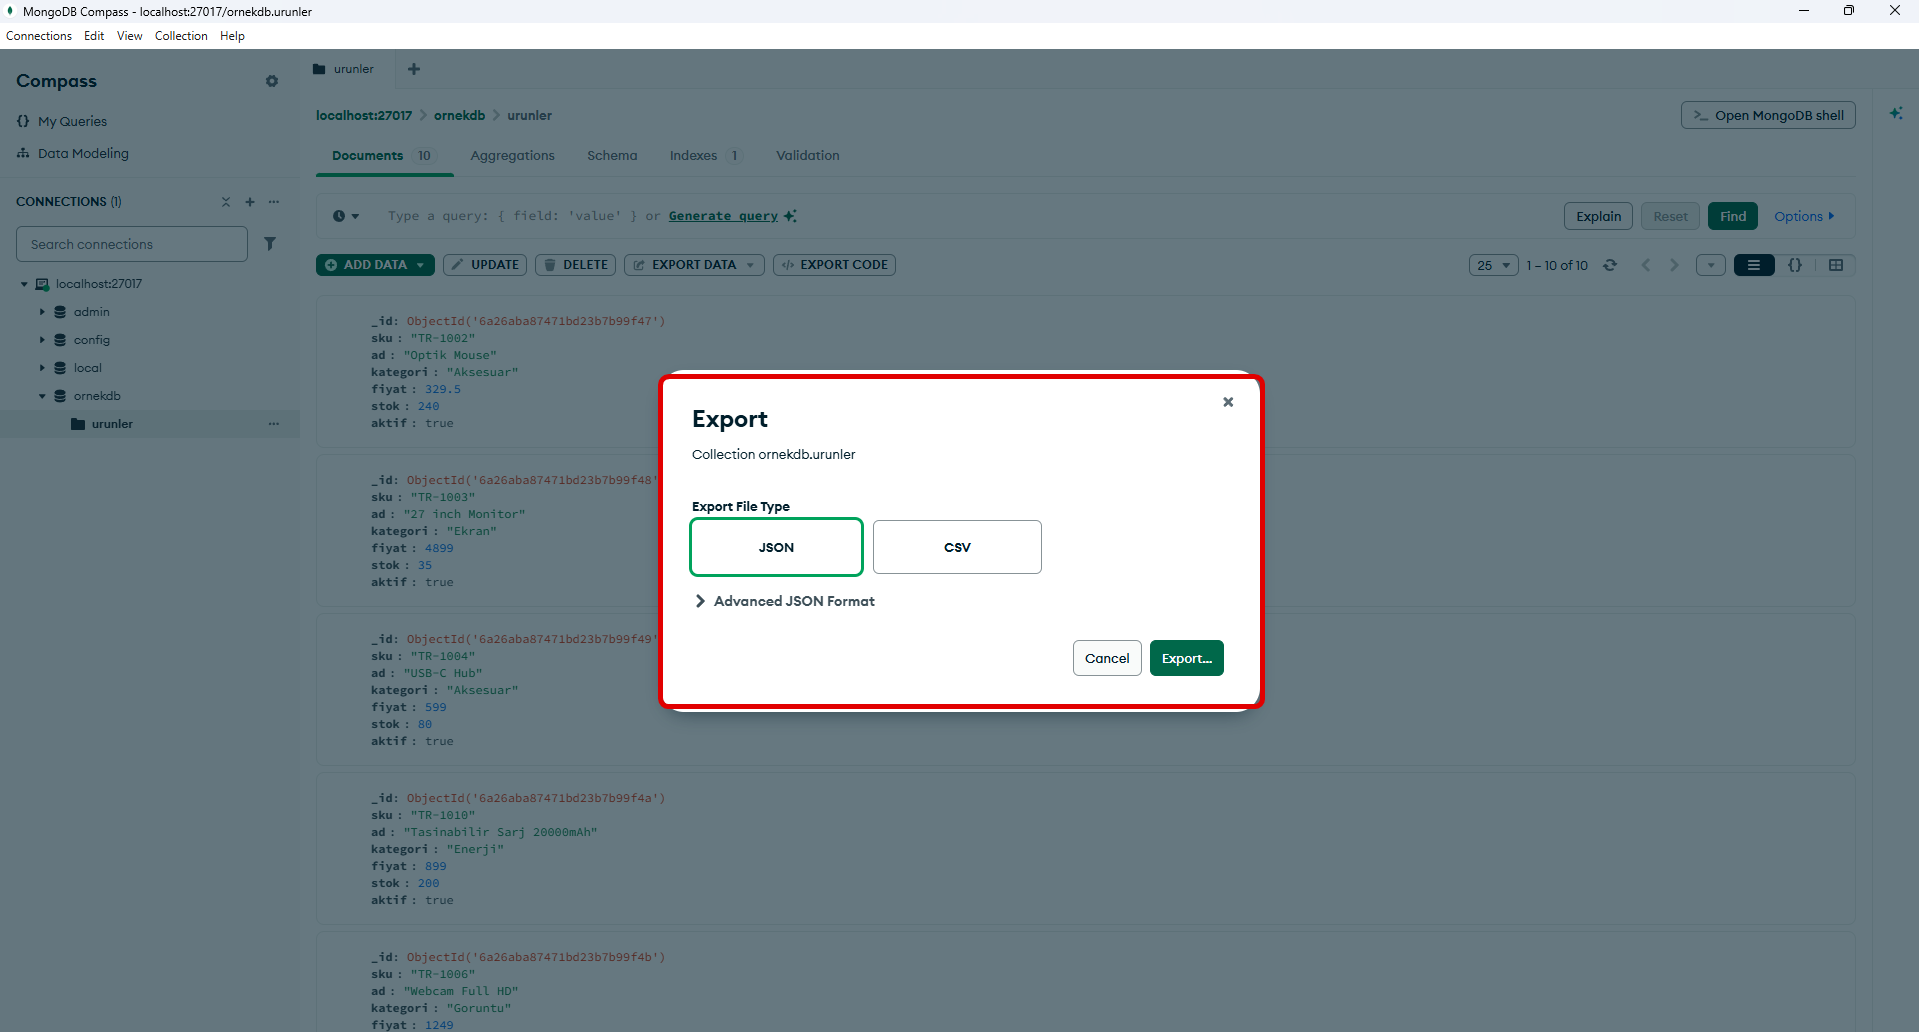
For Those Who Prefer a GUI: MongoDB Compass
For those who would rather not deal with the command line, MongoDB’s official graphical interface MongoDB Compass lets you view collections visually and export data in JSON format. However, Compass is not a full backup tool; it provides a collection-based export (indexes and the full database structure are not included in this export). For a real backup, mongodump should be preferred.
mongodump can take much longer.That’s why logical backup is ideal for small and medium-sized deployments.
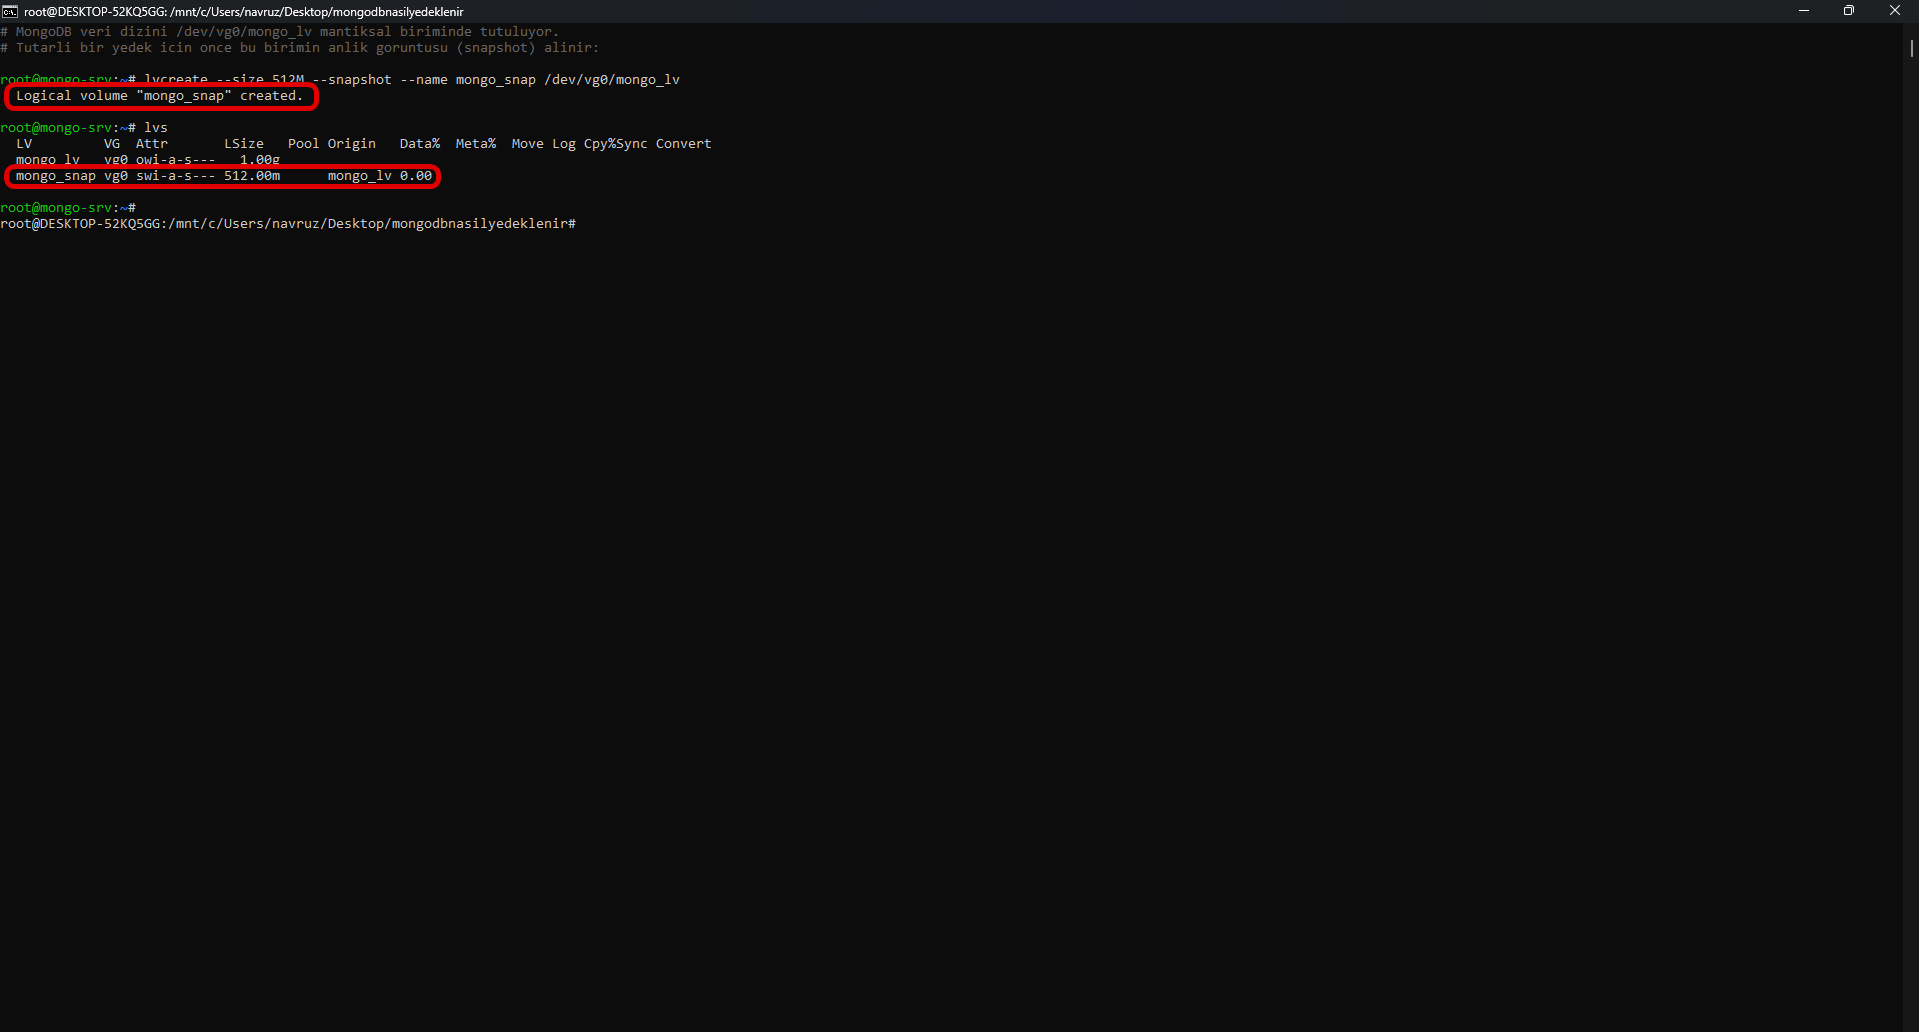
Method 2: Filesystem Snapshots (Physical Backup)
As your database grows (hundreds of GB and above), mongodump becomes slow. This is where filesystem snapshots come into play. This “block-level” method takes a direct copy of the disk hosting MongoDB’s data files using system tools (for example, LVM on Linux).
Snapshots complete very quickly and run reliably; however, they require additional system configuration beyond MongoDB. The restore also finishes within minutes — which is why this is the most practical method for large databases.
Restoring from a Snapshot
In case of a problem, you can roll the database back to the moment the snapshot was taken by merging the snapshot back into the main volume. On Linux/LVM, the flow is three steps:
# 1. Stop the MongoDB service
systemctl stop mongod

# 2. Merge the snapshot back into the main volume (rolls back to the snapshot point)
lvconvert --merge /dev/vg0/mongo_snap

# 3. Start the MongoDB service
systemctl start mongod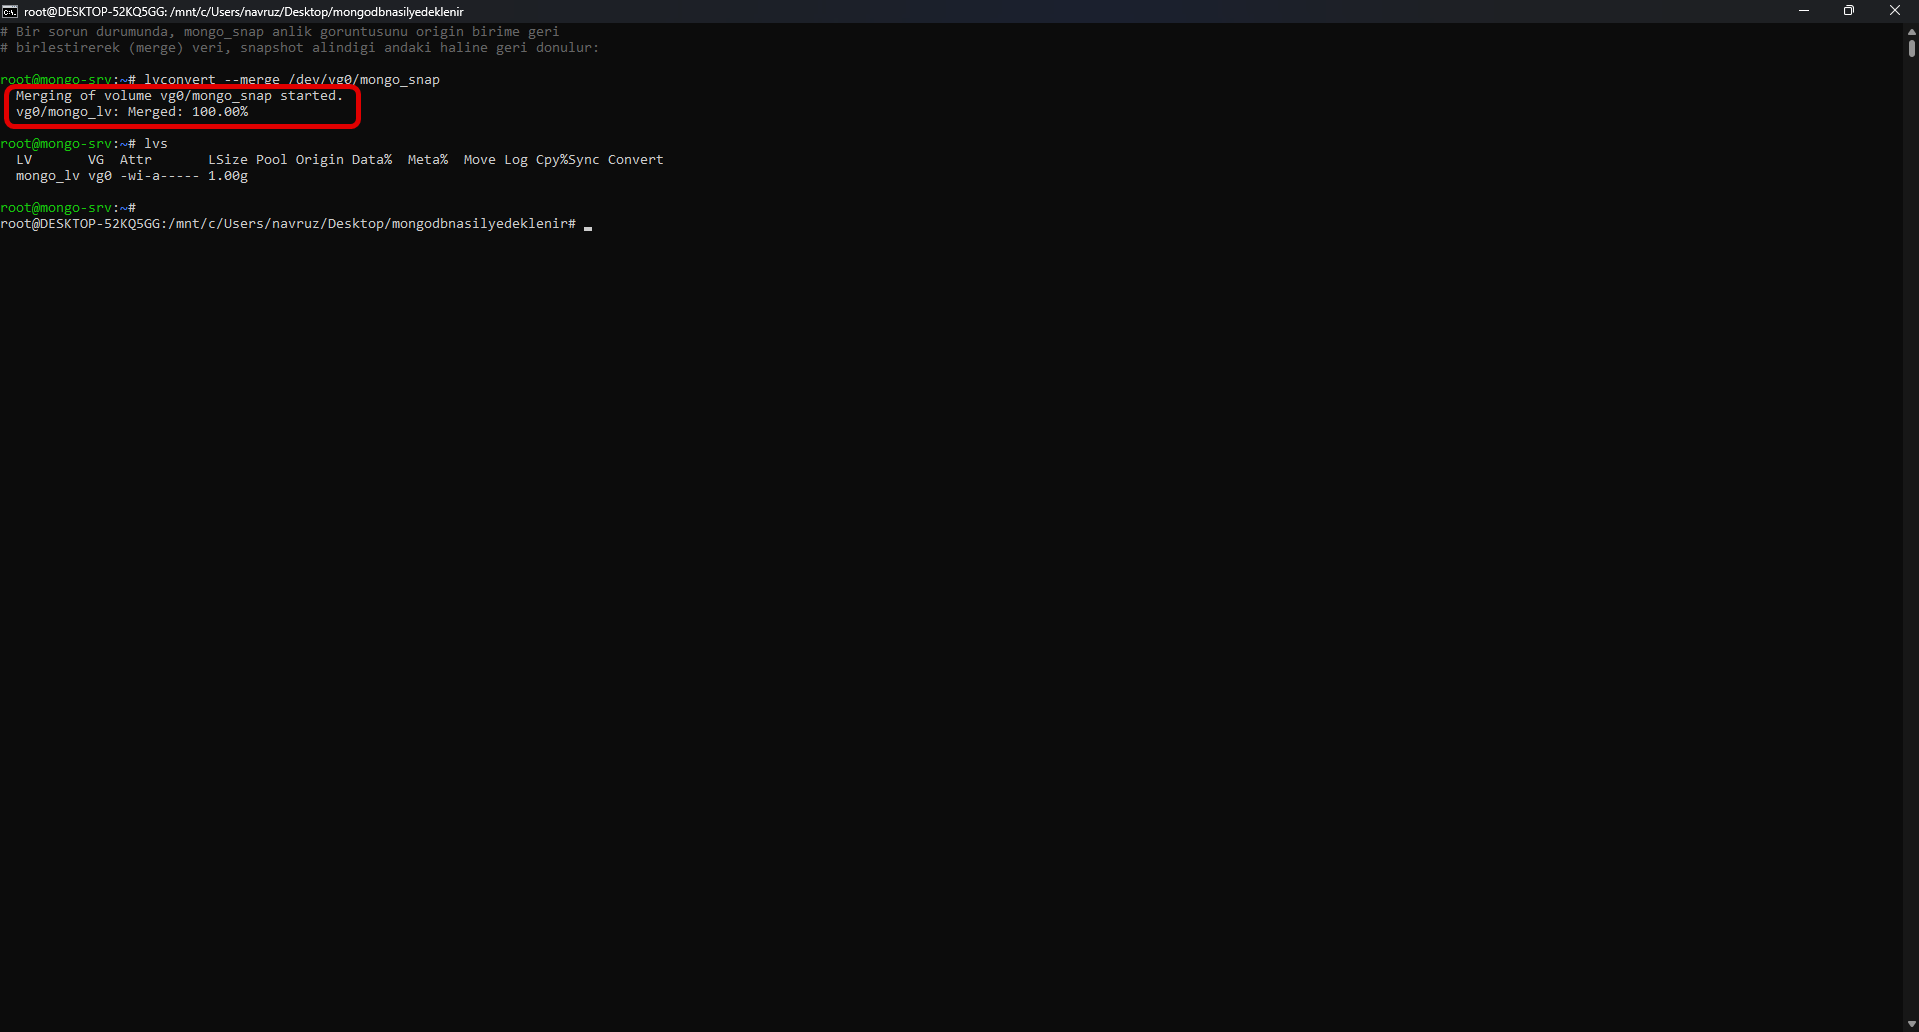
Method 3: Third-Party Backup Tools
For teams that don’t want to deal with the backup job or that manage large/distributed (sharded cluster) deployments, third-party tools make the job easier.
If you want to stay on your own infrastructure, Percona Backup for MongoDB (PBM) is a powerful open-source solution; with compression, physical backup, and sharded cluster support, it is suitable for large deployments.
Which Method Should I Choose?
A quick guide:
- Small database / single server:
mongodumpis enough and the easiest. - Large database (hundreds of GB+): Filesystem snapshots.
- Distributed / sharded cluster: Third-party tools (e.g., PBM).
Automating Backups
Manual backup is sooner or later forgotten. The healthiest approach is to tie the backup to a scheduled task.
Linux (cron) — every night at 02:00:
0 2 * * * mongodump --oplog --gzip --out=/yedek/mongo_$(date +\%F)Example .bat file for Windows (Task Scheduler):
@echo off
set TARIH=%date:~-4%-%date:~3,2%-%date:~0,2%
mongodump --uri="mongodb://localhost:27017" --gzip --out=C:\yedek\mongo_%TARIH%
Since the date is added to the folder name, each backup is kept separately. You can run this .bat file every night at a specific time with Task Scheduler.
Whichever Method You Choose: 5 Golden Rules
- Apply the 3-2-1 rule: Keep 3 copies of your data, on 2 different storage types, with 1 copy off-site.
- Test your backup: A backup that has never been restored is really just an assumption. Practice your restore procedure regularly.
- Automate it: Manual backups sooner or later fail because of human error. Automate them with scheduled tasks.
- Encrypt and restrict access: Backups are a full copy of your production data; they must be protected with the same security rigor.
- Distribute the load: If possible, take the backup not from the primary but from a secondary member of the replica set.
Store Your Backups Safely: Narbulut
Taking your MongoDB backups is only half the story. The real question is: where and how safely are you storing those backups? A backup sitting on the same server disappears together with the data if the server crashes.
Narbulut‘s cloud backup and storage solutions let you store the MongoDB backups you take locally in a secure, encrypted, and geographically separate cloud environment — meaning they handle that critical “off-site copy” part of the 3-2-1 rule for you. With automatic upload, version tracking, and PDPL-compliant infrastructure, your data always stays accessible during disasters such as ransomware and hardware failure.
Store Your Data in the Right Place
Storing those backups in the right place is just as important as taking them. To move your MongoDB backups to a secure cloud layer, start with Narbulut and keep your data safe.
Explore the MongoDB Backup Solution