
- Company
-
Products
Products
New ProductCloud Server
Fully managed virtual server infrastructure. Setup in minutes, hourly billing and 24/7 expert support so you can focus on your business.
Try Now -
Solutions
Backup & Security
Data SecurityRansomware & encryptionSilent Ransom: TDEProtection against TDE abuseCloud BackupSecure backup to data centersImage BackupFull disk image + fast recoveryOff-Site BackupOff-site disaster recoveryMobile BackupiOS & Android photos/contactsRansomware ProtectionAgainst ransomware attacksTwo-Factor Auth2FA account security - Plans
- Resources
- Partners
- Blog
How to Back Up a MySQL Database?
A database is one of the most valuable digital assets a business owns. A hardware failure, a mistaken DROP TABLE command, a ransomware attack, or a simple human error — any of them can wipe out years of data in seconds. That is exactly why a regular, properly configured backup strategy is not a preference but a necessity.
In this guide we will cover all the common methods of backing up your MySQL database, step by step, using both command-line and graphical user interface (GUI) tools. By the end, you will have the knowledge to choose the method that best fits your needs and to automate your backup process.
Why Is Backup Critical?
Most data loss happens when you least expect it. Each of the scenarios below has actually happened to real businesses:
- Physical data loss due to disk failure
- Accidentally deleted tables or records
- Data encrypted by ransomware
- A failed application update corrupting the data
- Inconsistencies that occur during a server migration
A backup strategy is not just about “taking backups”; it covers the right method, the right frequency, and a tested restore plan. Because a backup that has never been tested is a backup that does not exist.
Before You Start: 3 Key Concepts You Should Know
Before moving on to the methods, let’s briefly get to know the three key concepts that shape a sound backup strategy.
RPO and RTO
RPO (Recovery Point Objective) describes your maximum acceptable data loss: “At most, how many hours of data can I afford to lose?” RTO (Recovery Time Objective), on the other hand, answers the question “In the event of a disaster, how quickly do I need to bring the system back up?” These two targets determine your backup frequency and method.
The 3-2-1 Rule
The golden rule of a solid backup strategy is this: keep 3 copies of your data, store them on 2 different media, and keep at least 1 copy off-site (for example, in the cloud). A single backup does not count as a backup.
A backup isn’t a backup until it’s tested
A backup that has never been restored is nothing more than a hope you can’t be sure works. That is why this guide also covers the restore steps.
The Difference Between Logical and Physical Backup
In MySQL, backup methods fall into two main categories. To choose the right tool, it is important to understand the difference between them.
Logical Backup
The structure and data in the database are exported to a text file in the form of SQL commands such as CREATE TABLE and INSERT. It is hardware-independent, portable between different MySQL versions, and human-readable. mysqldump, MySQL Workbench, and phpMyAdmin fall into this category. Its drawback is being slow on large databases.
Physical Backup
The raw files of the database on disk (.ibd, redo log, etc.) are copied directly. It is much faster and ideal for databases hundreds of GB in size. Percona XtraBackup falls into this category.
| Feature | Logical | Physical |
|---|---|---|
| Output | SQL text file | Raw data files |
| Speed | Slow | Fast |
| Portability | High | Low (version-dependent) |
| Suitable data size | Small–medium | Large (100 GB+) |
| Version migration | Easy | Limited |
Method 1: Backup from the Command Line with mysqldump
mysqldump is the most widely used logical backup tool that ships with MySQL. It requires no extra installation. On Windows, if MySQL is installed, mysqldump.exe is located in MySQL’s bin folder (for example C:\Program Files\MySQL\MySQL Server 8.4\bin).
Basic usage
Open Command Prompt (CMD) or PowerShell and run the following command to back up a single database:
mysqldump -u root -p --single-transaction narbulut_test > C:\Backups\backup.sql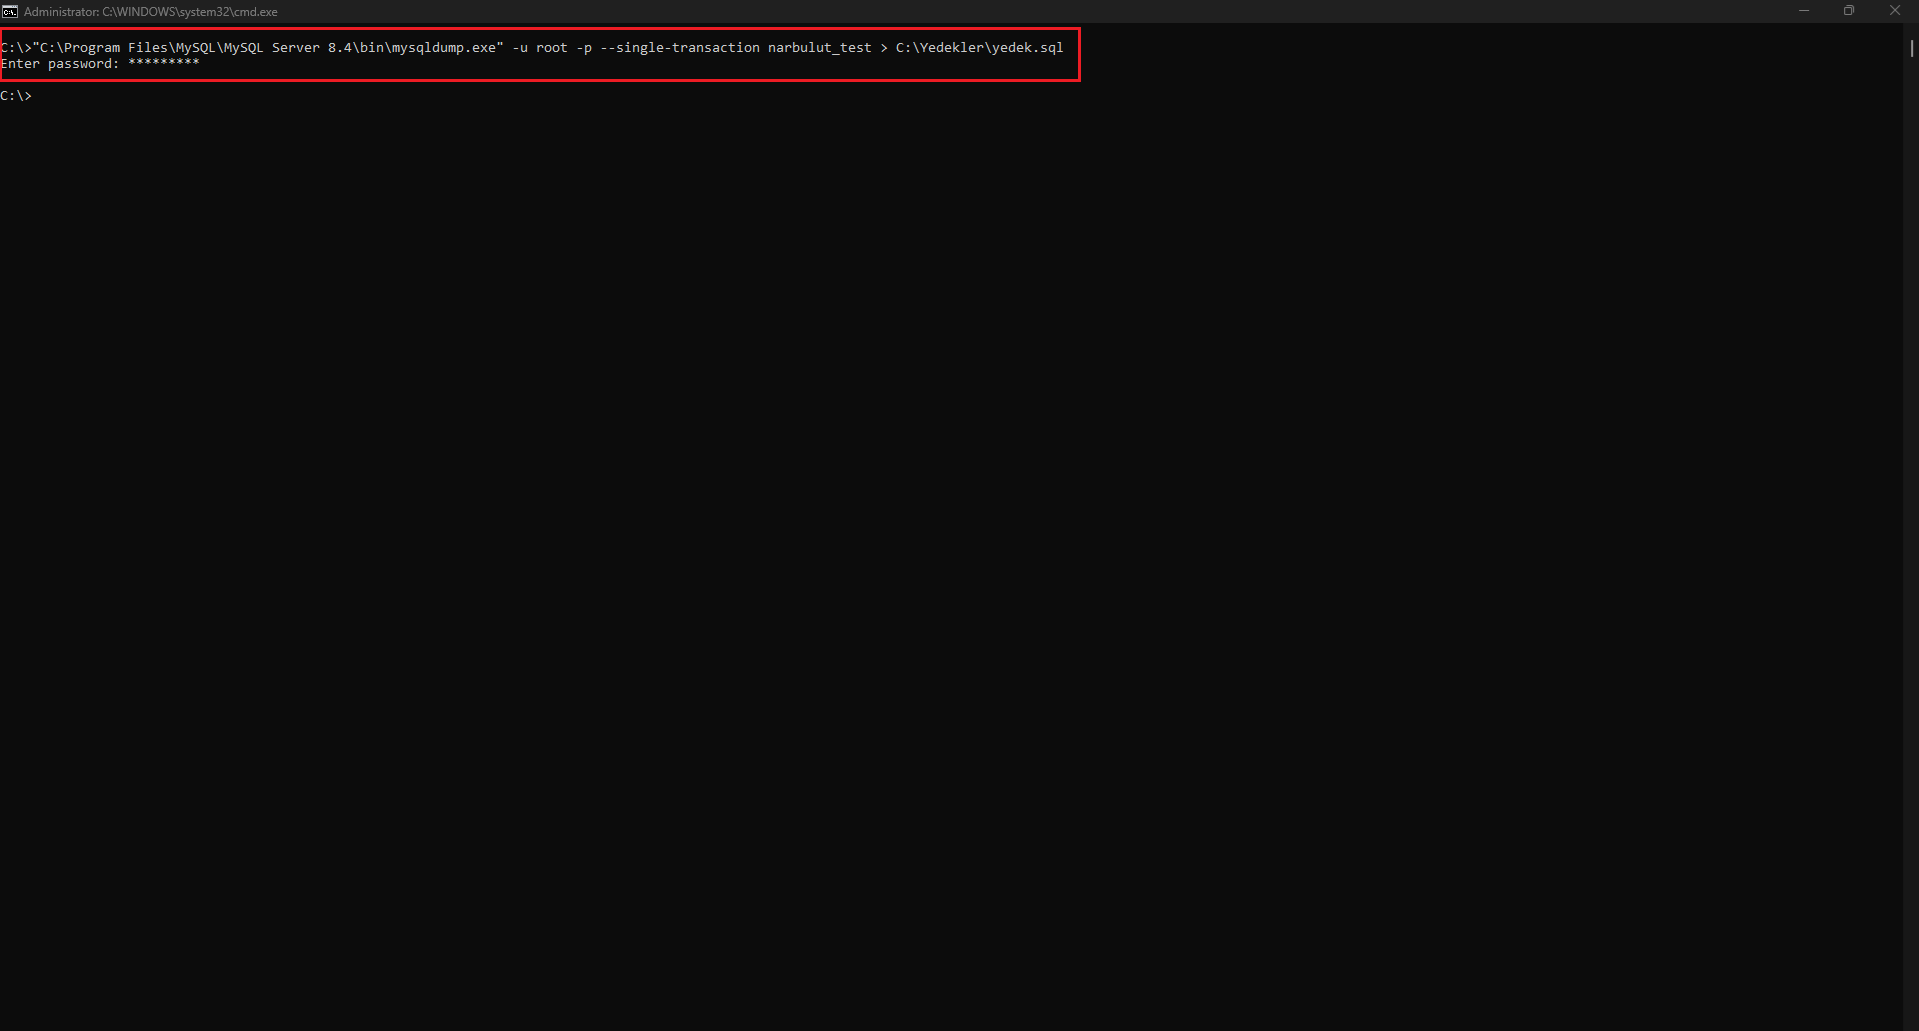
When you run the command you will be prompted for a password; after entering it, the backup.sql file is created in the folder you specified. The --single-transaction parameter here lets you take a consistent backup of InnoDB tables without making the database read-only, which is critical on live systems.
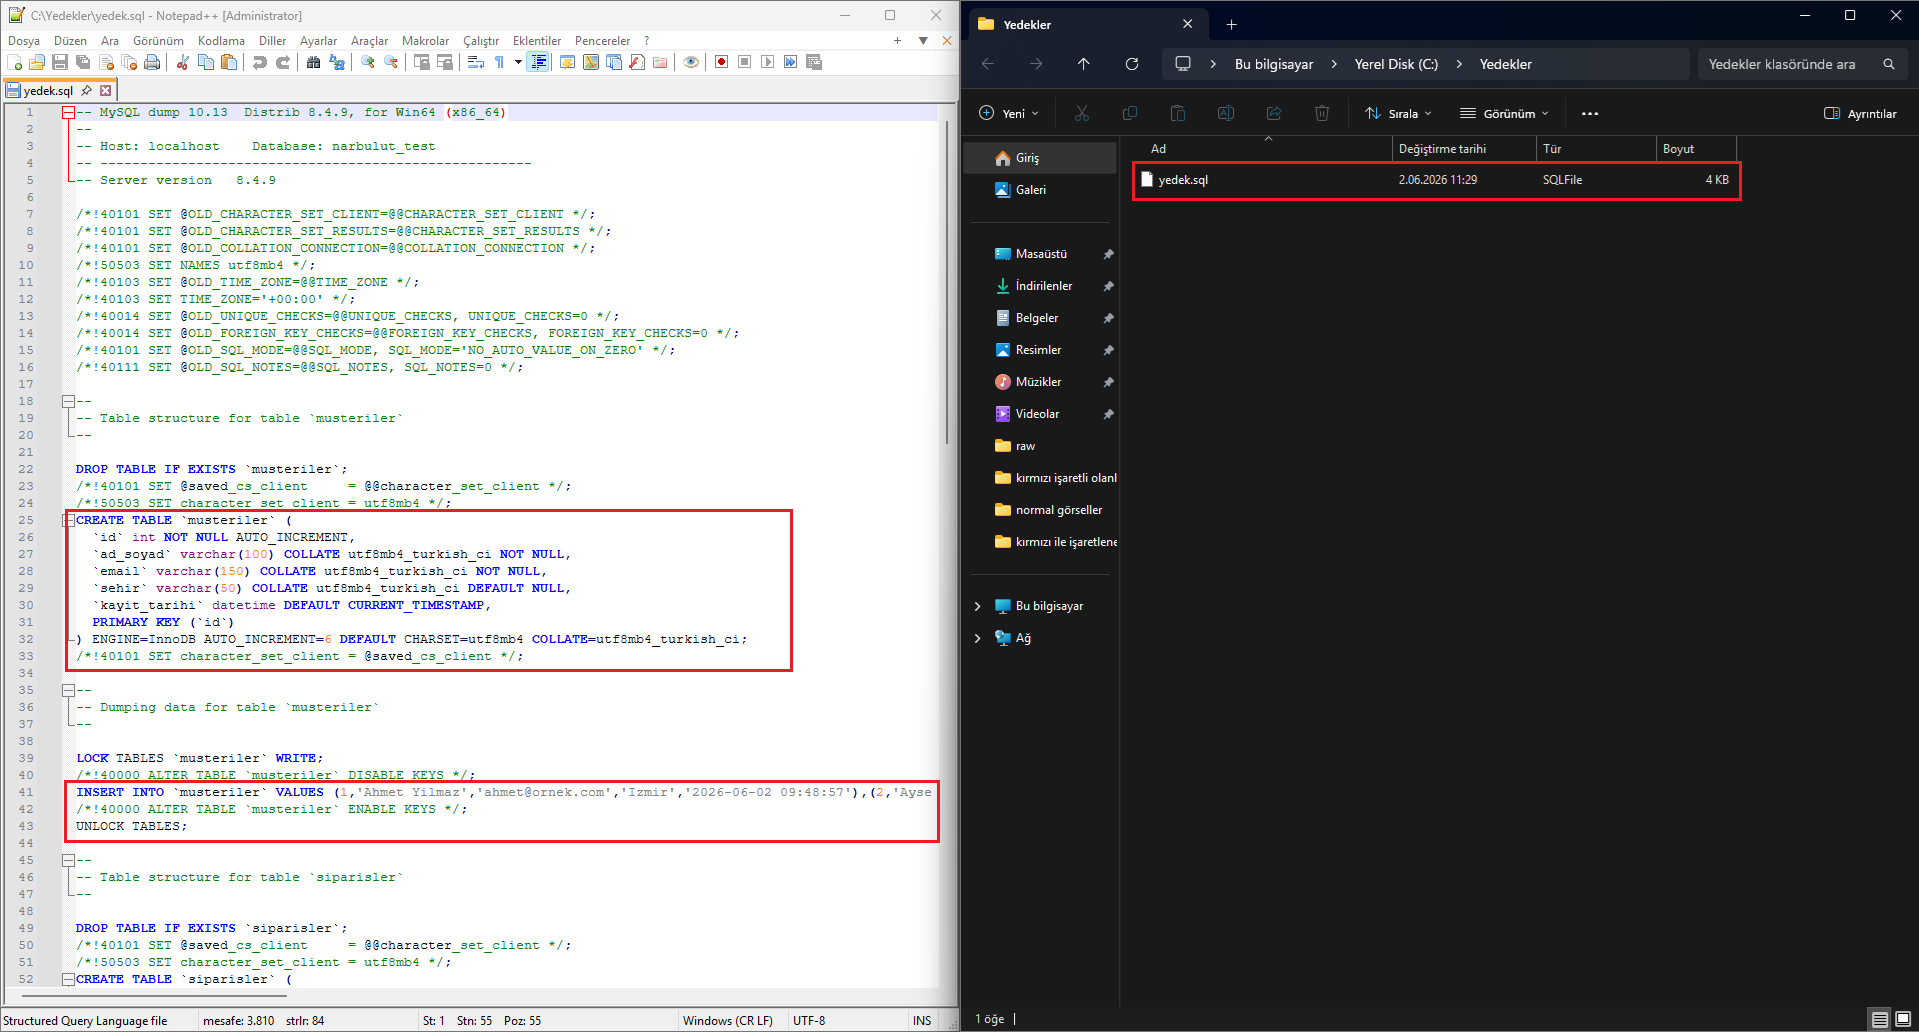
When you open the resulting file in a text editor, you will clearly see that a logical backup is in fact just a series of SQL commands:
Commonly used parameters
To back up all databases at once:
mysqldump -u root -p --all-databases > C:\Backups\all_databases.sqlTo back up only the structure (without data):
mysqldump -u root -p --no-data narbulut_test > schema.sqlRestoring a mysqldump backup
Restoring from the command line is quite simple:
mysql -u root -p narbulut_test < C:\Backups\backup.sql
Before restoring, make sure the target database exists. If necessary, create it first with CREATE DATABASE narbulut_test;.
Method 2: Backup with MySQL Workbench
For those who would rather not work on the command line, MySQL Workbench is the official, free graphical interface. It lets you back up with just a few clicks.
Step-by-step backup
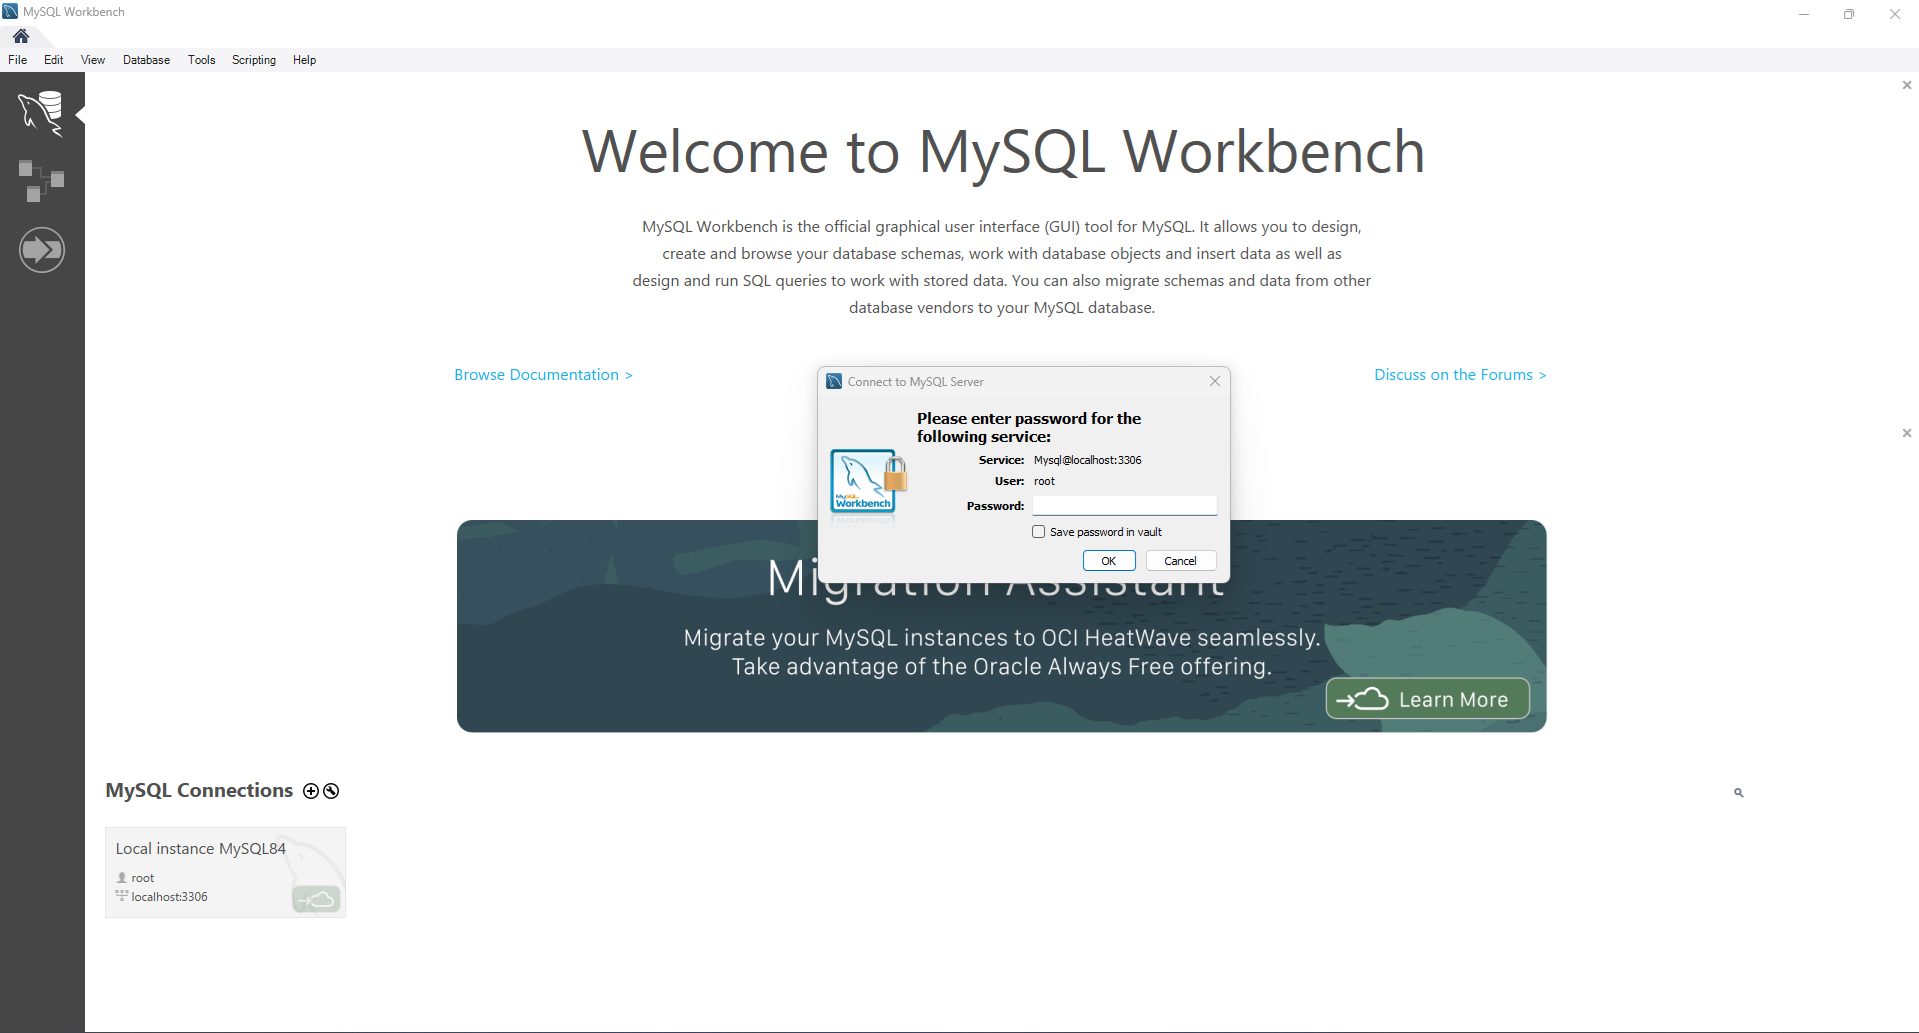
Open Workbench and log in by clicking your database connection. Switch to the Administration tab on the left menu and click Data Export. On the screen that opens, check the databases and tables you want to back up.
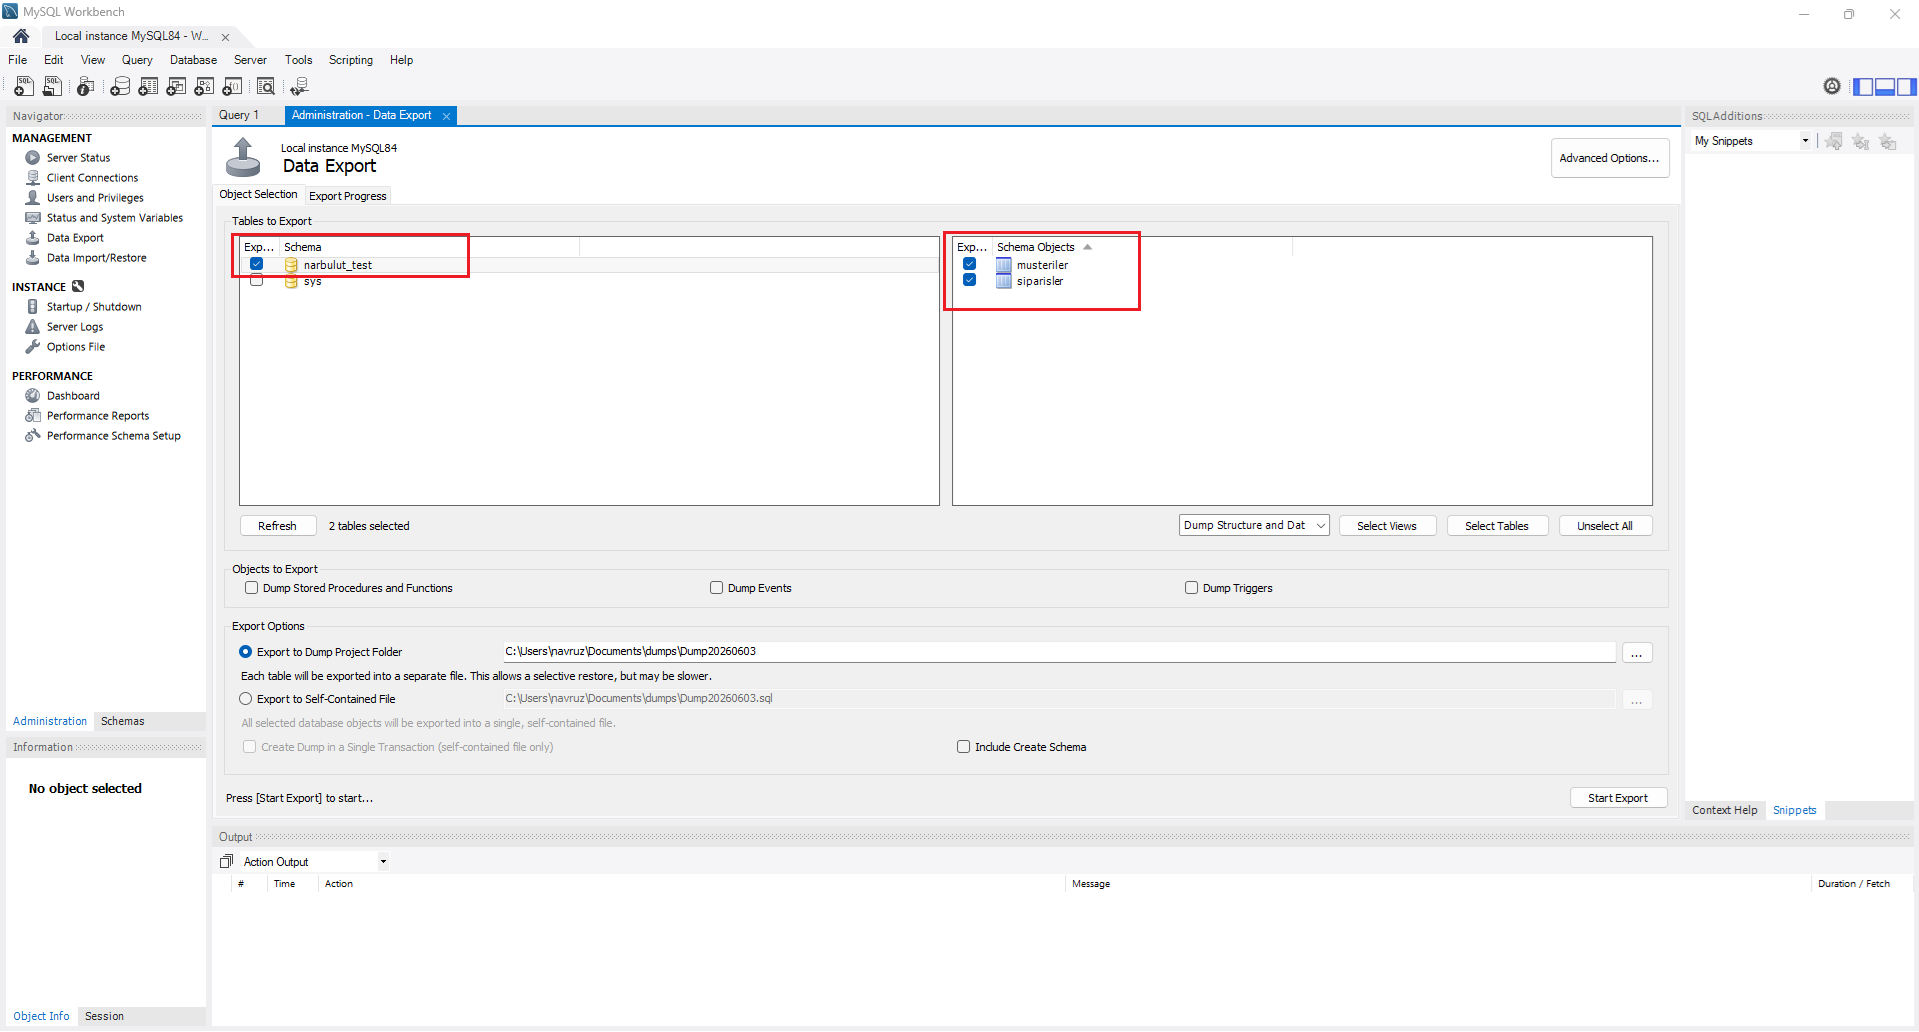
Then, in the Export Options section, choose how the backup will be saved. The Export to Self-Contained File option collects the entire database into a single .sql file and is the most practical method for migration. For a consistent backup, it is also recommended to check Include Create Schema.
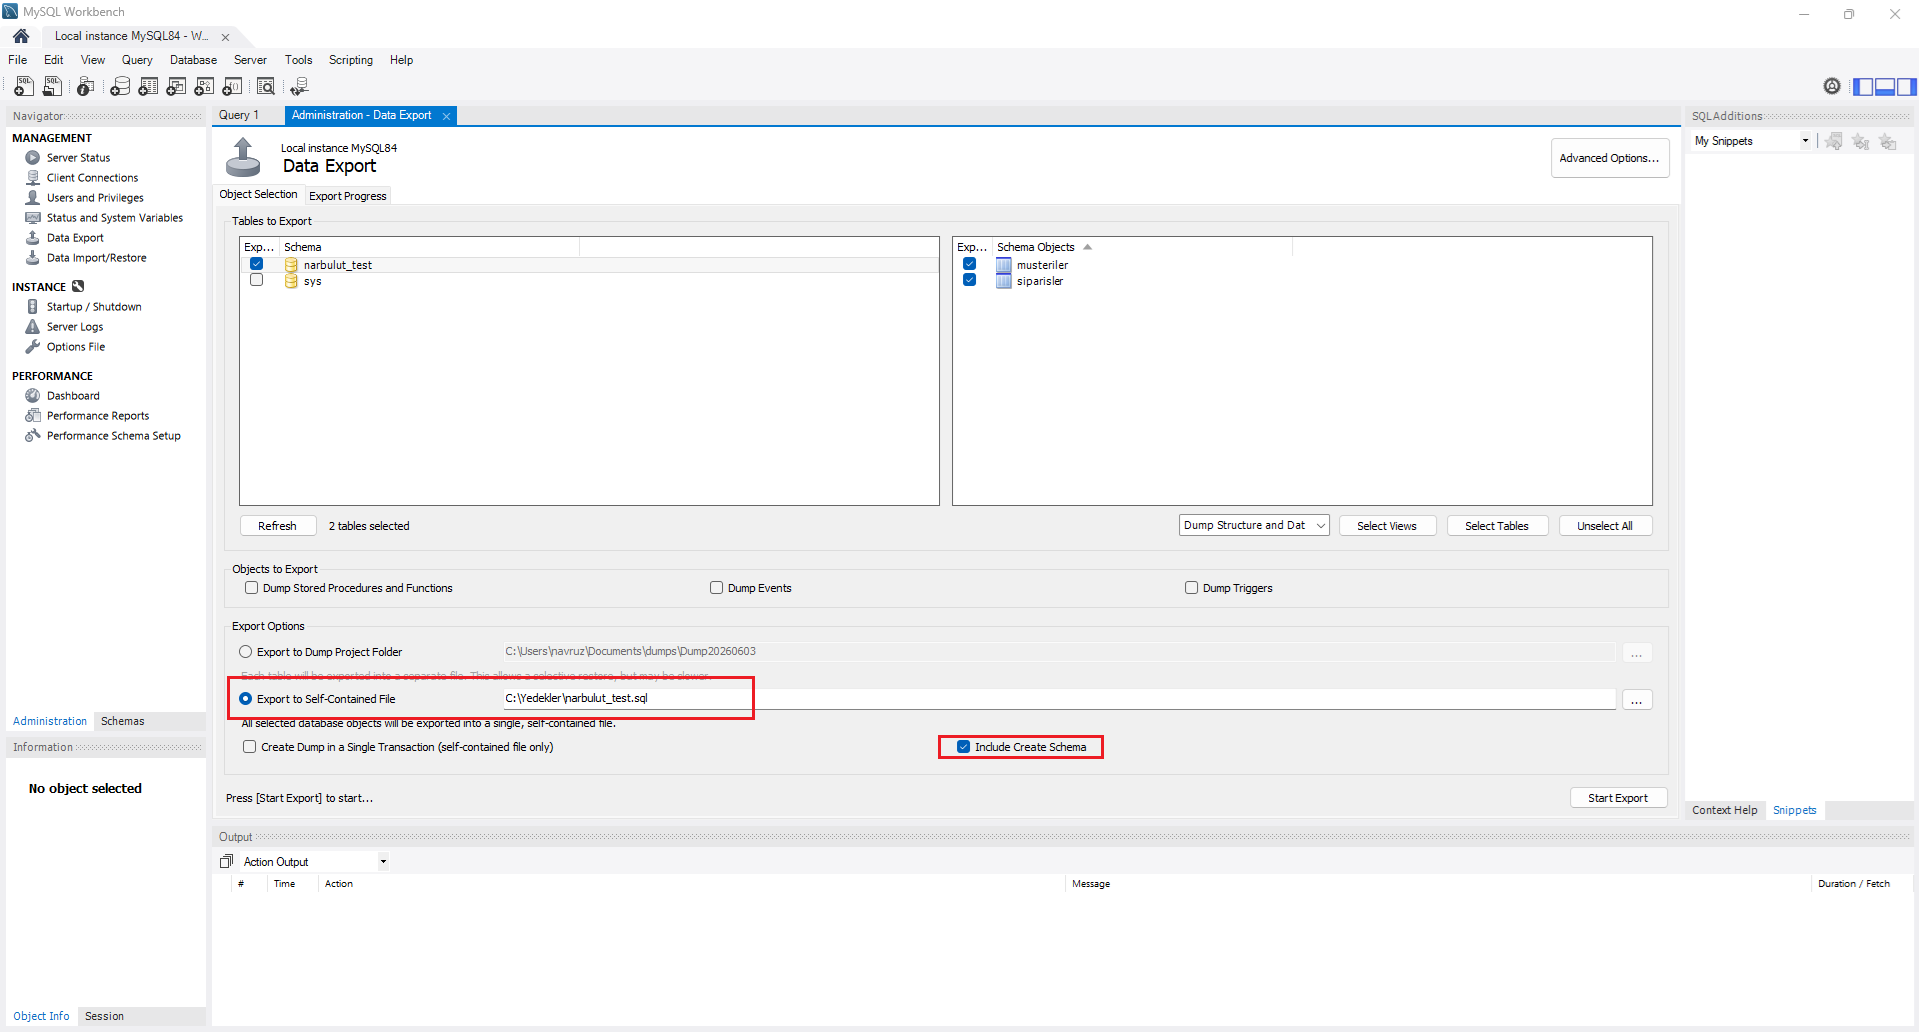
Click the Start Export button and wait for the process to complete. When it finishes, you will see a completion message in the bottom panel.

Restoring with Workbench
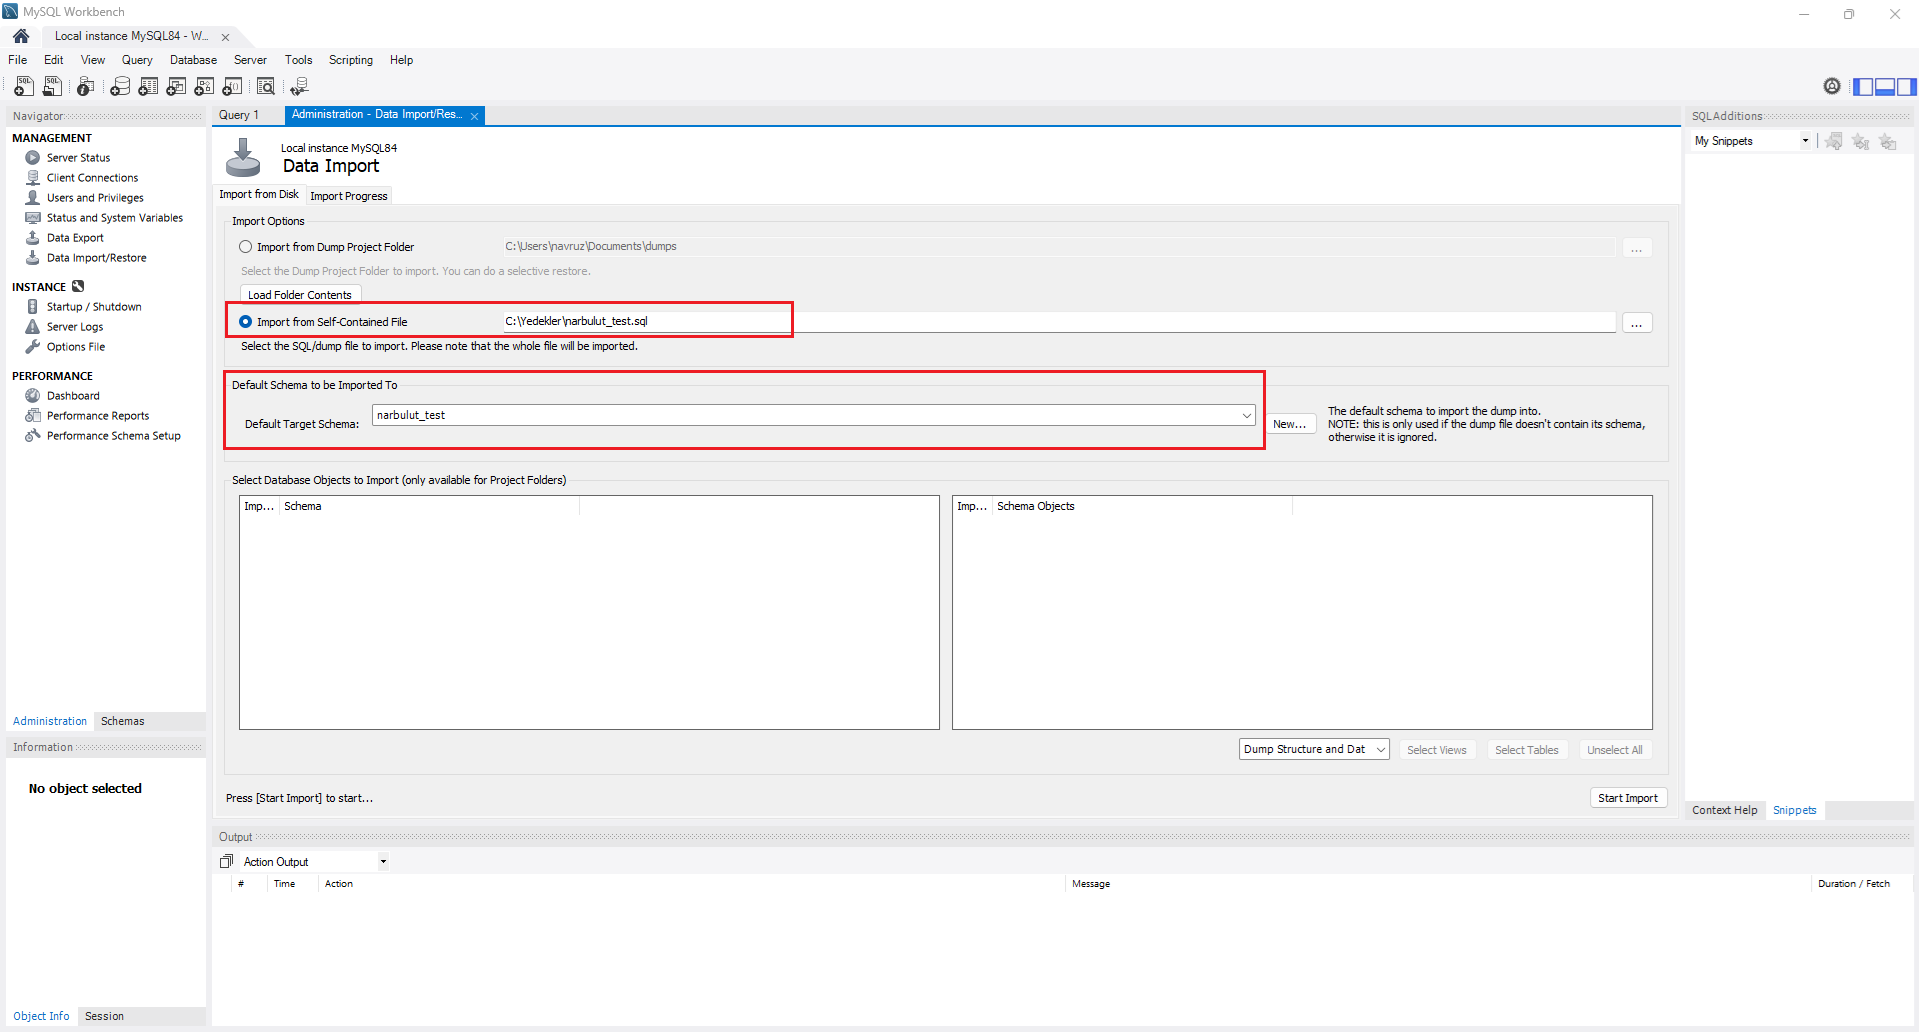
For restoring, you use the Data Import/Restore screen. With the Import from Self-Contained File option you point to the .sql file you took earlier, select the target schema (Default Target Schema), and click Start Import.
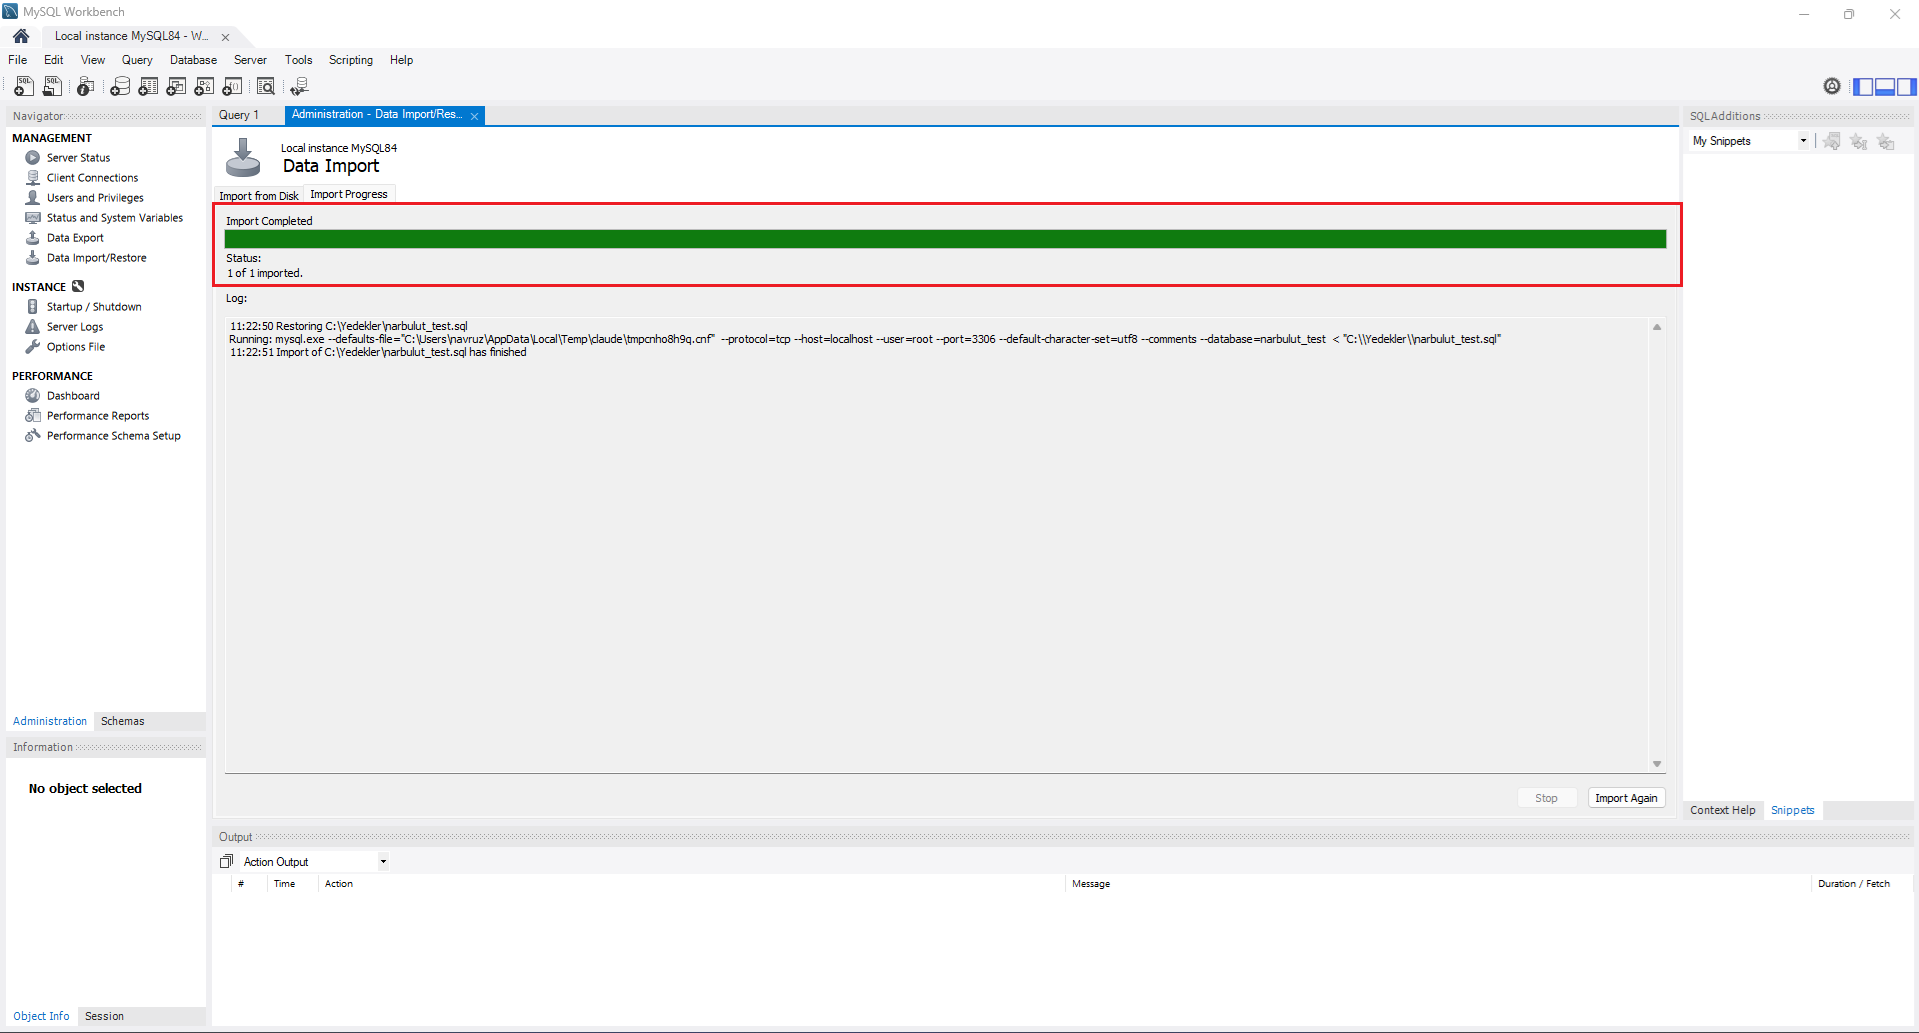
When the process completes, your backup will have been restored.
Method 3: Backup with phpMyAdmin
For those who use shared hosting or prefer a web-based interface, phpMyAdmin is the most practical solution. It comes ready in most hosting packages.
Export
Log in to phpMyAdmin and select the database you want to back up from the left menu. Click the Export tab in the top menu. The Quick method is sufficient for most cases; the format should be set to SQL. If you want more control, you can use the Custom option.
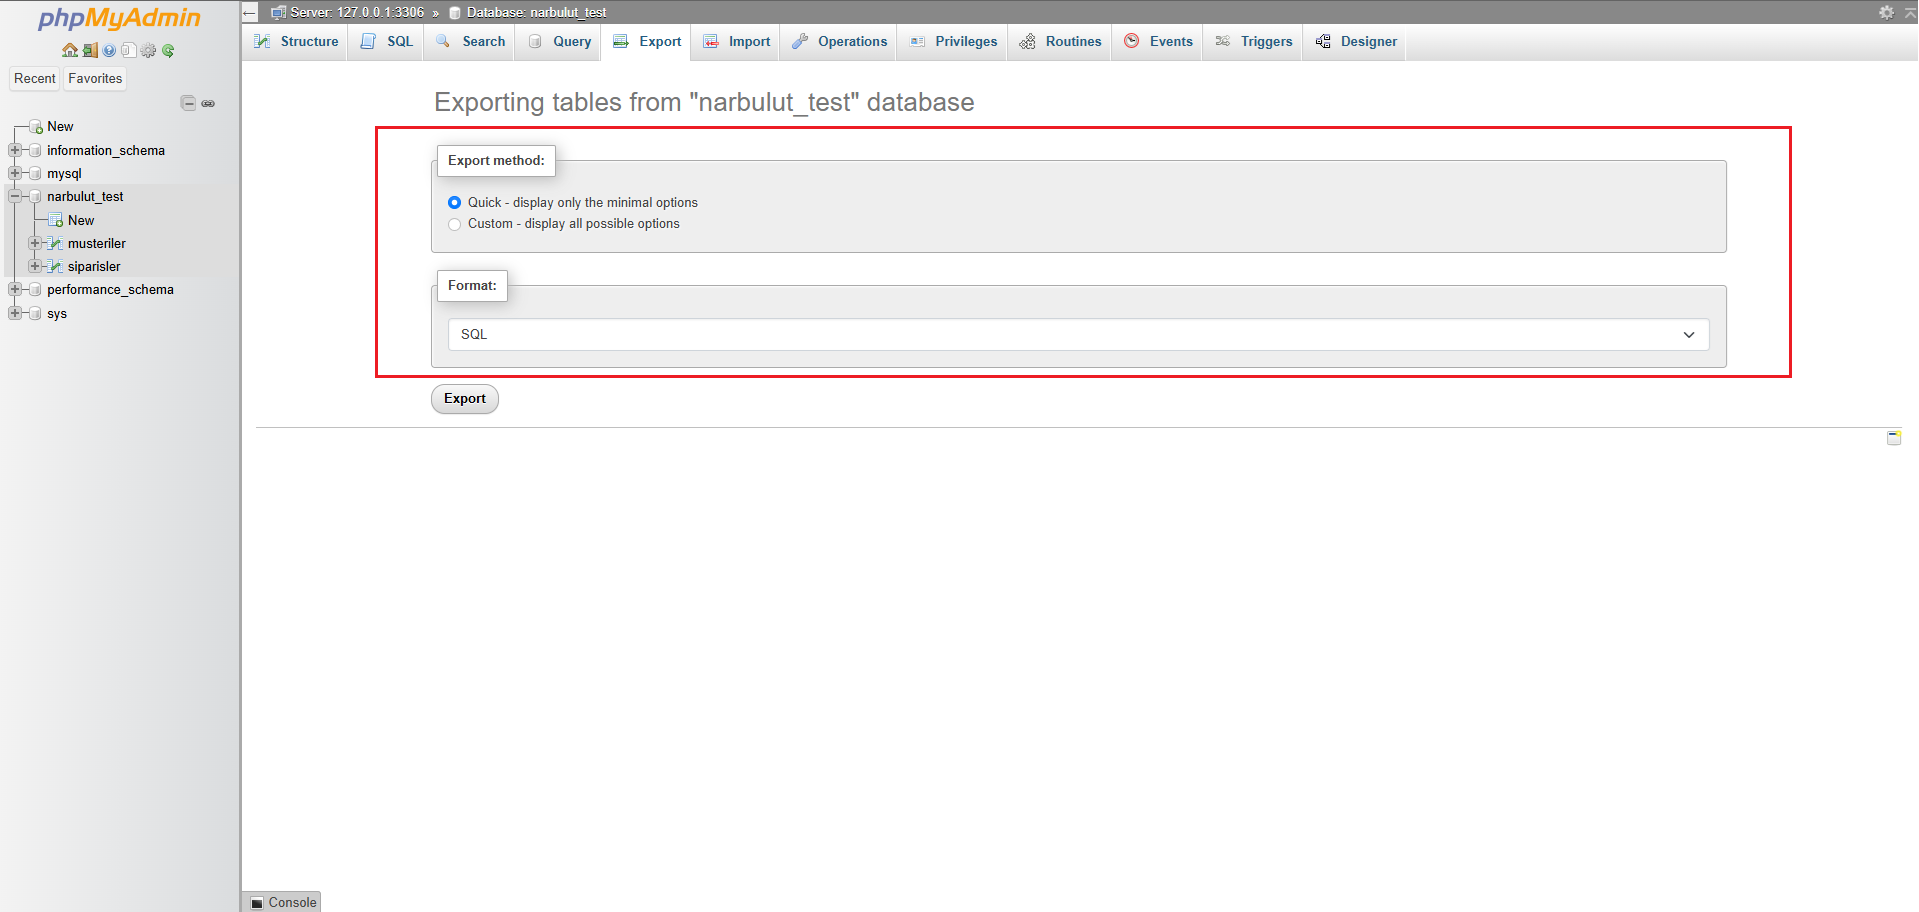
When you click the Go button, the .sql file downloads to your computer.
Import
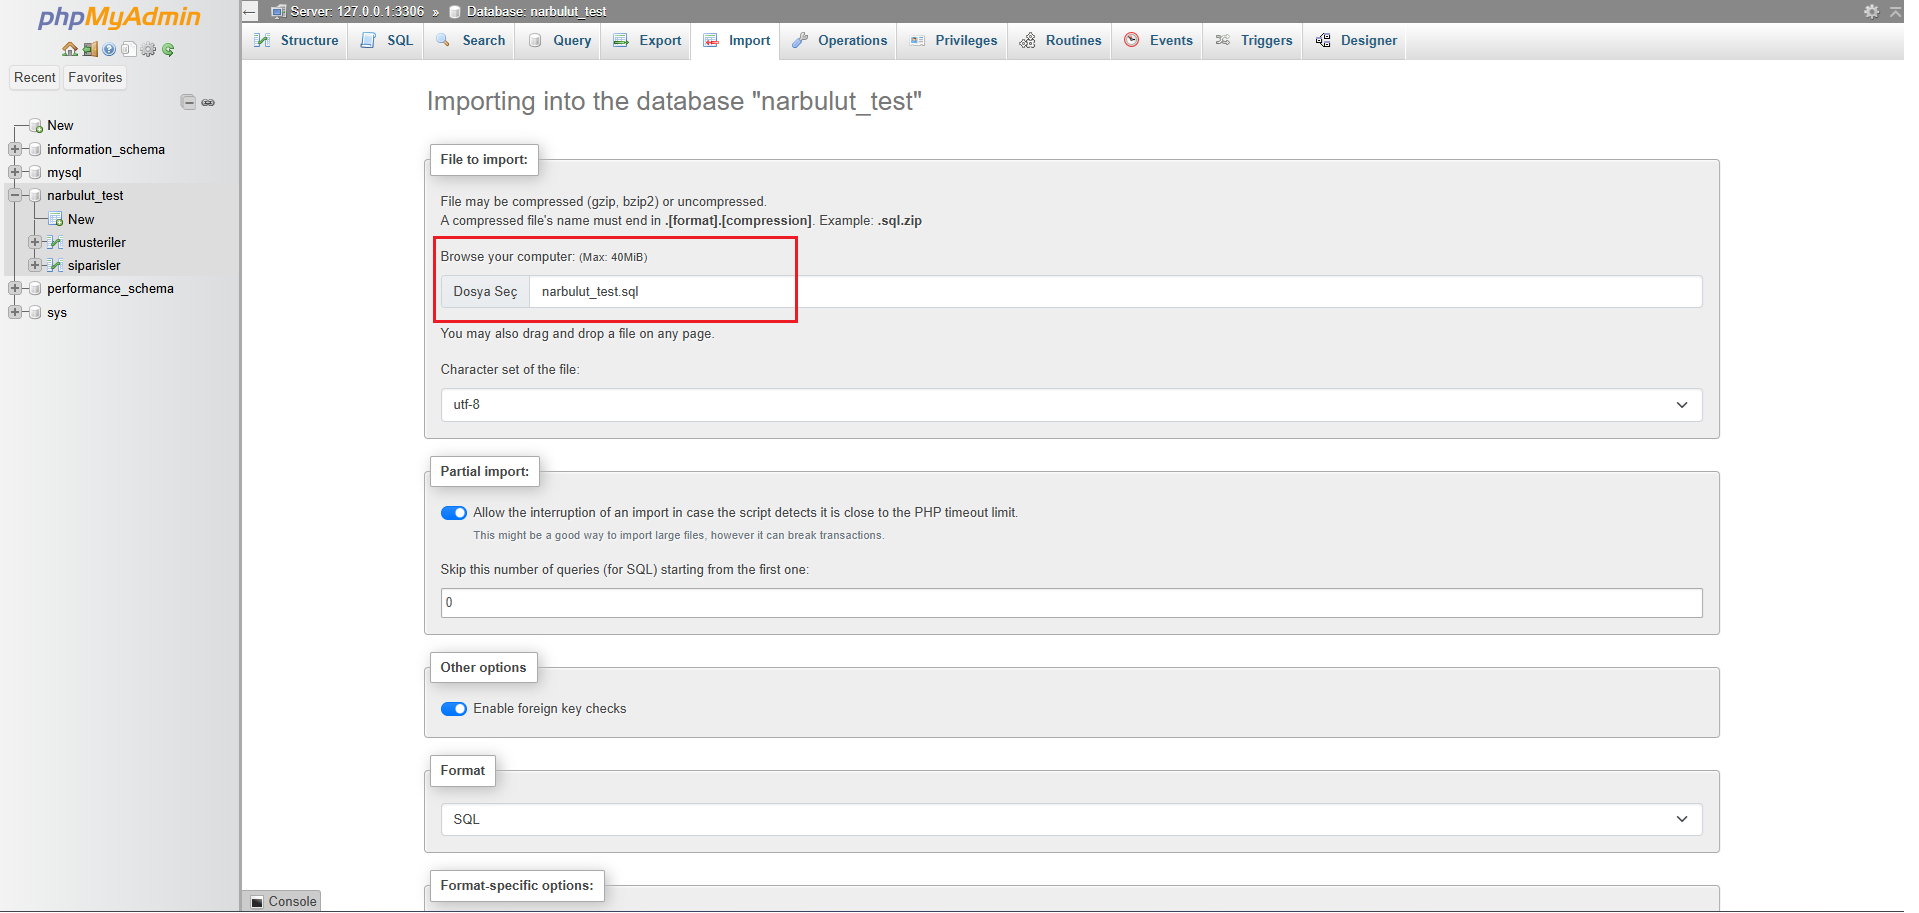
Select the database you want to restore (or create an empty database), switch to the Import tab, choose your .sql file with Choose File, and click Go.
Method 4: Hot Backup with Percona XtraBackup
For live production databases that are hundreds of GB or TB in size, logical methods are too slow. This is where Percona XtraBackup comes in.
XtraBackup is an open-source hot backup tool; that is, it takes a physical copy of the InnoDB data files without stopping or locking the database. While the database keeps responding to queries, it copies pages from disk in the background and produces a consistent backup using InnoDB’s crash recovery mechanism.
Its main advantages:
- Backup with zero downtime
- Much faster restore than mysqldump on large databases
- Point-in-Time Recovery support through incremental backups
- Compression and encryption features
Binary Log and Point-in-Time Recovery (PITR)
Taking only a daily full backup is not always enough. Say you took your backup at 02:00 at night and the data loss occurred at 15:00 in the afternoon. What happens to the 13 hours of data in between?
This is where the Binary Log (binlog) comes in. The binary log records all changes made to the database (every INSERT, UPDATE, DELETE) in order. By combining your full backup with the binlog, you can roll back to a specific point in time. For this reason, a serious backup strategy keeps full backups together with copies of the binary log. One of the greatest strengths of tools like XtraBackup is this PITR capability.
Automating Backups: Windows Task Scheduler
Manual backup is doomed to be forgotten. A reliable strategy must be automatic. On Windows, we do this with Task Scheduler.
1. Creating a backup batch file
First, prepare a .bat file that takes the backup. For example C:\Backups\backup.bat:
@echo off
set DATE=%date:~-4%-%date:~3,2%-%date:~0,2%
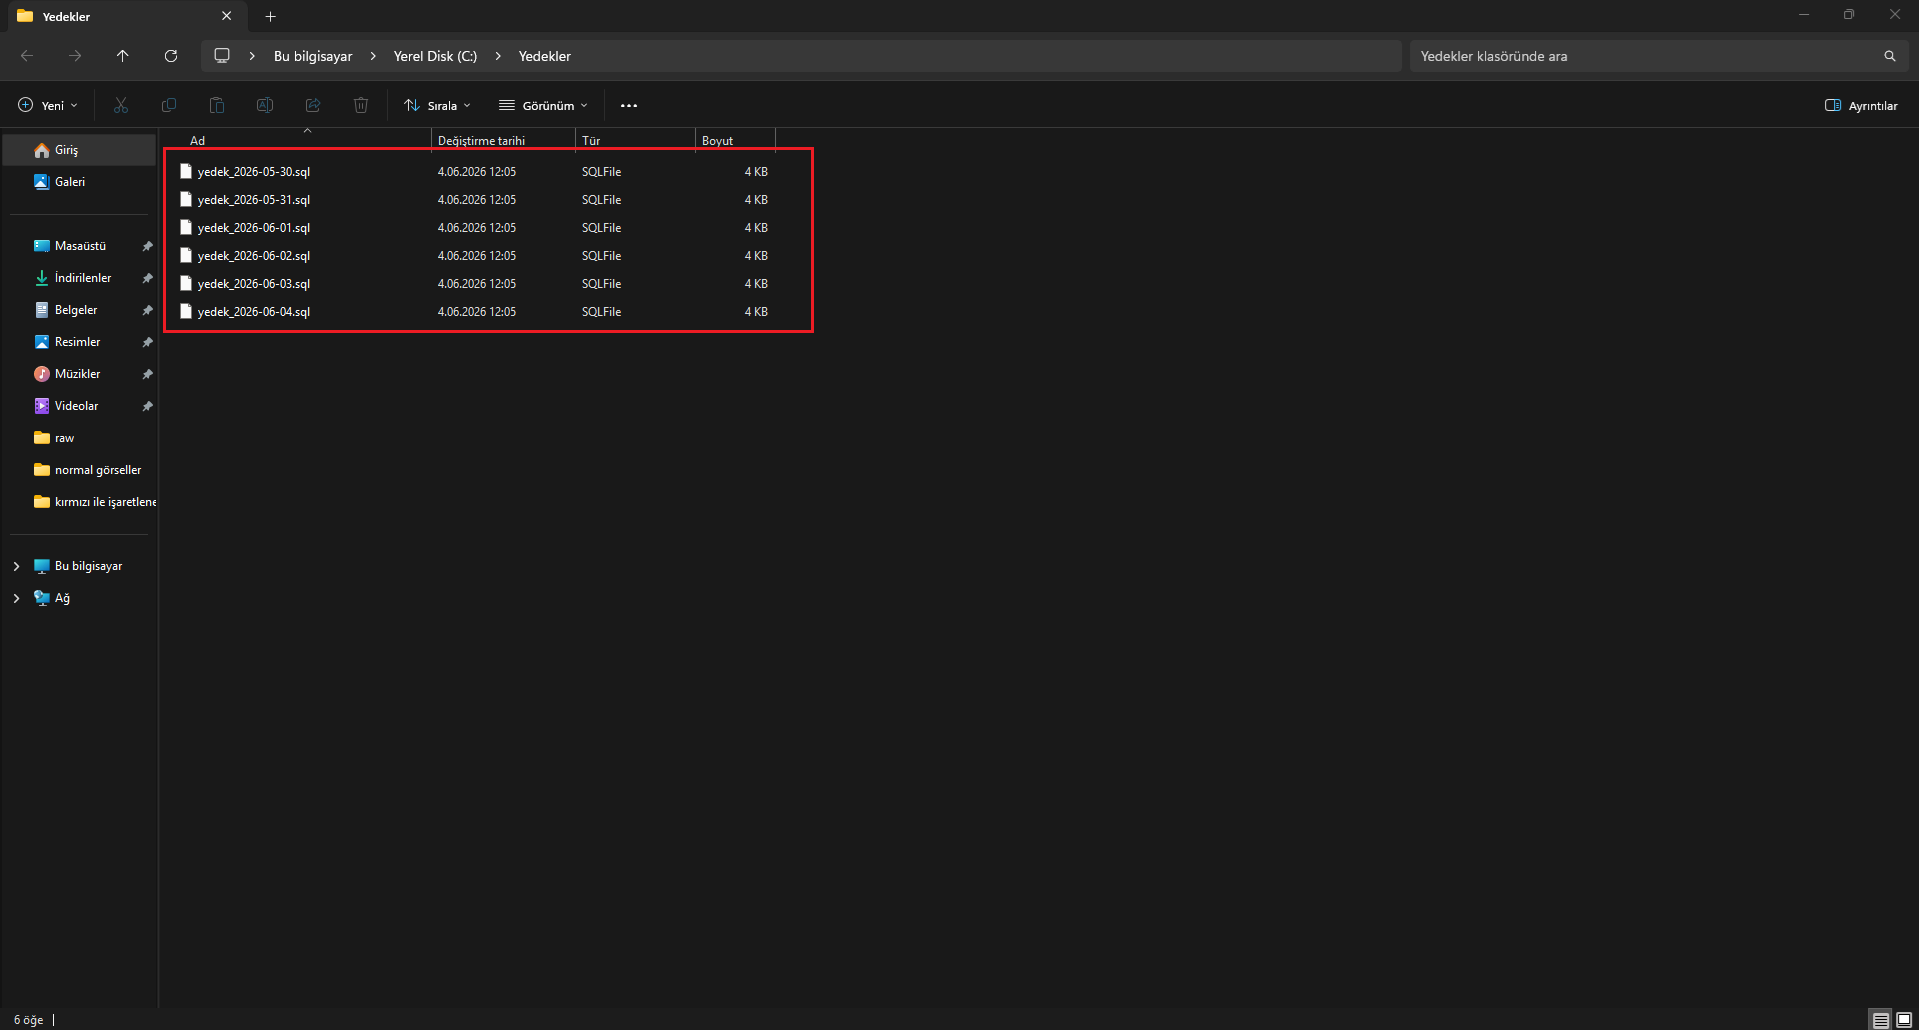
"C:\Program Files\MySQL\MySQL Server 8.4\bin\mysqldump.exe" -u root -pPASSWORD --single-transaction narbulut_test > C:\Backups\backup_%DATE%.sqlWhen this script runs, it produces a backup by appending the date to the file name (backup_2026-06-04.sql).
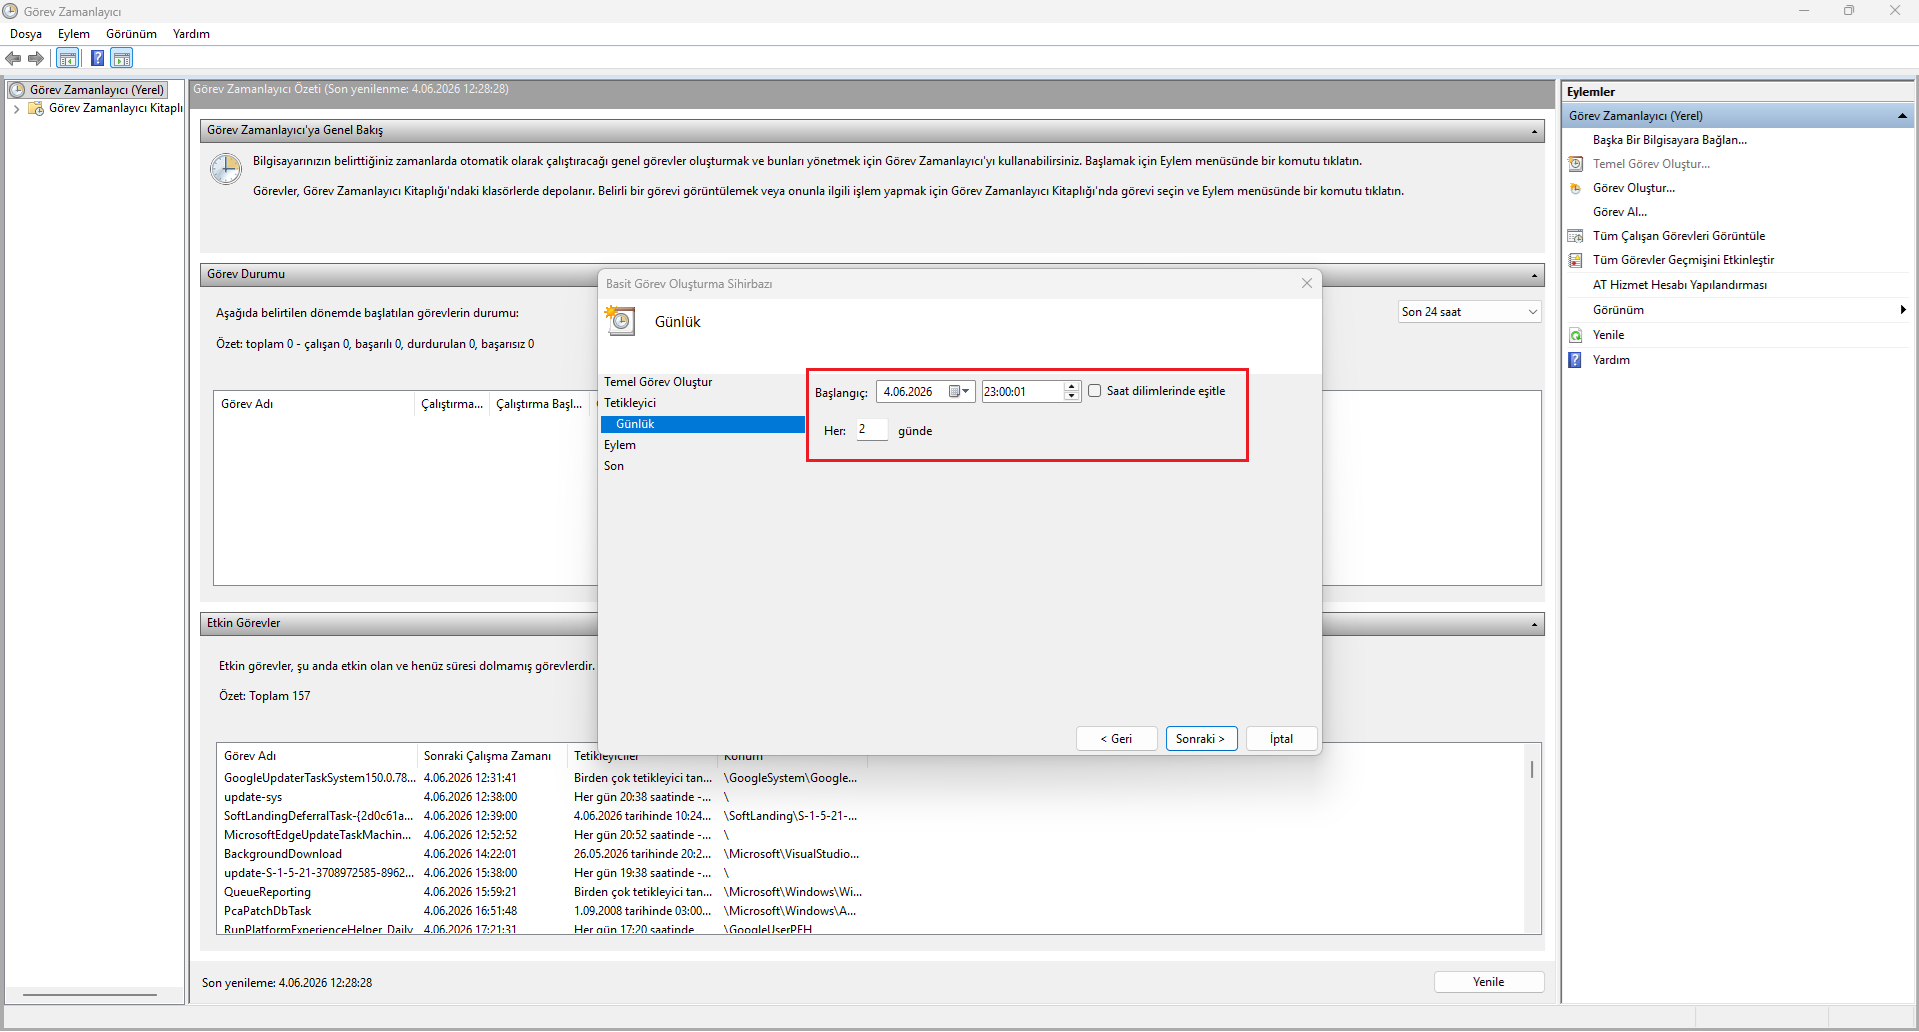
2. Creating a task in Task Scheduler
Type Task Scheduler in the Start menu and open it. From the panel on the right, choose Create Basic Task and give the task a name.

In the Trigger step, choose how often the backup will run (for example, every day at 02:00).
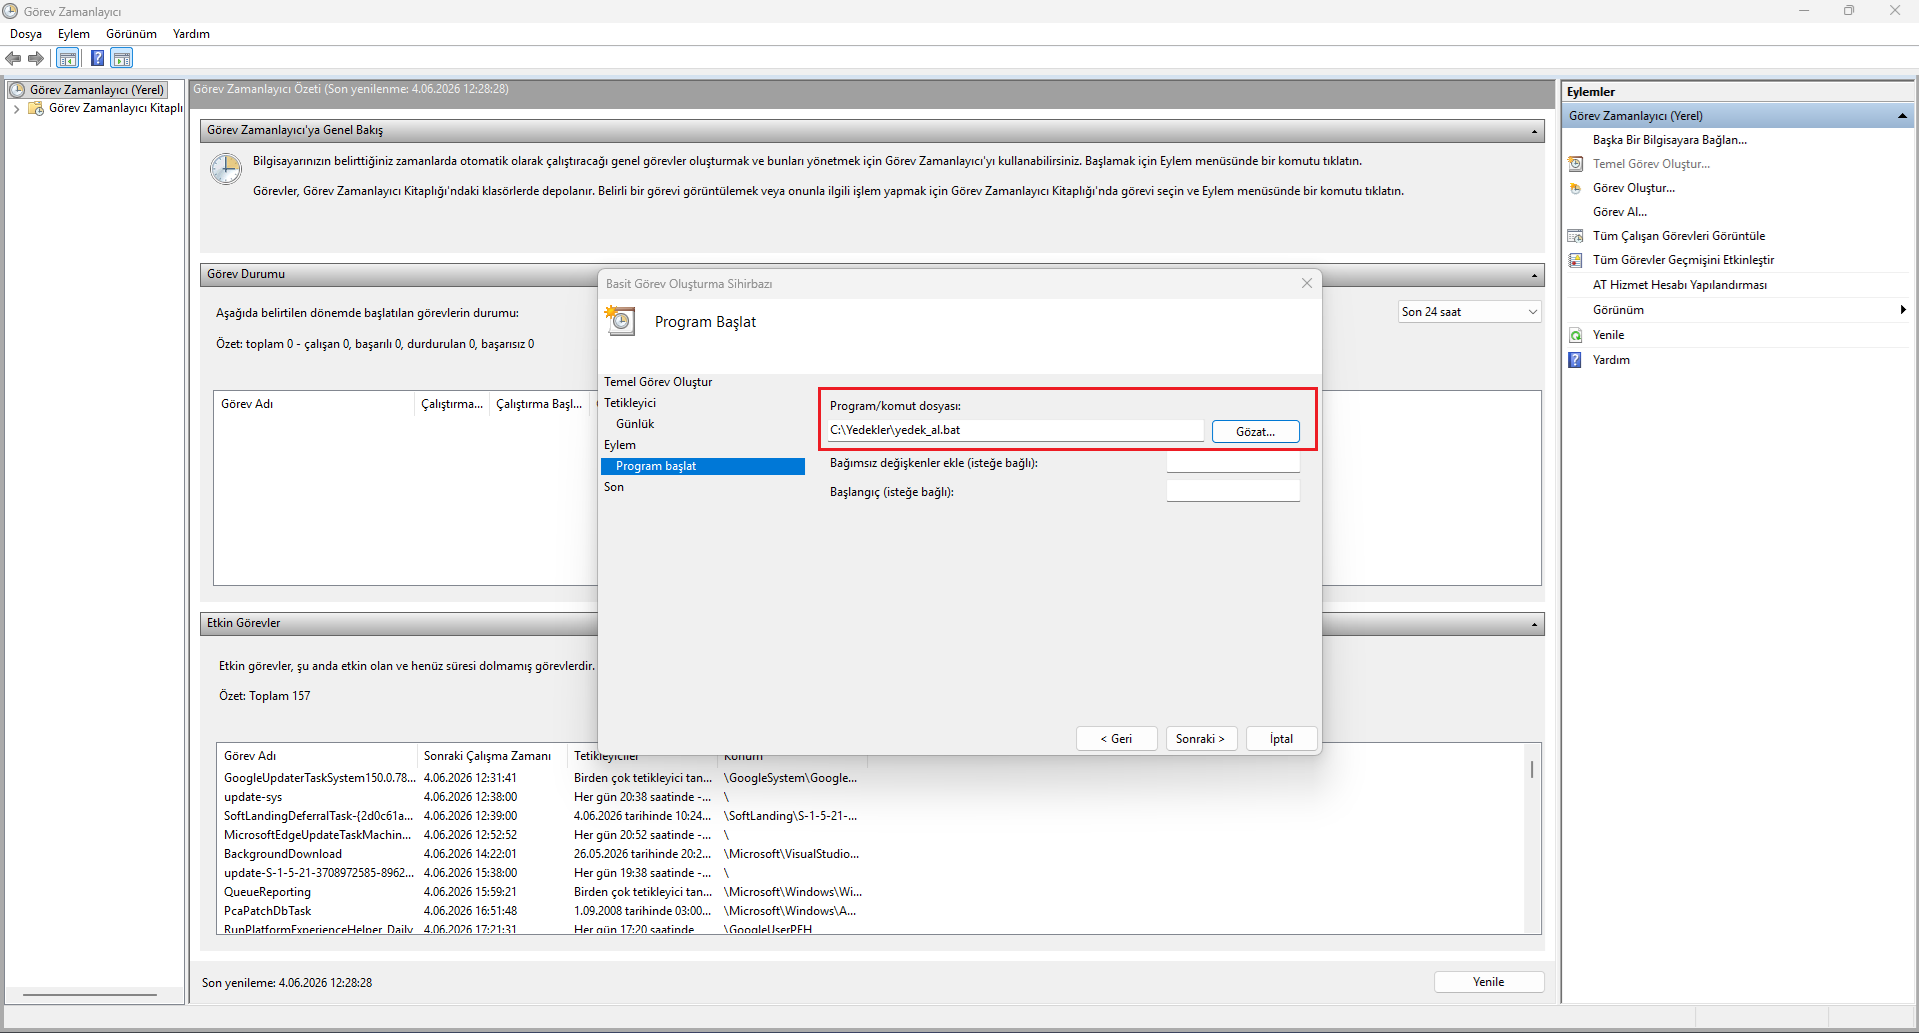
In the Action step, choose Start a program and point to the .bat file you created.
Complete the wizard. From now on, your backup will be taken automatically every day. After a few days, you will see dated files accumulating in your backup folder:
Best Practices
Follow these principles for a solid MySQL backup strategy: apply the 3-2-1 rule so that you keep at least 3 copies, on 2 different media, with 1 copy in a different location. Set a regular schedule based on how often your data changes, and take large backups during low-traffic hours such as at night. Use --single-transaction for consistency on InnoDB tables, keep the binary log enabled for point-in-time recovery, and most importantly, test the restore process regularly. Local backups alone are not enough; always keep an off-site or cloud copy.
Keep Your Data Safe in the Cloud
The most critical link in your backup strategy is storing backups in a secure location that is independent of the physical server. A backup taken to a local disk can be lost together with the primary data in the event of fire, theft, hardware failure, or ransomware.
Narbulut Cloud Backup solutions provide an automated, encrypted, and PDPL-compliant off-site backup layer for your MySQL databases and all your critical data. Your data is stored in data centers in Türkiye, in full compliance with legal regulations; this completely eliminates the question “I have a backup, but where is it and is it safe?”
Take Your MySQL Backup Processes to a Professional Level
If you need a professional cloud backup solution for your database backup processes, you can explore Narbulut solutions.
Explore the MySQL Backup Solution