
- Company
-
Products
Products
New ProductCloud Server
Fully managed virtual server infrastructure. Setup in minutes, hourly billing and 24/7 expert support so you can focus on your business.
Try Now -
Solutions
Backup & Security
Data SecurityRansomware & encryptionSilent Ransom: TDEProtection against TDE abuseCloud BackupSecure backup to data centersImage BackupFull disk image + fast recoveryOff-Site BackupOff-site disaster recoveryMobile BackupiOS & Android photos/contactsRansomware ProtectionAgainst ransomware attacksTwo-Factor Auth2FA account security - Plans
- Resources
- Partners
- Blog
How to Back Up a PostgreSQL Database?

A database is one of the most valuable digital assets most businesses own. Customer records, orders, financial transactions, application data… all of it lives in a database like PostgreSQL. But what if something happens to that data one day? An accidentally deleted table, a corrupted disk, or a ransomware attack can destroy years of accumulated data in seconds.
That is exactly why a regular, properly configured backup is not a matter for debate; it is an absolute necessity. What’s more, for every organization that processes personal data under PDPL, backup is also a legal responsibility.
In this guide, we’ll show you step by step, with screenshots, how to back up your PostgreSQL database from start to finish. There’s no need to be intimidated by the command line — we’ll explain each command along with what it does, and we’ll also show the graphical (pgAdmin) backup method.
Before You Start: 3 Key Concepts You Should Know
Before moving on to the methods, let’s briefly get to know the three key concepts that shape a sound backup strategy.
RPO and RTO
RPO (Recovery Point Objective) describes your maximum acceptable data loss: “At most, how many hours of data can I afford to lose?” RTO (Recovery Time Objective), on the other hand, answers the question “In the event of a disaster, how quickly do I need to bring the system back up?” These two targets determine your backup frequency and method.
The 3-2-1 Rule
The golden rule of a solid backup strategy is this: keep 3 copies of your data, store them on 2 different media, and keep at least 1 copy off-site (for example, in the cloud). A single backup does not count as a backup.
A backup isn’t a backup until it’s tested
A backup that has never been restored is nothing more than a hope you can’t be sure works. That is why this guide also covers the restore steps.
Backup in PostgreSQL: 3 Core Methods
There are three distinct approaches to backing up data in PostgreSQL:
- Logical backup (
pg_dump/pg_dumpall): Converts the database into SQL commands that recreate it, or into a special archive file. It is the most flexible and most common method. - Physical backup (
pg_basebackup): Takes an exact copy of the database files. It is fast on large databases. - Continuous archiving + PITR: Thanks to WAL records, it lets you roll the database back to any point in the past.
For most users, the most practical and sufficient method in everyday use is logical backup. So that is where we’ll start.
Method 1: Logical Backup with pg_dump (The Most Common Method)
pg_dump is a command-line tool that exports a single database to a file. It comes ready with PostgreSQL and requires no extra installation.
Step 1: Connect to PostgreSQL and check your version
First, let’s make sure everything is in place. Open Terminal (Linux) or Command Prompt (Windows) and check the connection and version with this command:
psql -U postgres -c "SELECT version();"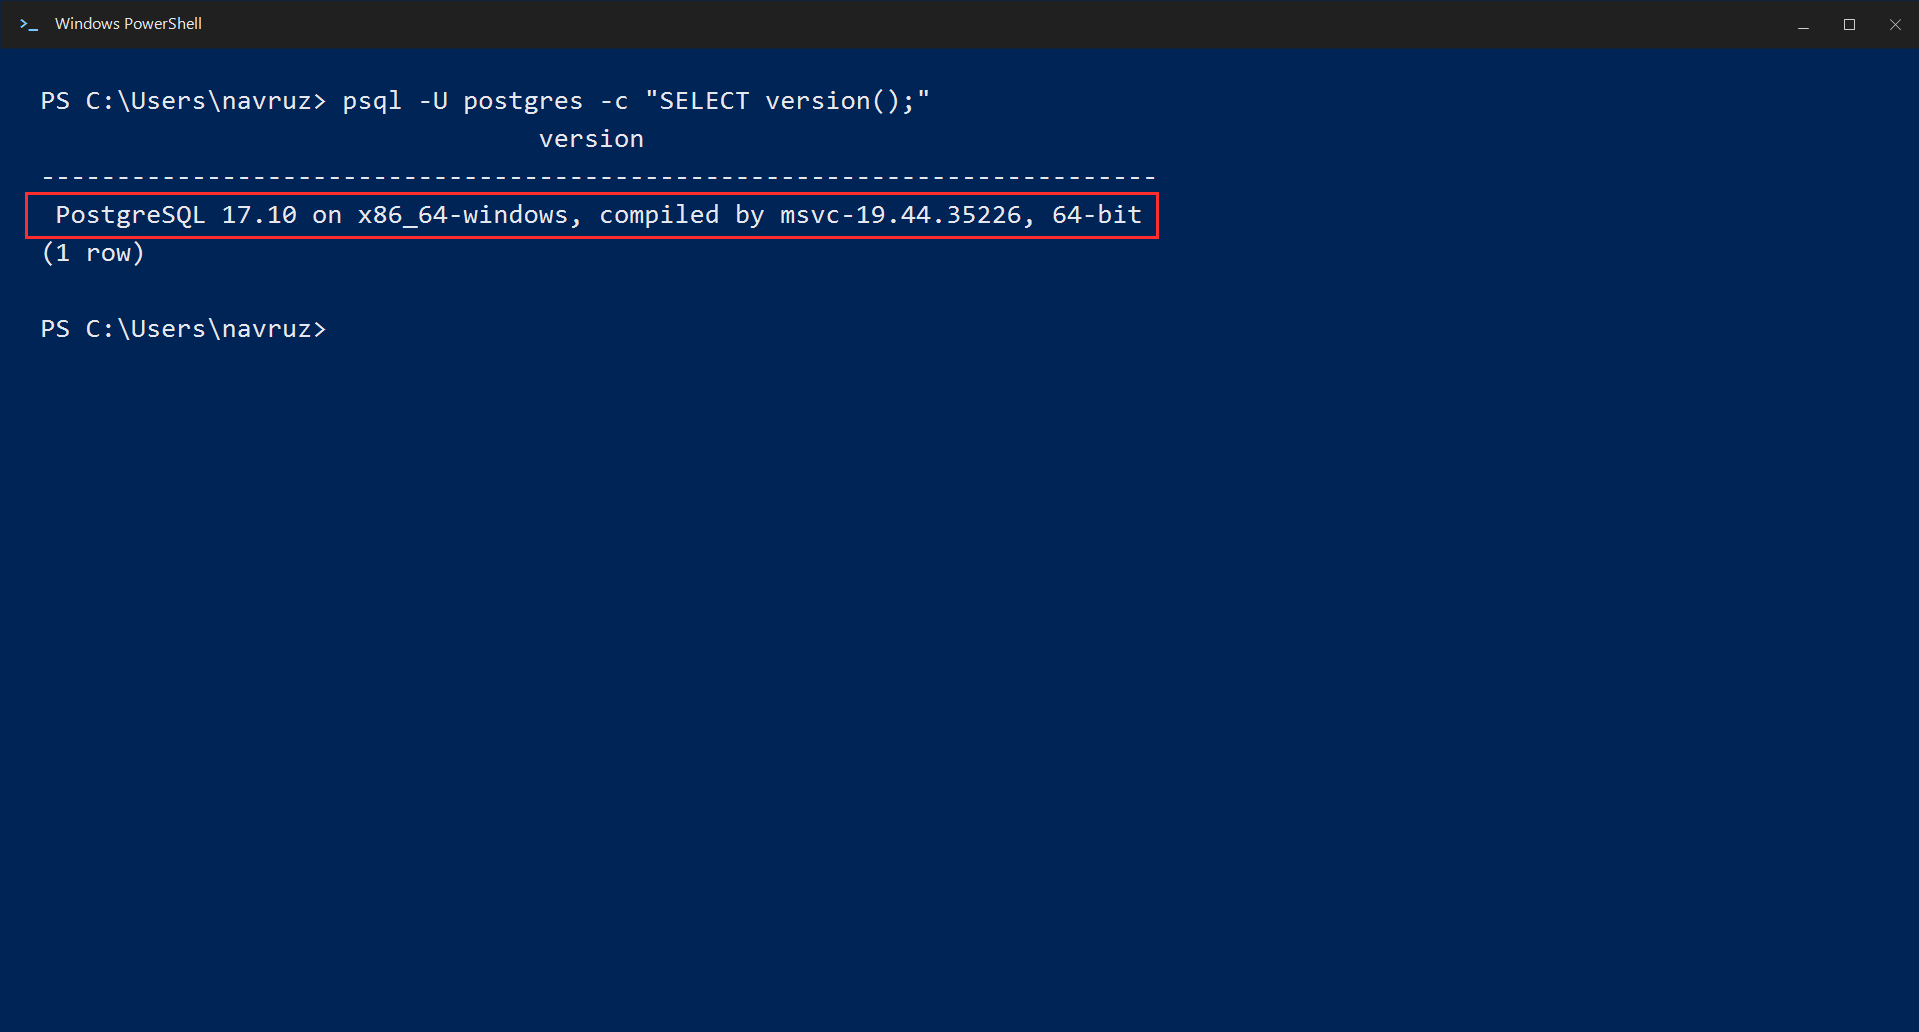
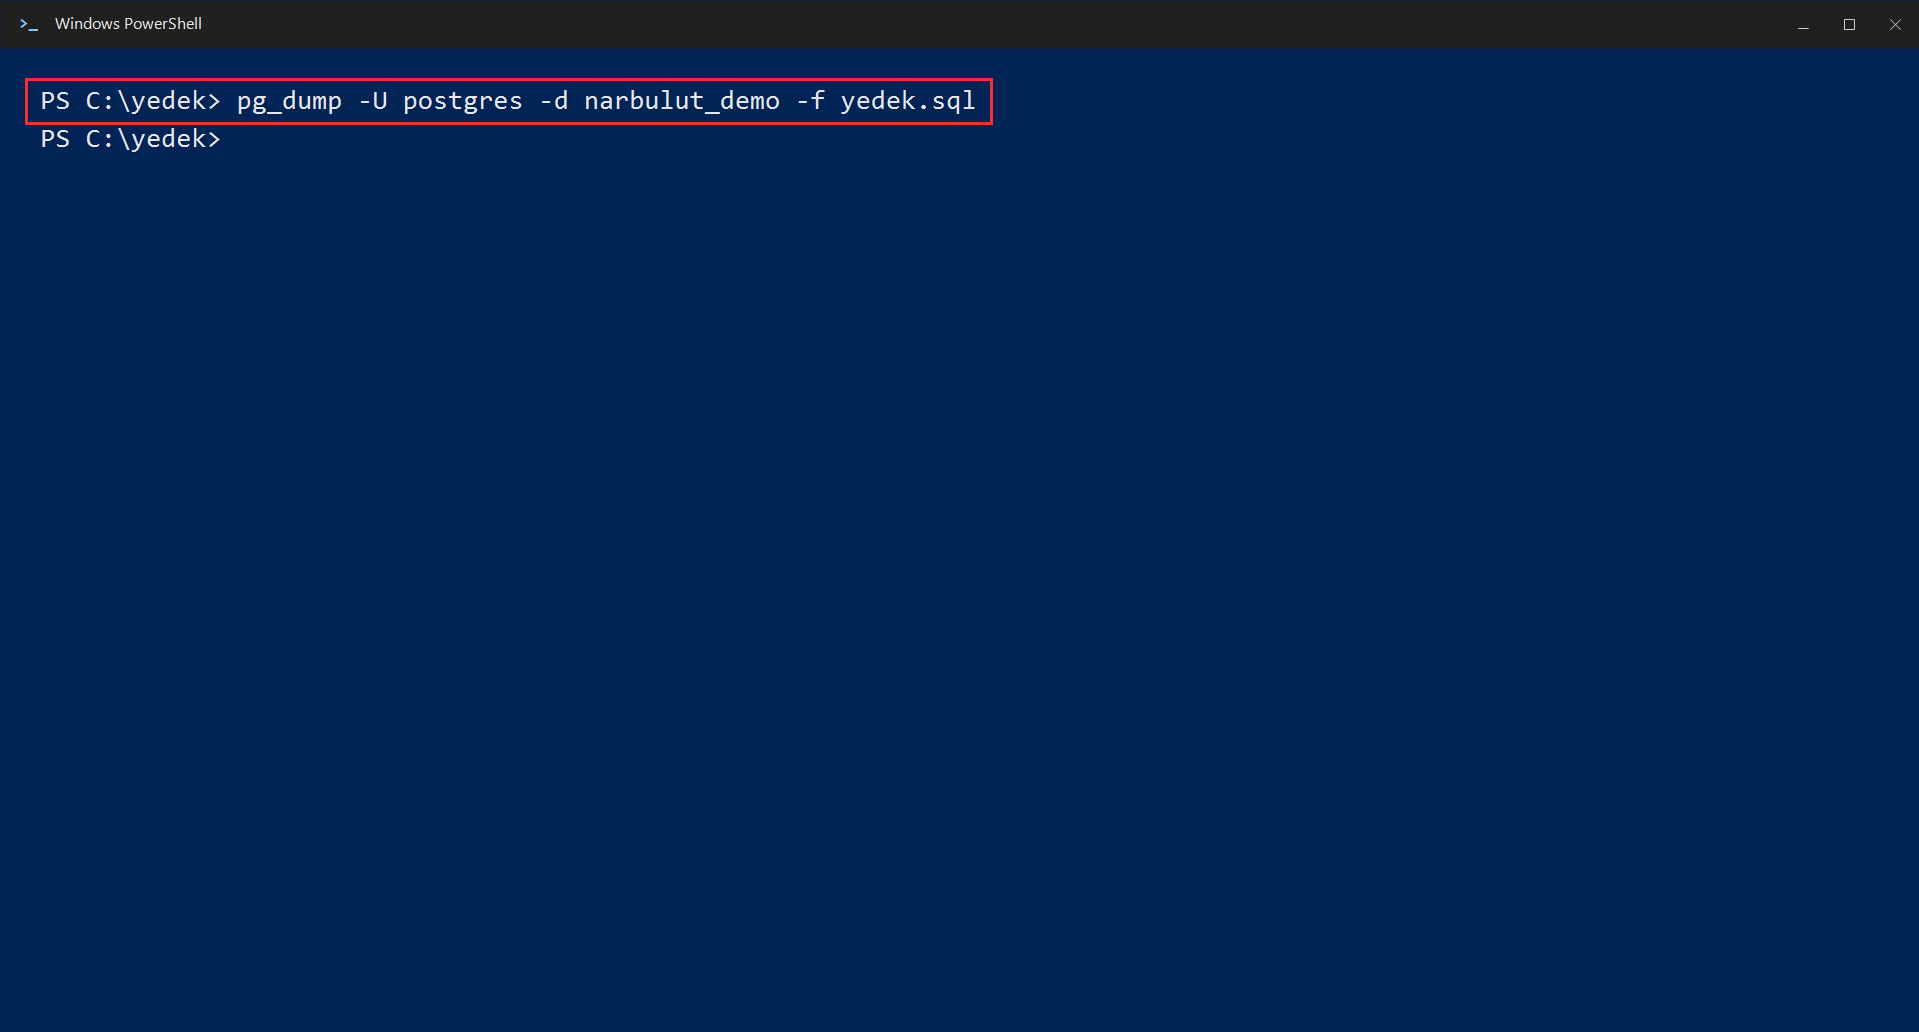
Step 2: Back up a single database
The simplest backup command is this. Replace veritabani_adi with the name of your own database:
pg_dump -U postgres -d veritabani_adi -f yedek.sqlThis command exports your database to a plain text file named yedek.sql. Inside the file are all the SQL commands needed to recreate the database from scratch.
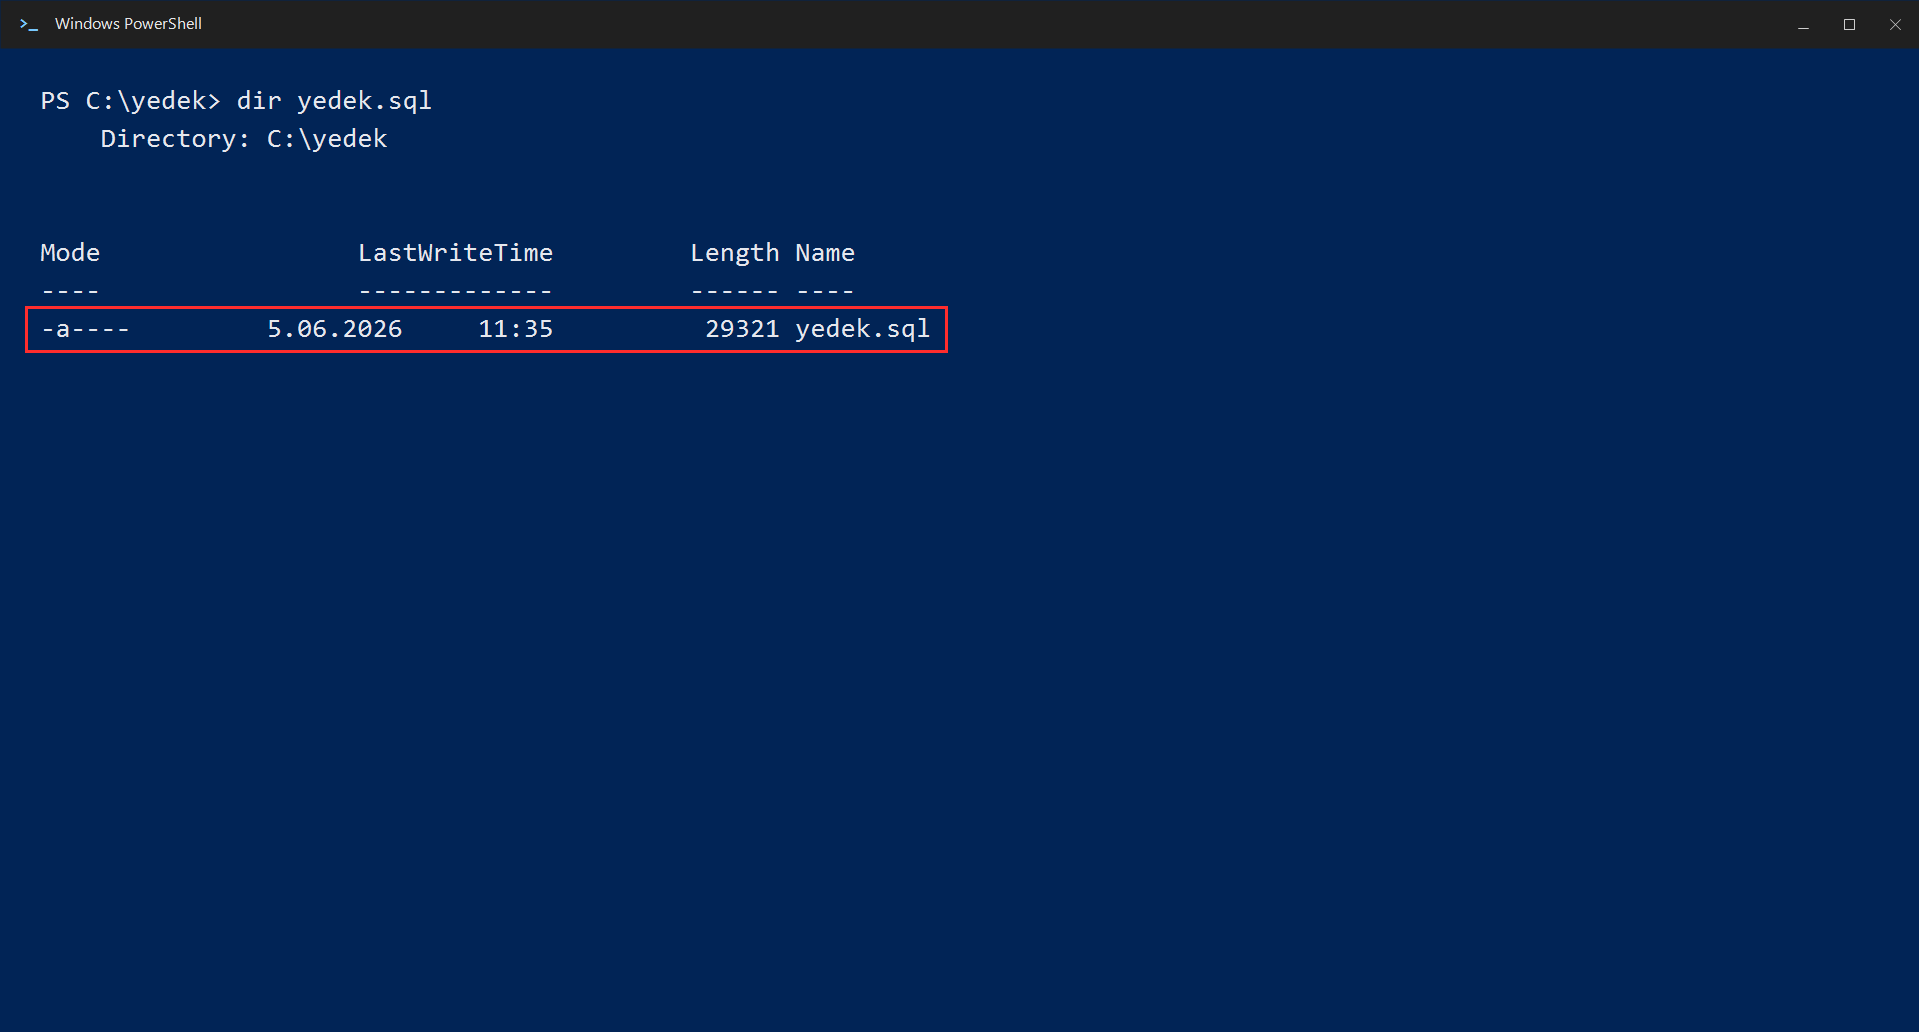
Step 3: Check the resulting backup file
After the command runs, verify that your backup file was actually created:
dir yedek.sqlMake sure the file size is not 0 — this indicates that the backup actually contains data.
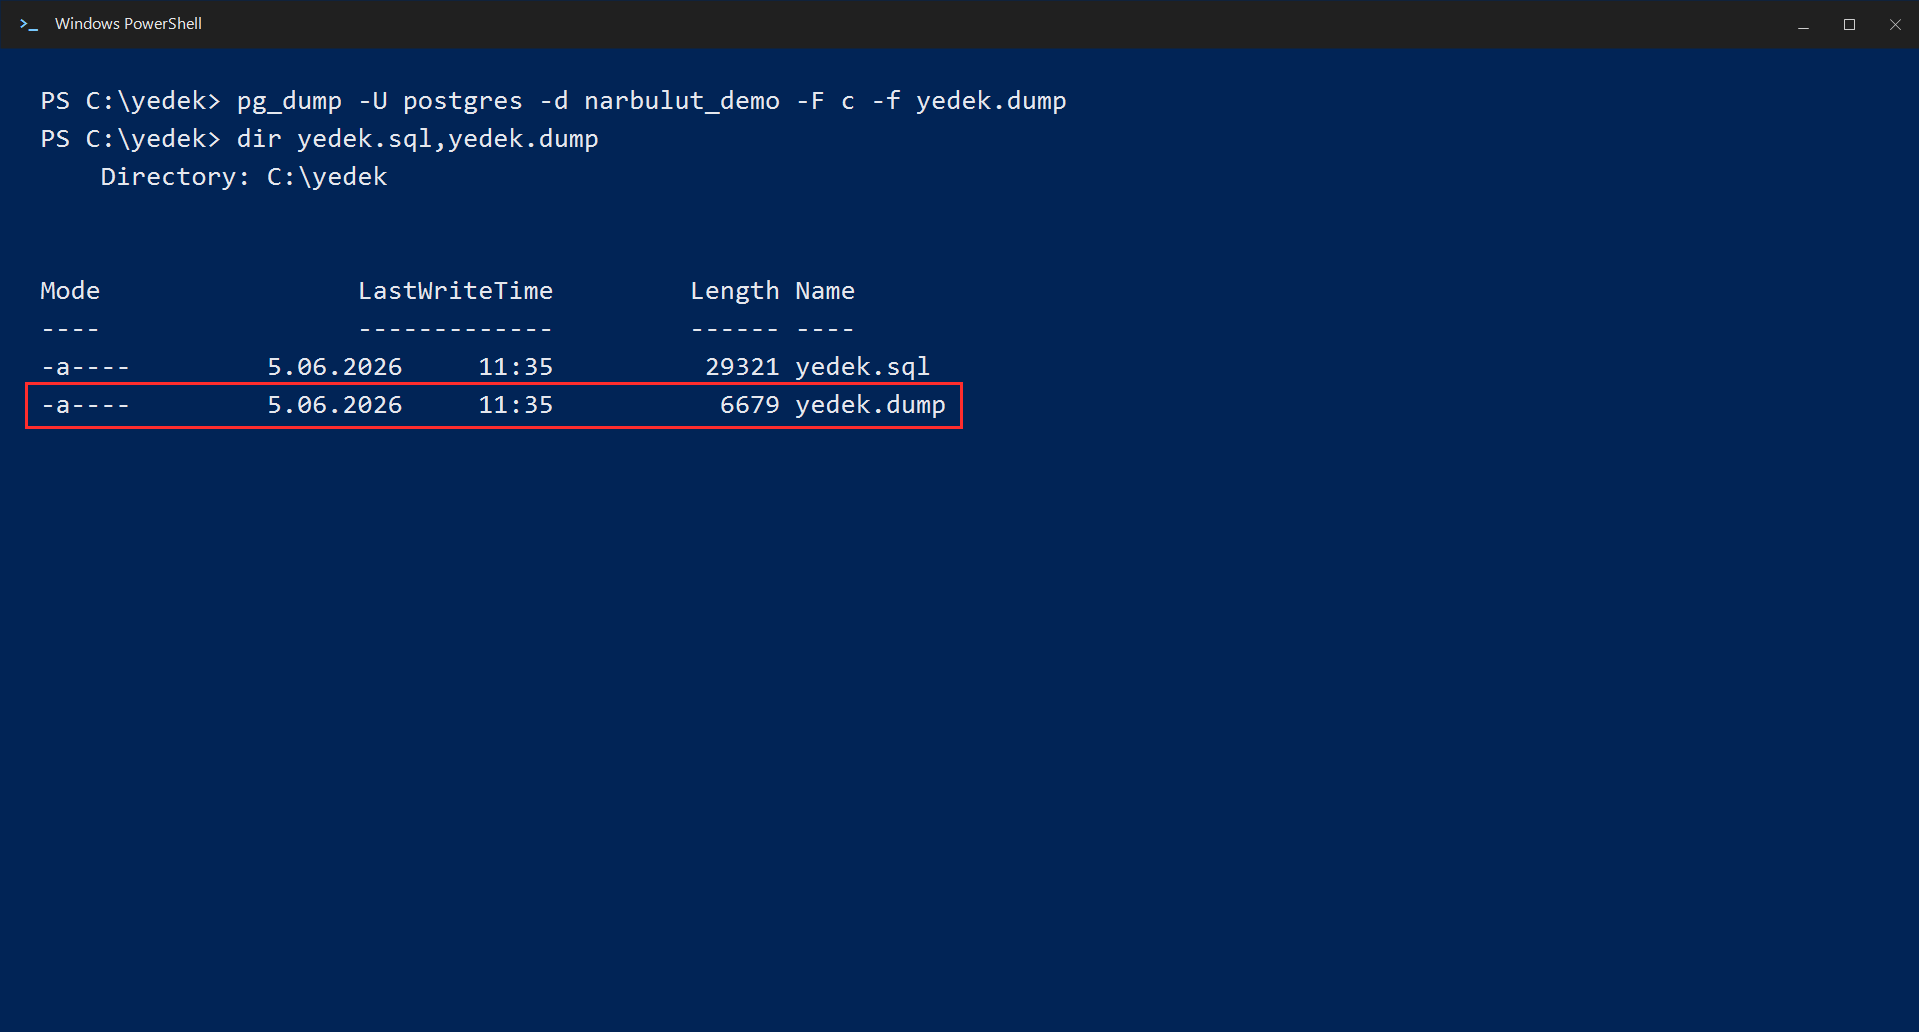
Step 4: Take a compressed “custom format” backup (Recommended)
A plain .sql file is readable but takes up a lot of space on large databases. Instead, we recommend the custom format, which is compressed and more flexible during restore:
pg_dump -U postgres -d veritabani_adi -F c -f yedek.dumpThe -F c here makes the output a custom compressed format. This format lets you restore individual tables later and perform parallel restores.
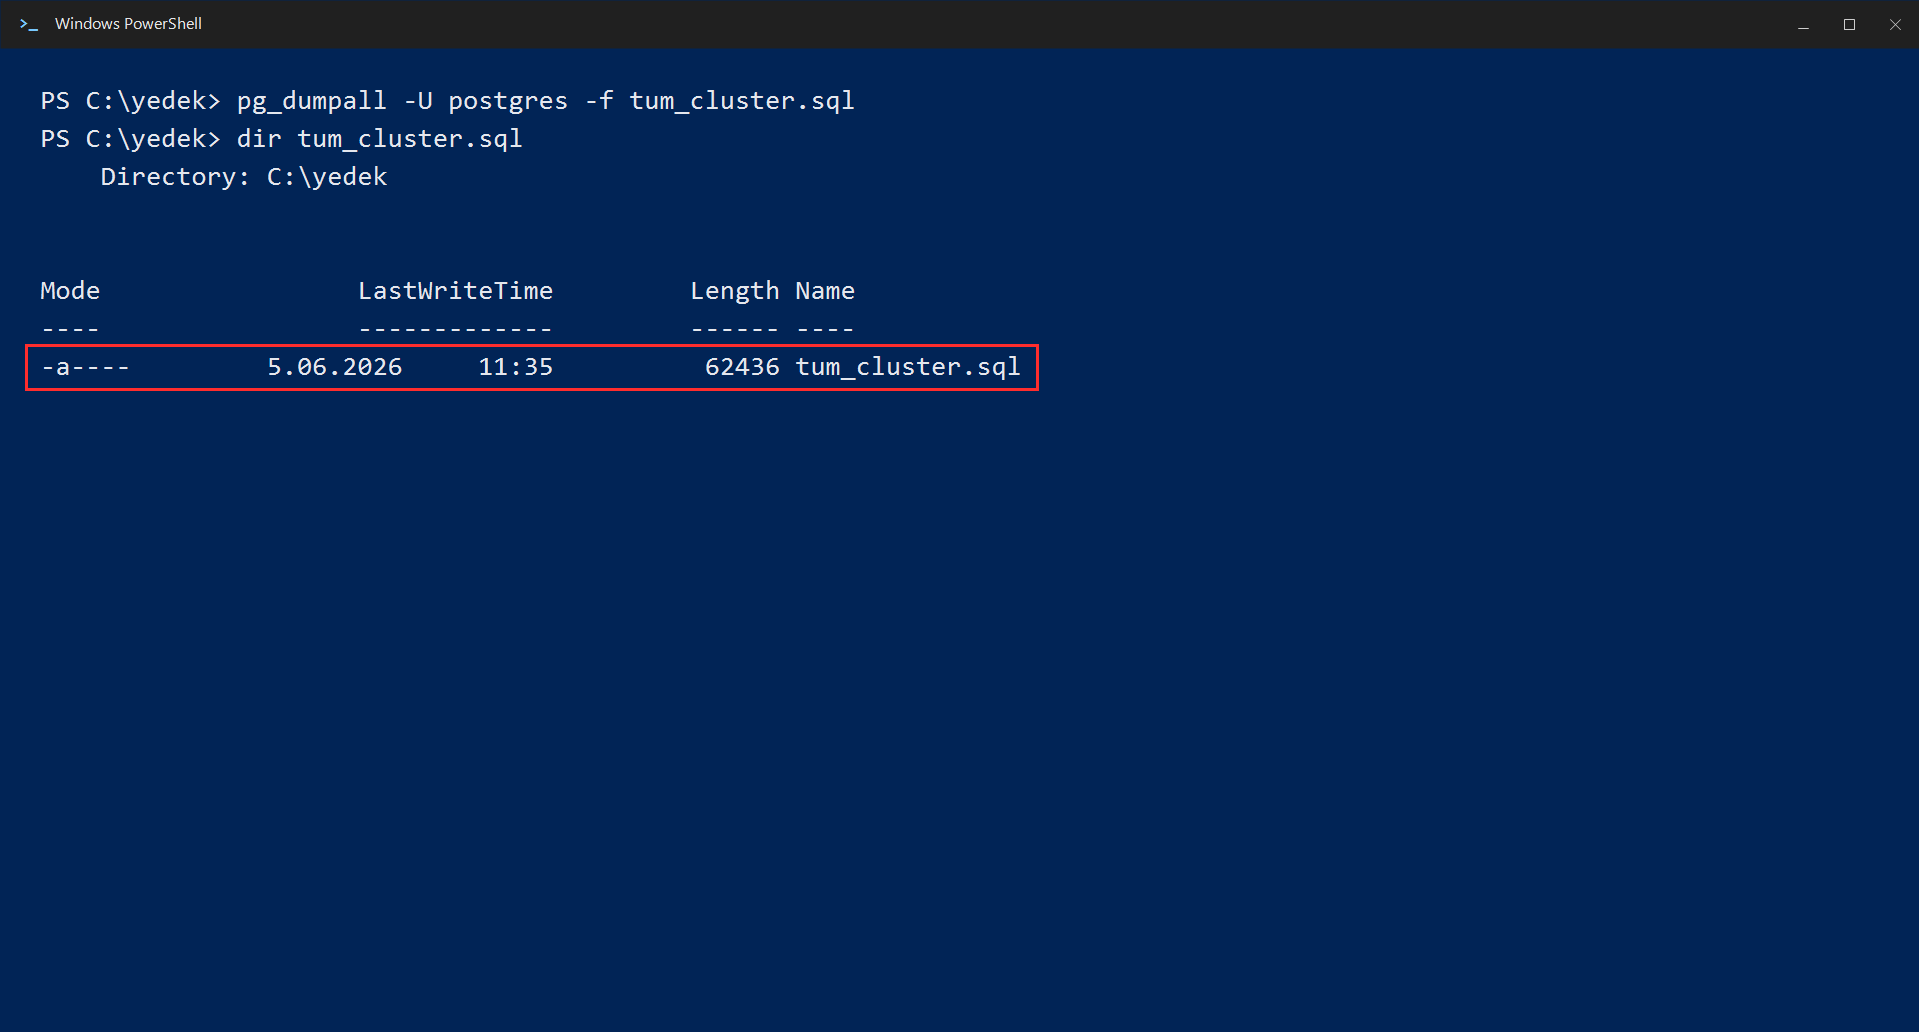
Step 5: Back up all databases at once (pg_dumpall)
If you have multiple databases on your server and want to back up all of them (including users and roles) at once, use pg_dumpall:
pg_dumpall -U postgres -f tum_cluster.sqlThis command backs up not only the databases but also the users, roles, and all server-wide settings.
Method 2: Backup from the Interface with pgAdmin
For those who would rather not deal with the command line, PostgreSQL’s official management tool pgAdmin lets you take a backup with just a few clicks.
Step 1: Right-click the database
Open pgAdmin, right-click the database you want to back up in the tree on the left, and choose Backup… from the menu that appears.

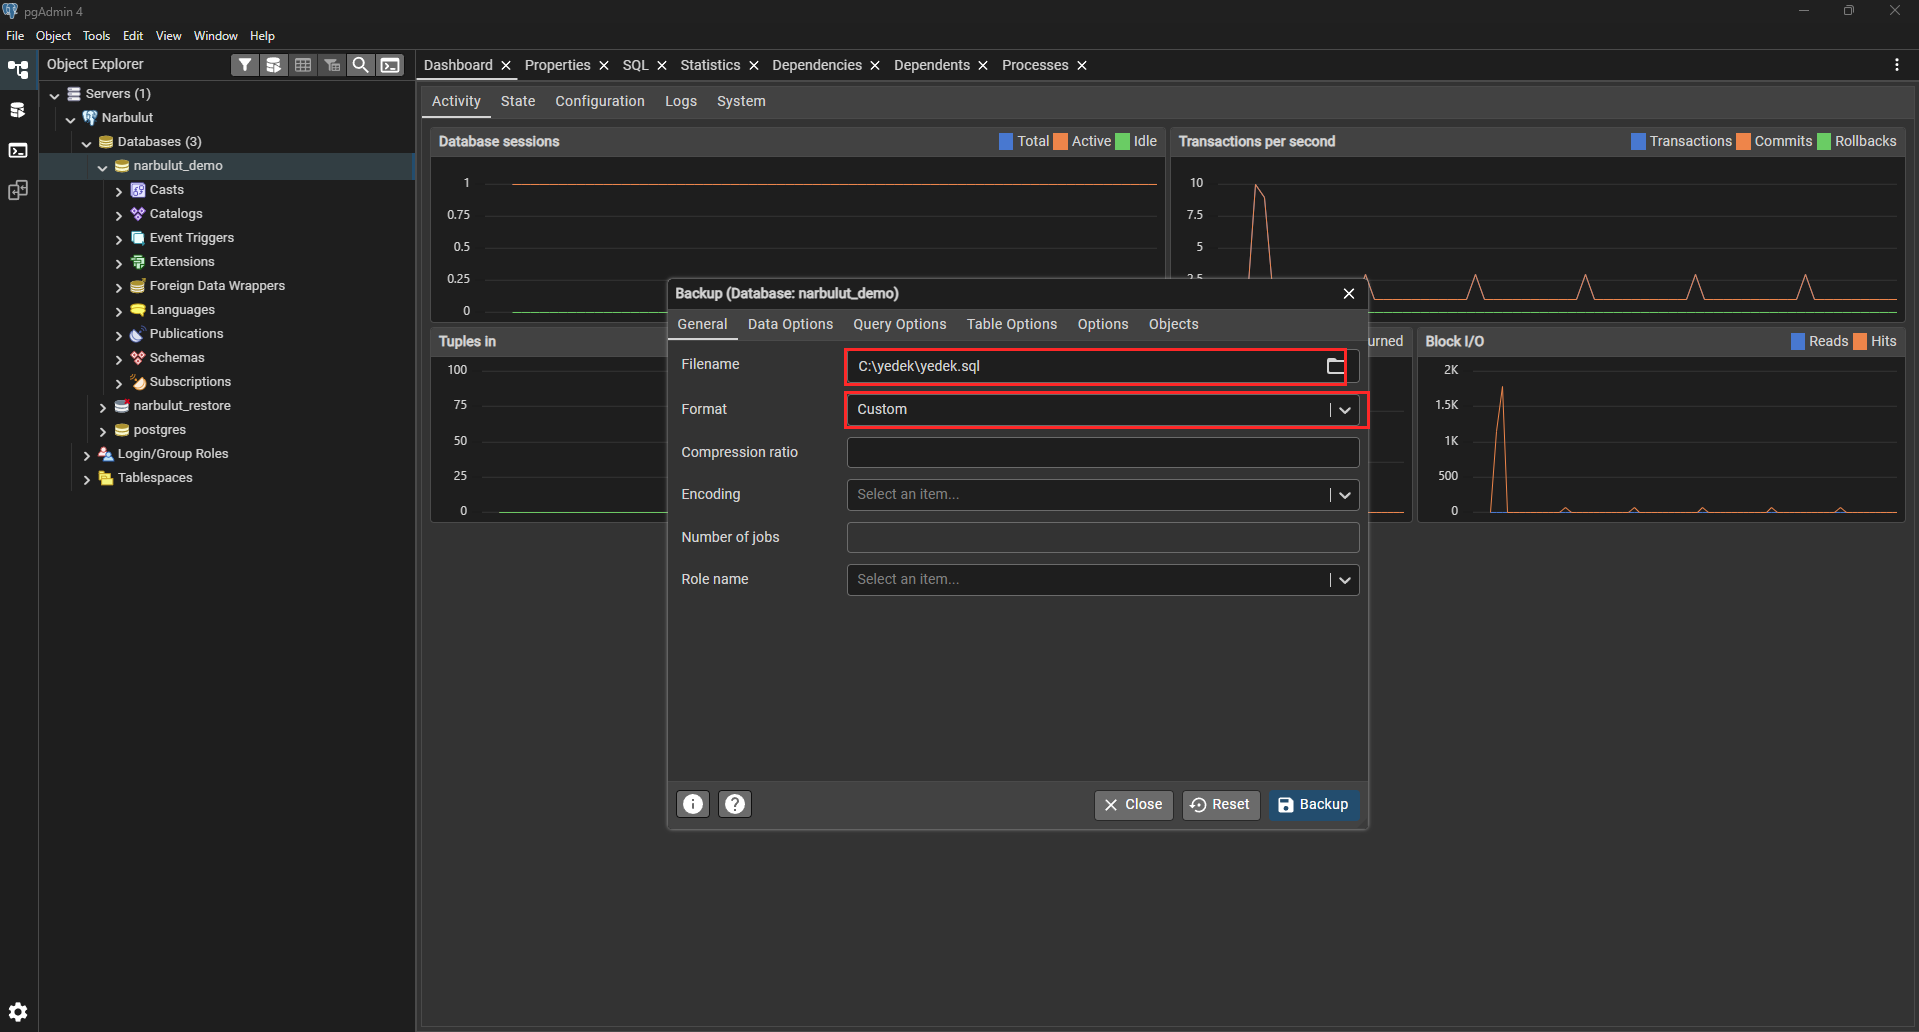
Step 2: Set the file name and format
In the window that opens, enter the location and name where the backup file will be saved. We recommend choosing Custom as the format — this is the visual equivalent of the -F c option on the command line.
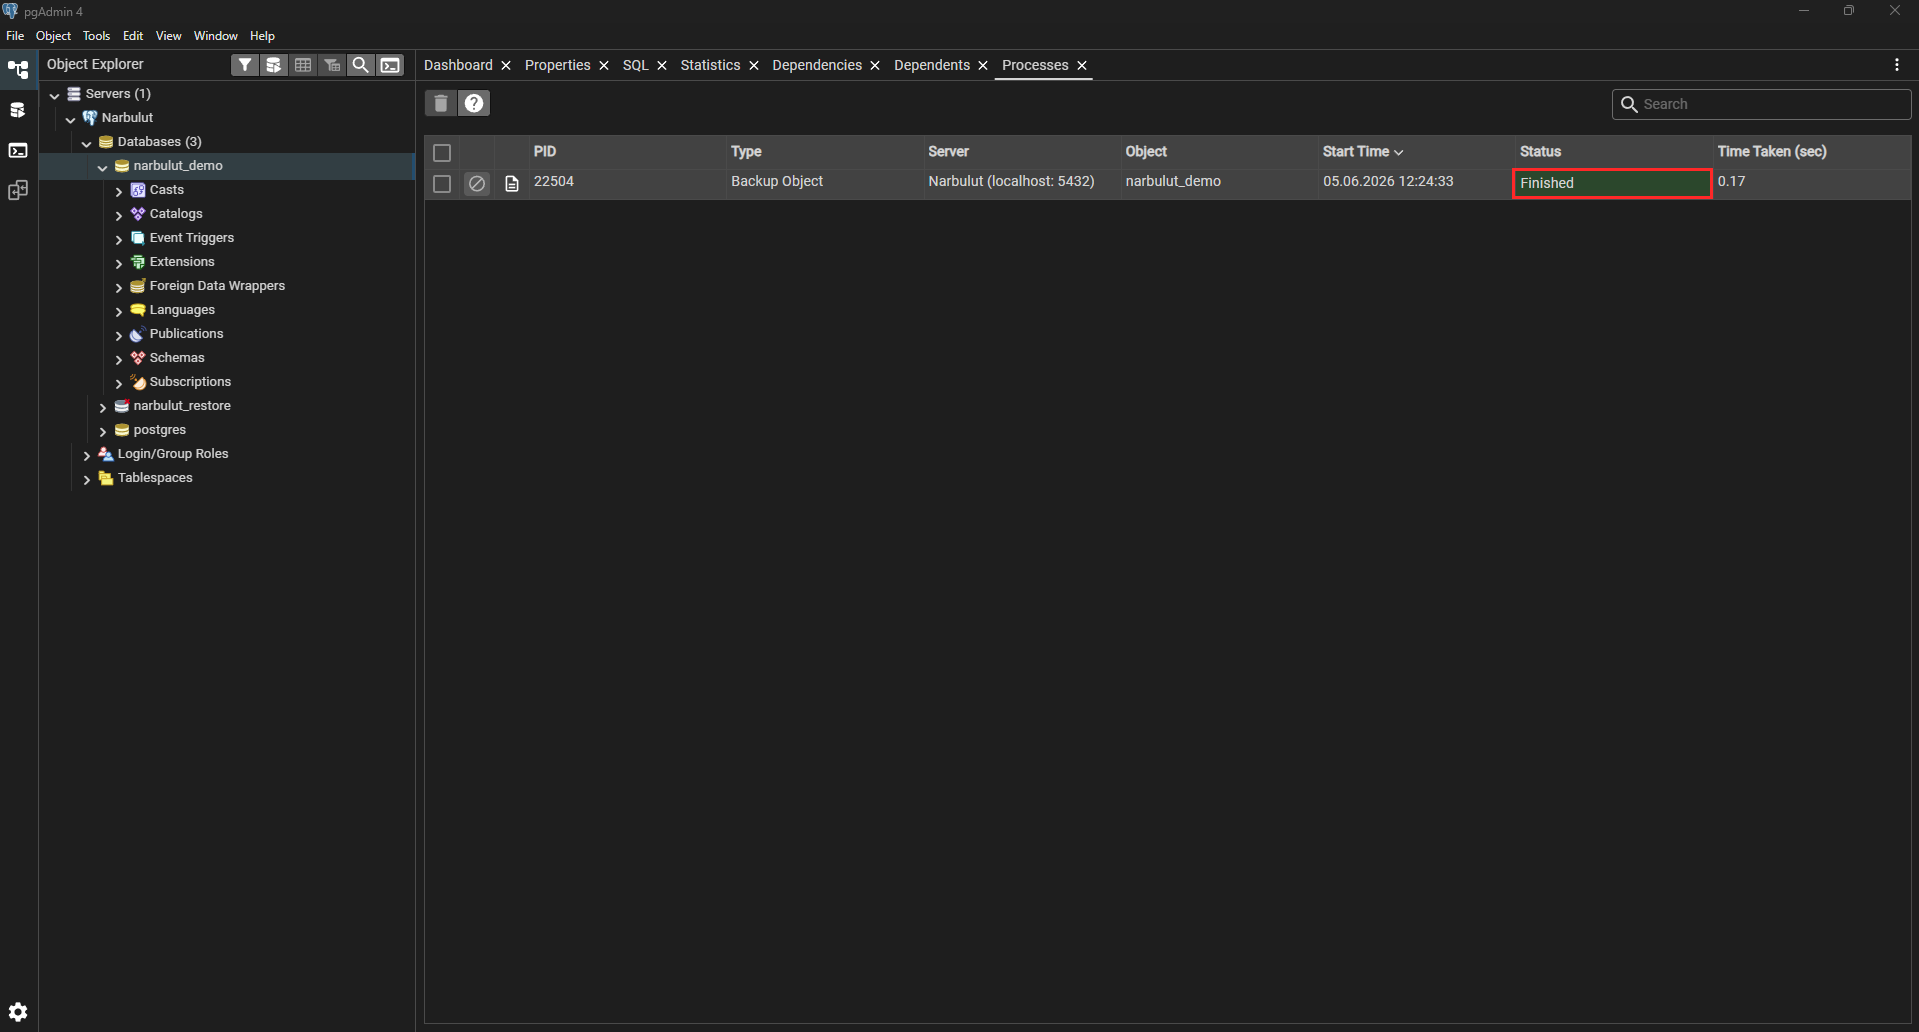
Step 3: Start the backup and see the result
When you click the Backup button, the process starts. In the bottom-right corner you’ll see a notification indicating the operation completed successfully.
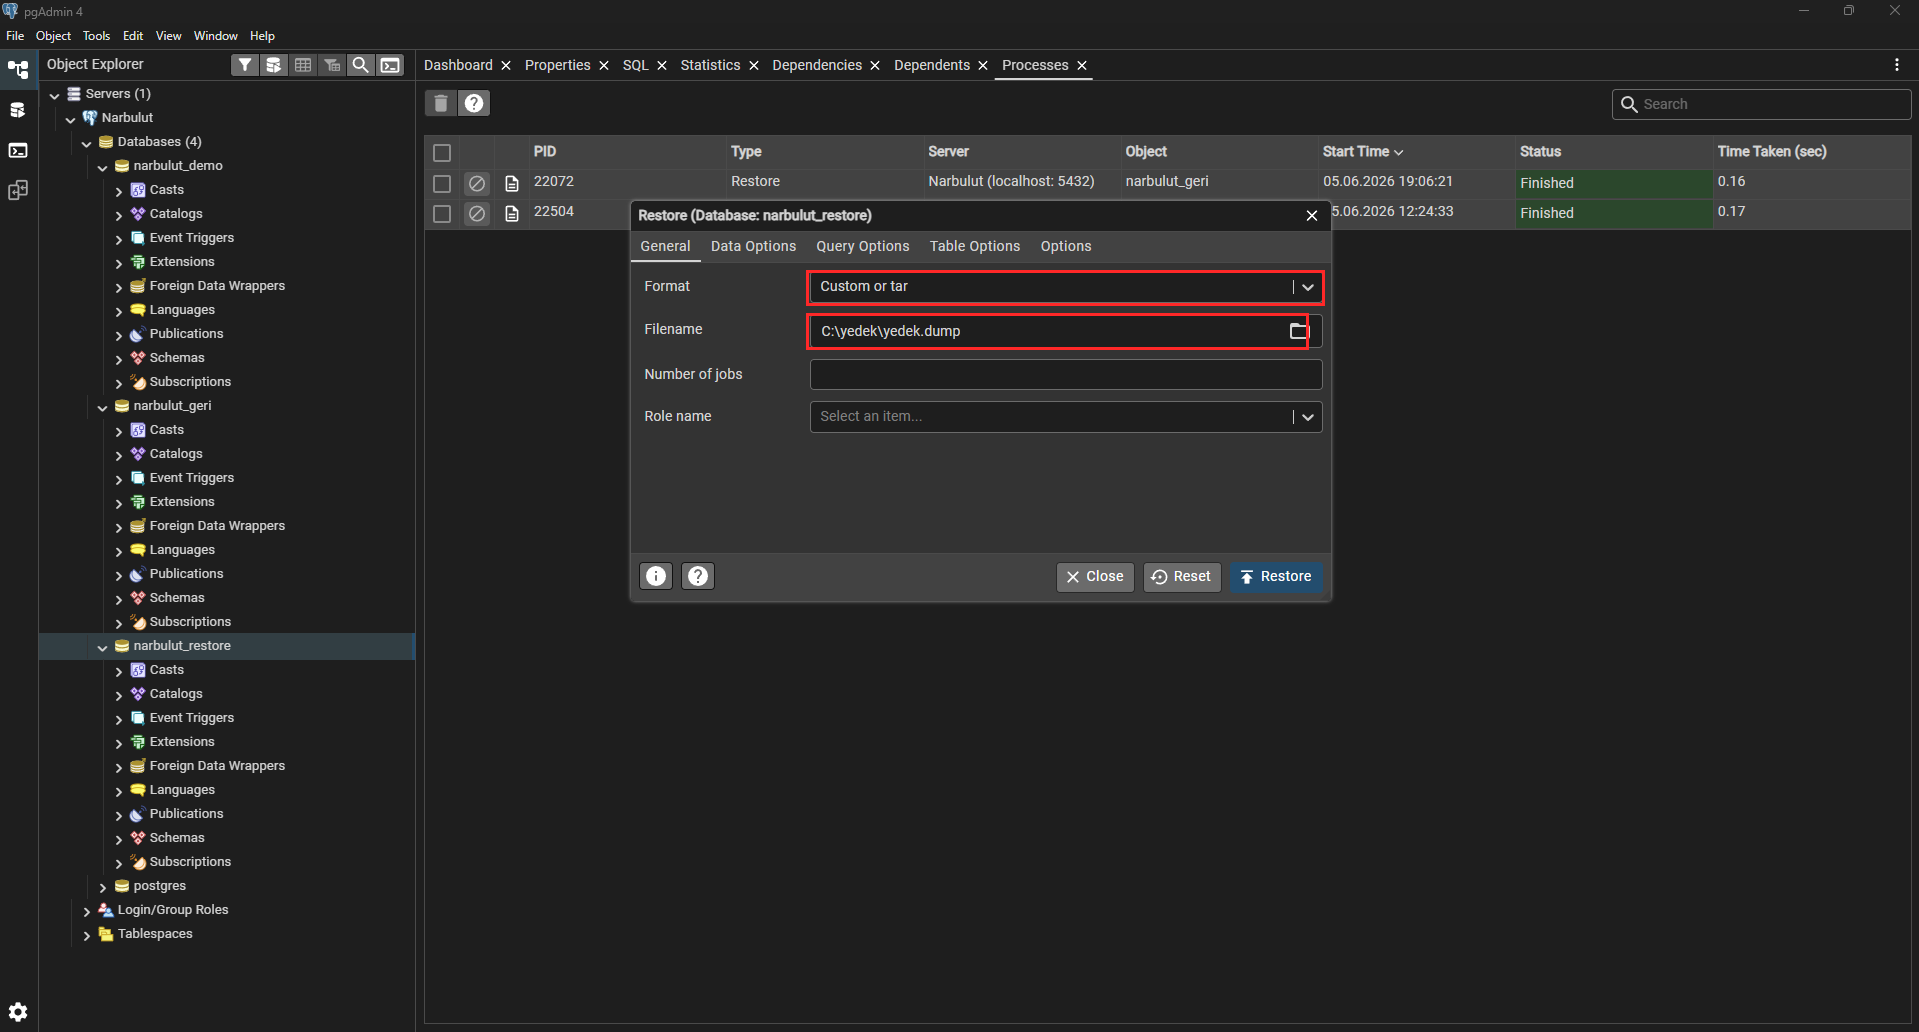
Step 4: Restoring with pgAdmin
pgAdmin doesn’t only take backups — it also lets you restore a backup from the interface. Right-click the database you want to restore into and choose Restore…. In the window that opens, set Format to Custom or tar and point the Filename field to the .dump file you took earlier. When you click the Restore button, the process starts, and you can see it completed (Finished) in the Processes tab.
Method 3: Physical Backup with pg_basebackup
For very large databases or when you need an exact copy of the entire server, pg_basebackup comes into play. This tool takes a physical copy of the database files.
pg_basebackup -U postgres -D C:\yedek\base -F t -z -PThe parts of the command mean:
-D C:\yedek\base→ the folder where the backup will be written-F t→ take the output as a single tar file-z→ compress-P→ show a progress bar
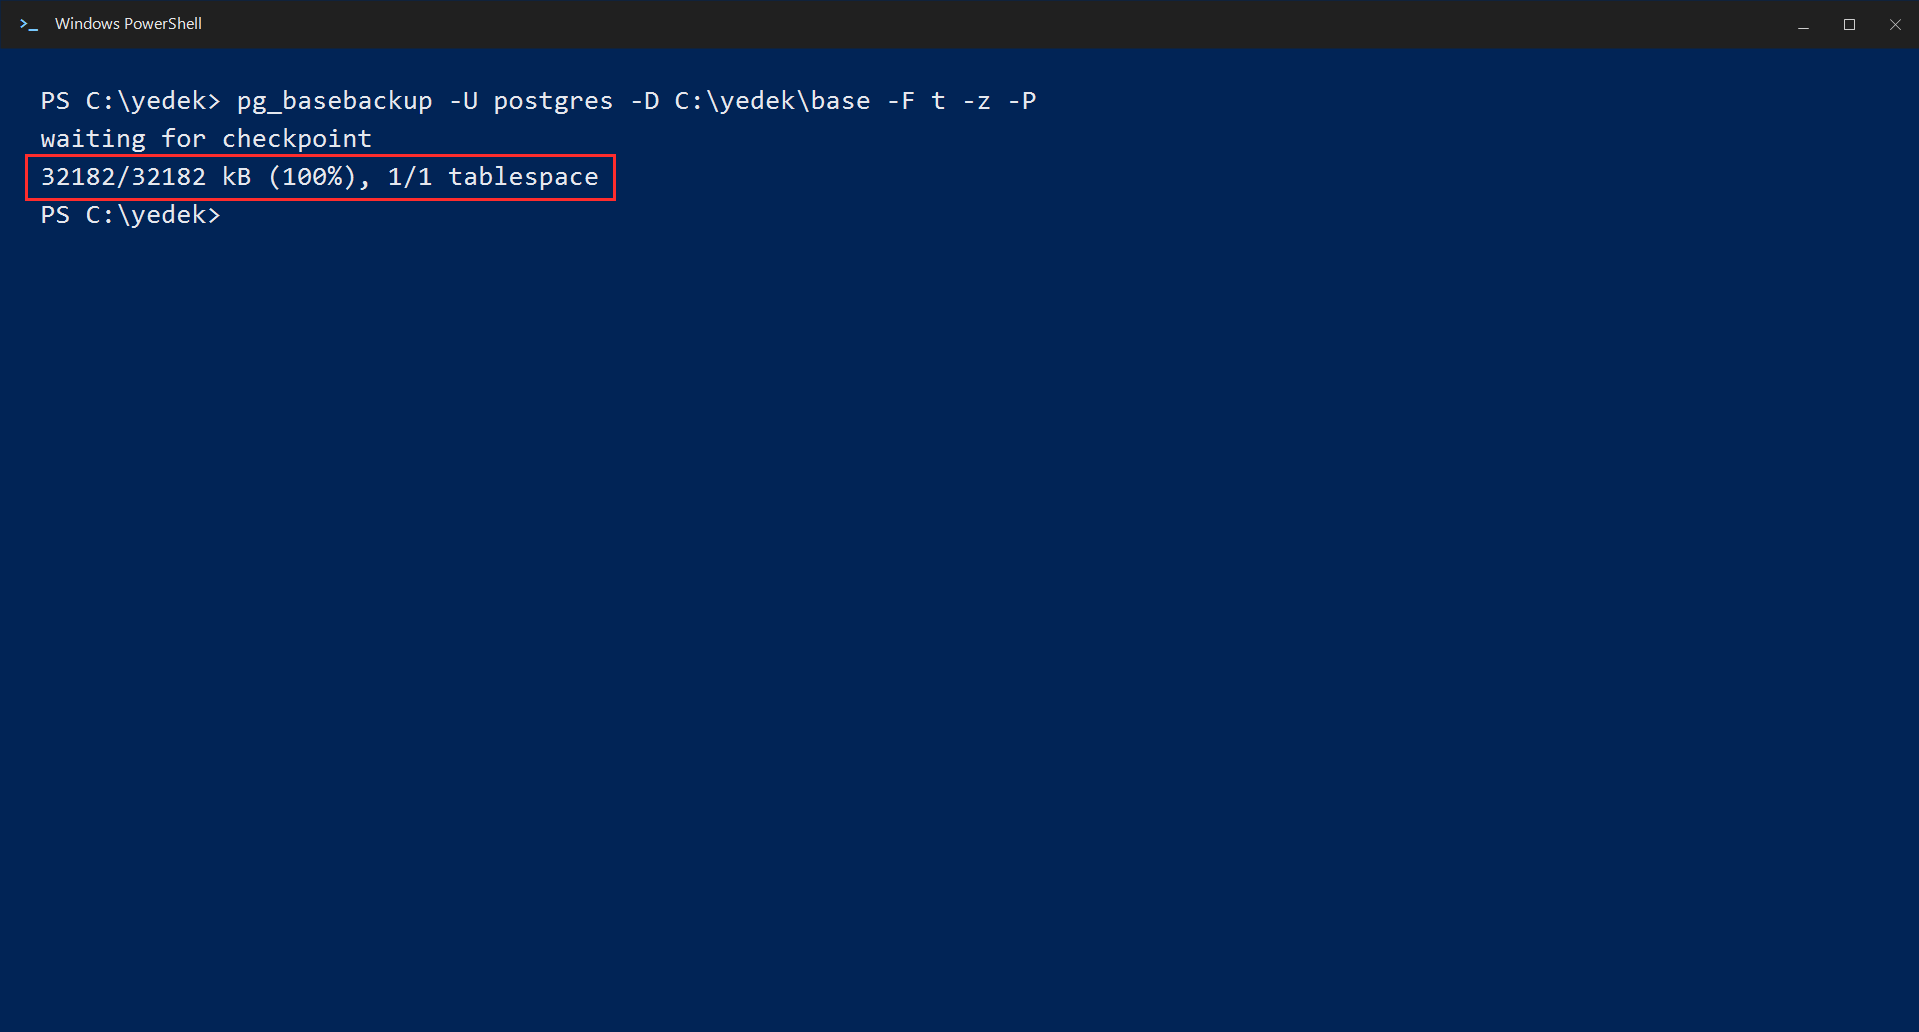
pg_basebackup always backs up the entire server (cluster); you cannot back up a single database selectively. For a single database, pg_dump is more suitable.
Continuous Archiving and PITR: Going Back in Time
In advanced scenarios, you may want to roll the database back to any moment in the past (for example, to one second before an accidental deletion). This is called PITR (Point-in-Time Recovery).
PITR works by archiving the continuously accumulating WAL (Write-Ahead Log) records together with a physical base backup. Roughly speaking, you enable WAL archiving in the postgresql.conf file:
wal_level = replica
archive_mode = on
archive_command = 'copy "%p" "C:\yedek\wal_arsivi\%f"'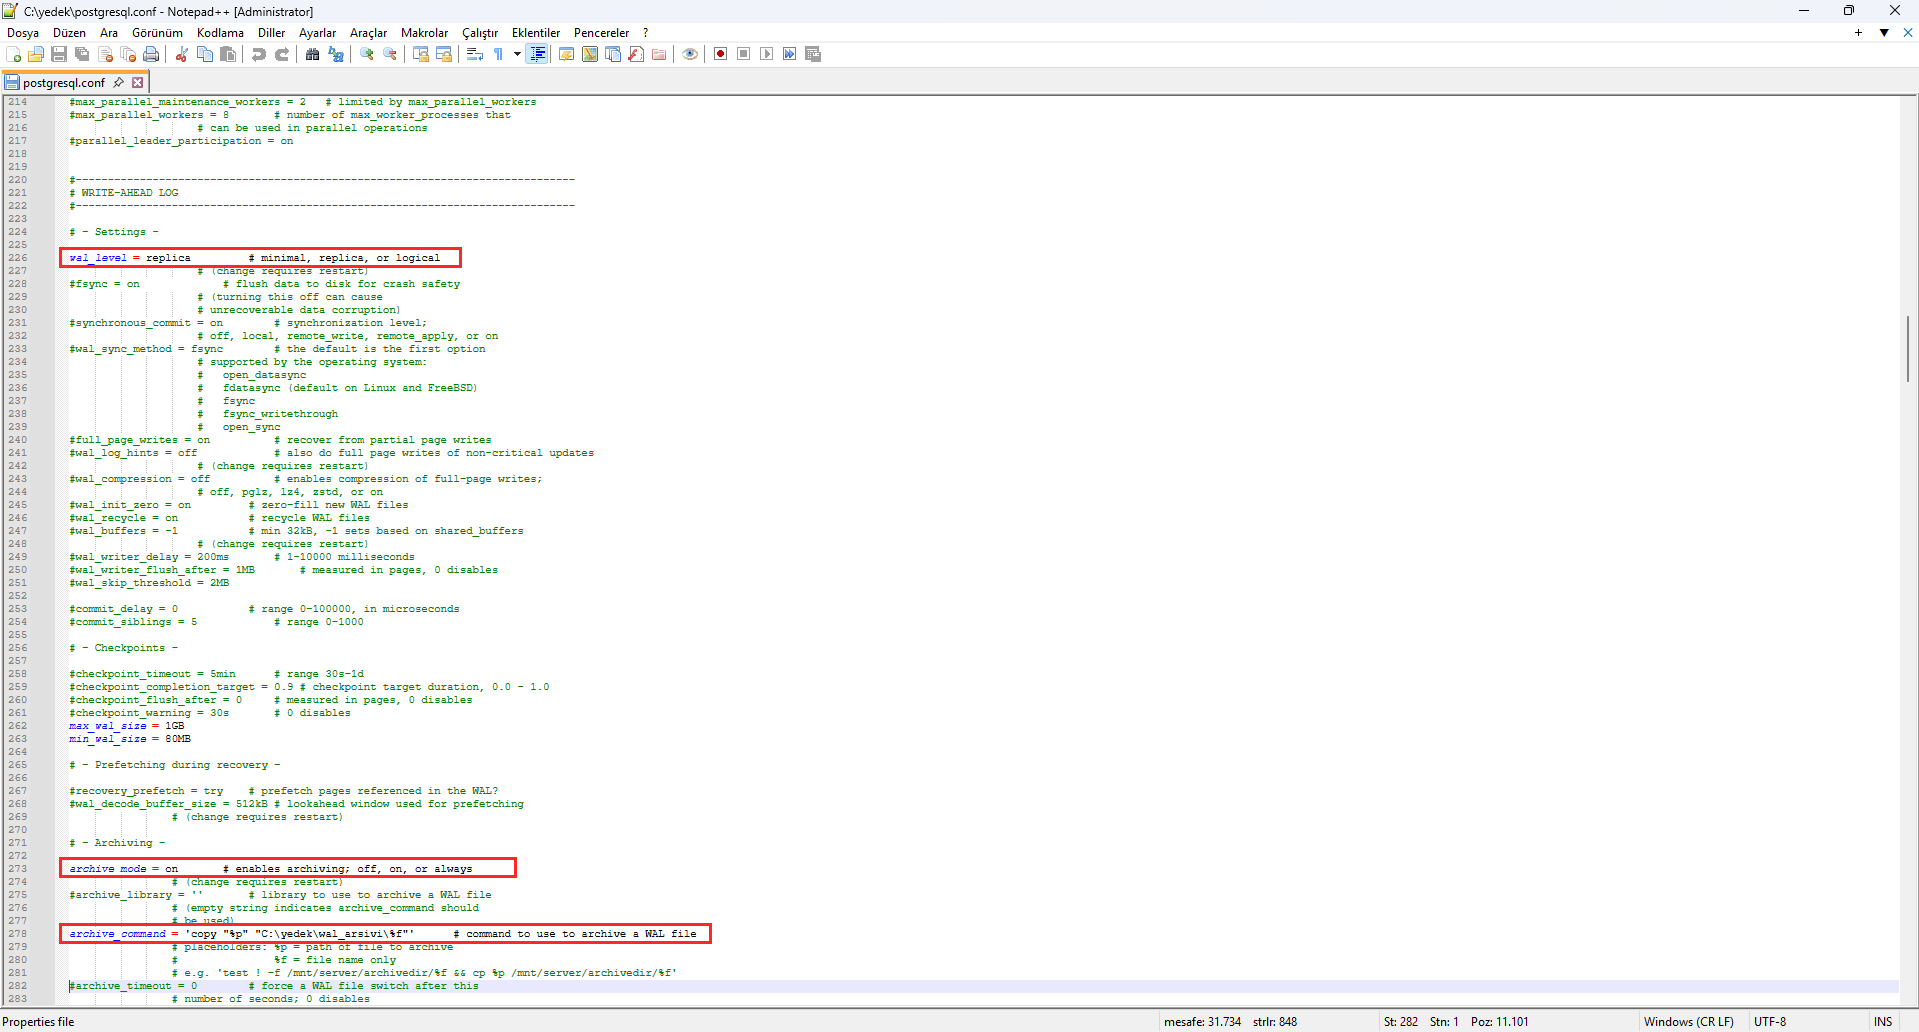
This method is critical for production environments aiming for zero data loss. Since it is more complex to set up, for small and medium-sized needs we recommend starting with pg_dump first.
The Most Important Step: Restoring a Backup
You only really find out whether a backup works when you restore it. Here’s how to restore your backups.
Restoring a custom format (.dump) backup
# First create the empty target database
psql -U postgres -c "CREATE DATABASE yeni_veritabani;"

pg_restore -U postgres -d yeni_veritabani yedek.dump
Restoring a plain SQL (.sql) backup
psql -U postgres -d yeni_veritabani -f yedek.sqlVerify the restore
After the restore finishes, confirm with a query that the data actually arrived:
psql -U postgres -d yeni_veritabani -c "SELECT count(*) FROM tablo_adi;"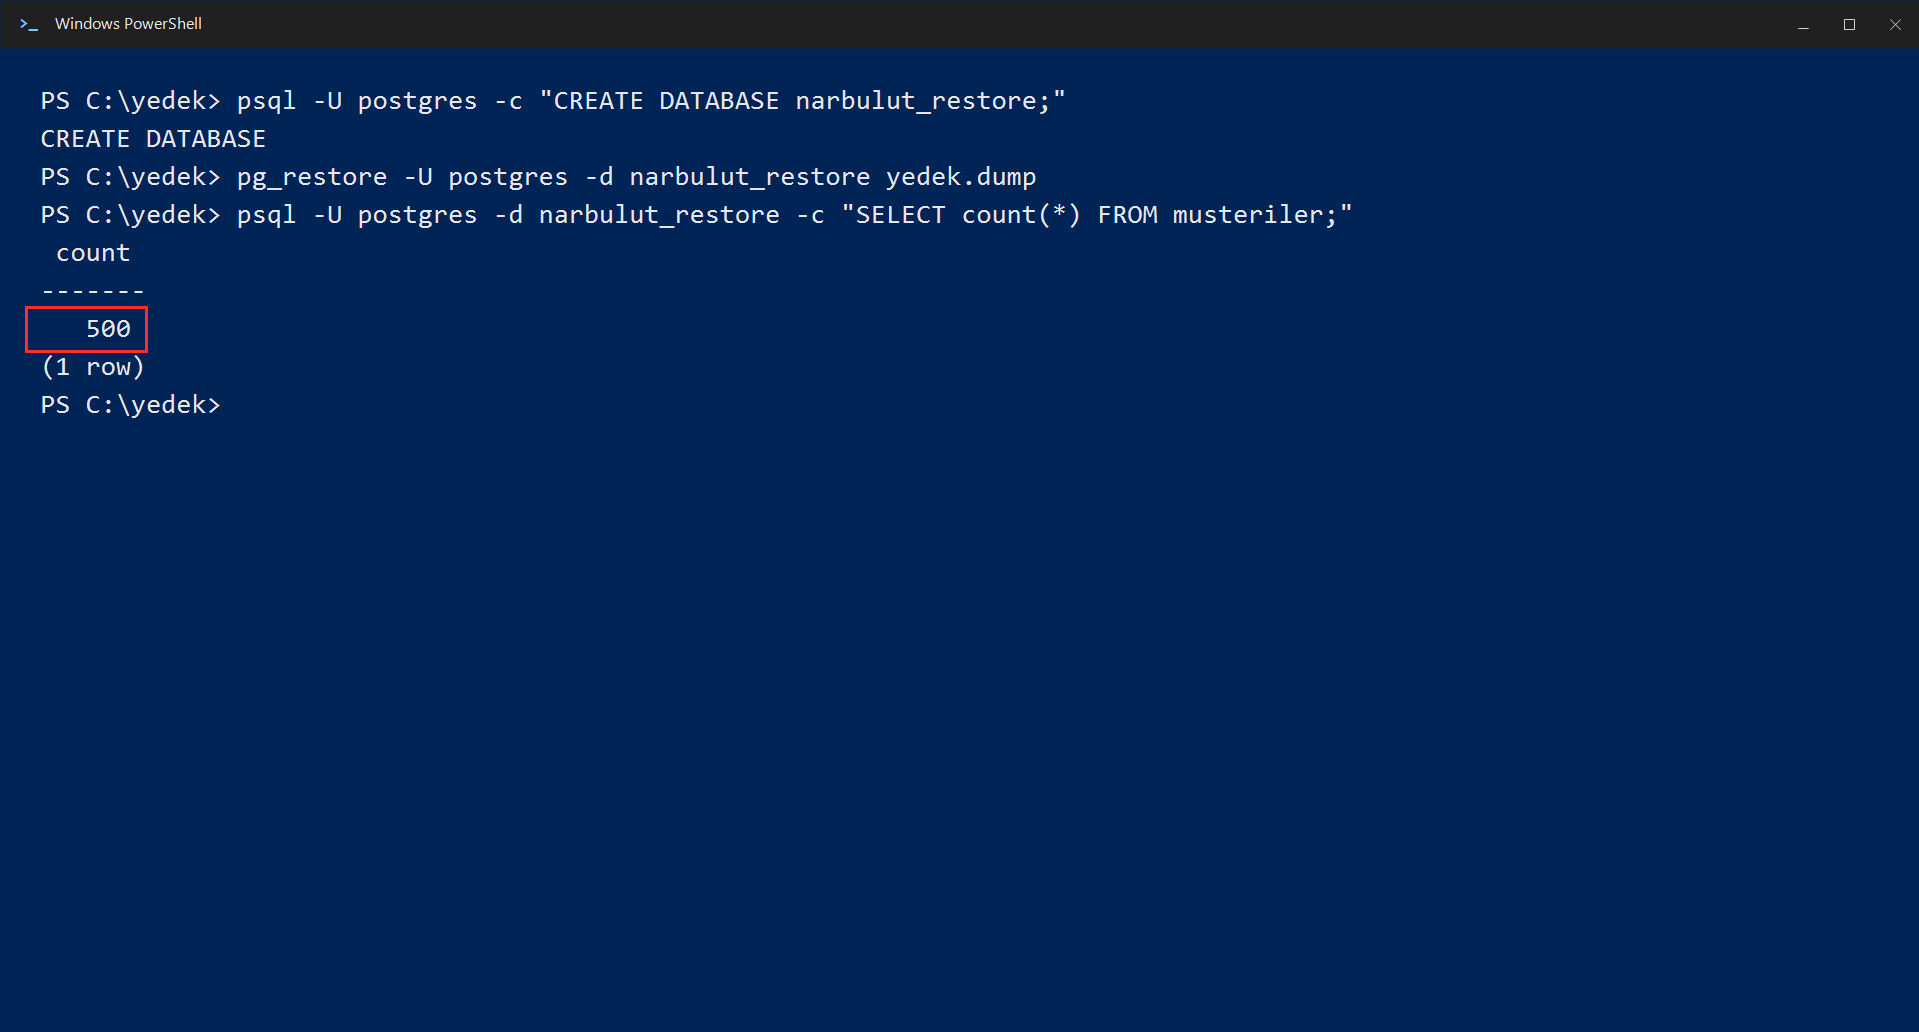
We strongly recommend repeating this step regularly. A backup that doesn’t work is no different from having no backup at all.
Automate Your Backups
Taking backups manually is very prone to being forgotten. The healthiest approach is to tie the backup to a scheduled task.
Windows (Task Scheduler): First create a batch file named C:\yedek\yedek-al.bat and write the backup command inside it:
pg_dump -U postgres -d veritabani_adi -F c -f C:\yedek\gunluk.dumpThen register this file in Task Scheduler to run every day at 02:00:
schtasks /create /tn "NarbulutGunlukYedek" /tr "C:\yedek\yedek-al.bat" /sc daily /st 02:00 /f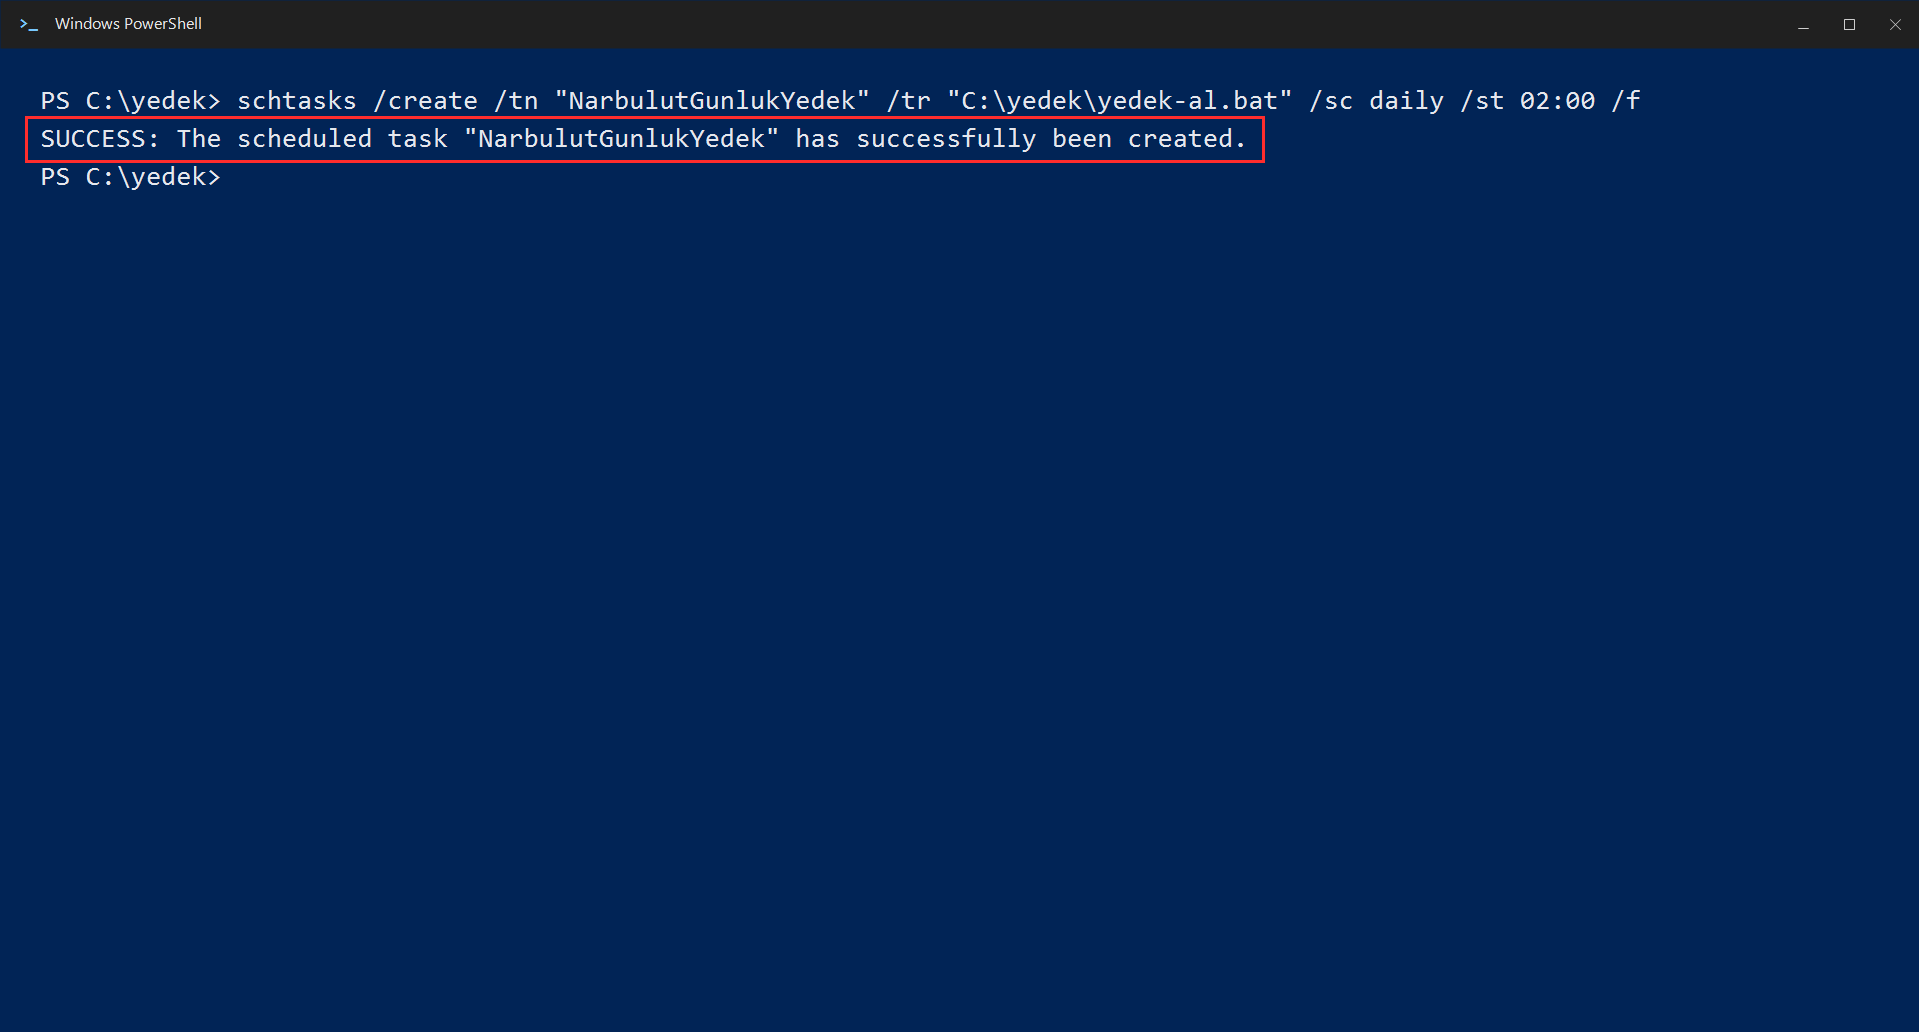
A Quick Look at Third-Party Tools
PostgreSQL’s own tools meet most needs. In very large-scale, multi-server enterprise environments, third-party tools (such as Barman, WAL-G, and pgBackRest) that offer parallel processing, automatic retention policies, and cloud integration may be preferred.
In any case, the right starting point is not choosing a tool, but a solid strategy built on RPO/RTO and the 3-2-1 rule.
Best Practices for Proper Backup
- Encrypt: Backup files contain your entire database. Always encrypt them, especially when storing in the cloud.
- Monitor: Set up monitoring/alerting that notifies you when a backup fails. A failed backup that goes unnoticed for weeks is the worst-case scenario.
- Store off-site: Keep at least one copy in a location different from where your server is (the cloud).
- Test regularly: Add restore drills to your calendar.
- Follow the 3-2-1 rule: 3 copies, 2 media, 1 off-site.
Move Your PostgreSQL Backups to the Cloud
To keep the “off-site” copy of the 3-2-1 rule automatically, encrypted, and PDPL-compliant, you can move your PostgreSQL databases to Narbulut‘s cloud backup infrastructure.
Explore the PostgreSQL Backup Solution