
- Company
-
Products
Products
New ProductCloud Server
Fully managed virtual server infrastructure. Setup in minutes, hourly billing and 24/7 expert support so you can focus on your business.
Try Now -
Solutions
Backup & Security
Data SecurityRansomware & encryptionCloud BackupSecure backup to data centersImage BackupFull disk image + fast recoveryOff-Site BackupOff-site disaster recoveryMobile BackupiOS & Android photos/contactsRansomware ProtectionAgainst ransomware attacksTwo-Factor Auth2FA account security - Plans
- Resources
- Partners
- Blog
How to Back Up Windows 11?
The most valuable thing on your computer is not the hardware — it is the data inside it. The operating system can crash, a disk can fail without warning, ransomware can encrypt all your files, or you might accidentally delete an important folder. All of these scenarios share a single solution: regular backups.
Windows 11 offers several different tools to back up the operating system and your data. However, each of these tools serves a different need; which one you choose depends on “what you want to recover.” In this guide, we cover Windows 11’s built-in backup methods step by step, with screenshots.
Decide First: What Do You Want to Back Up?
Before understanding Windows backup methods, you need to distinguish two basic concepts:
- File-level backup: Protects only your personal files (documents, photos, videos, etc.). It does not cover the operating system or installed programs. If you want to recover individual files, this method is ideal.
- Full system image: Takes an exact copy of the disk. It includes everything — the operating system, all installed programs, settings and files. It is used when you want to restore your computer to exactly the state it was in when the image was taken.
In short: Are you protecting only your documents, or do you want to be able to bring the entire system back to life in a disaster? The ideal approach is to use both together.
Method 1: Creating a Full System Image
A system image is the most comprehensive built-in backup method Windows 11 offers. It takes a full copy of the entire disk, including the operating system. Although Microsoft now classifies this feature as “legacy,” it is still available in Windows 11 and works without issues.
The biggest advantage of this method is that after a disk failure or operating system crash, you can restore the computer to its previous state instead of setting it up from scratch. Its most important limitation is this: from a system image you can only restore the entire system; you cannot pull a single file out of it.
Steps
- Open Control Panel (you can find it by typing “Control Panel” in the Start menu).
- Go to System and Security > File History.
- Click the System Image Backup option in the bottom-left corner of the window that opens.
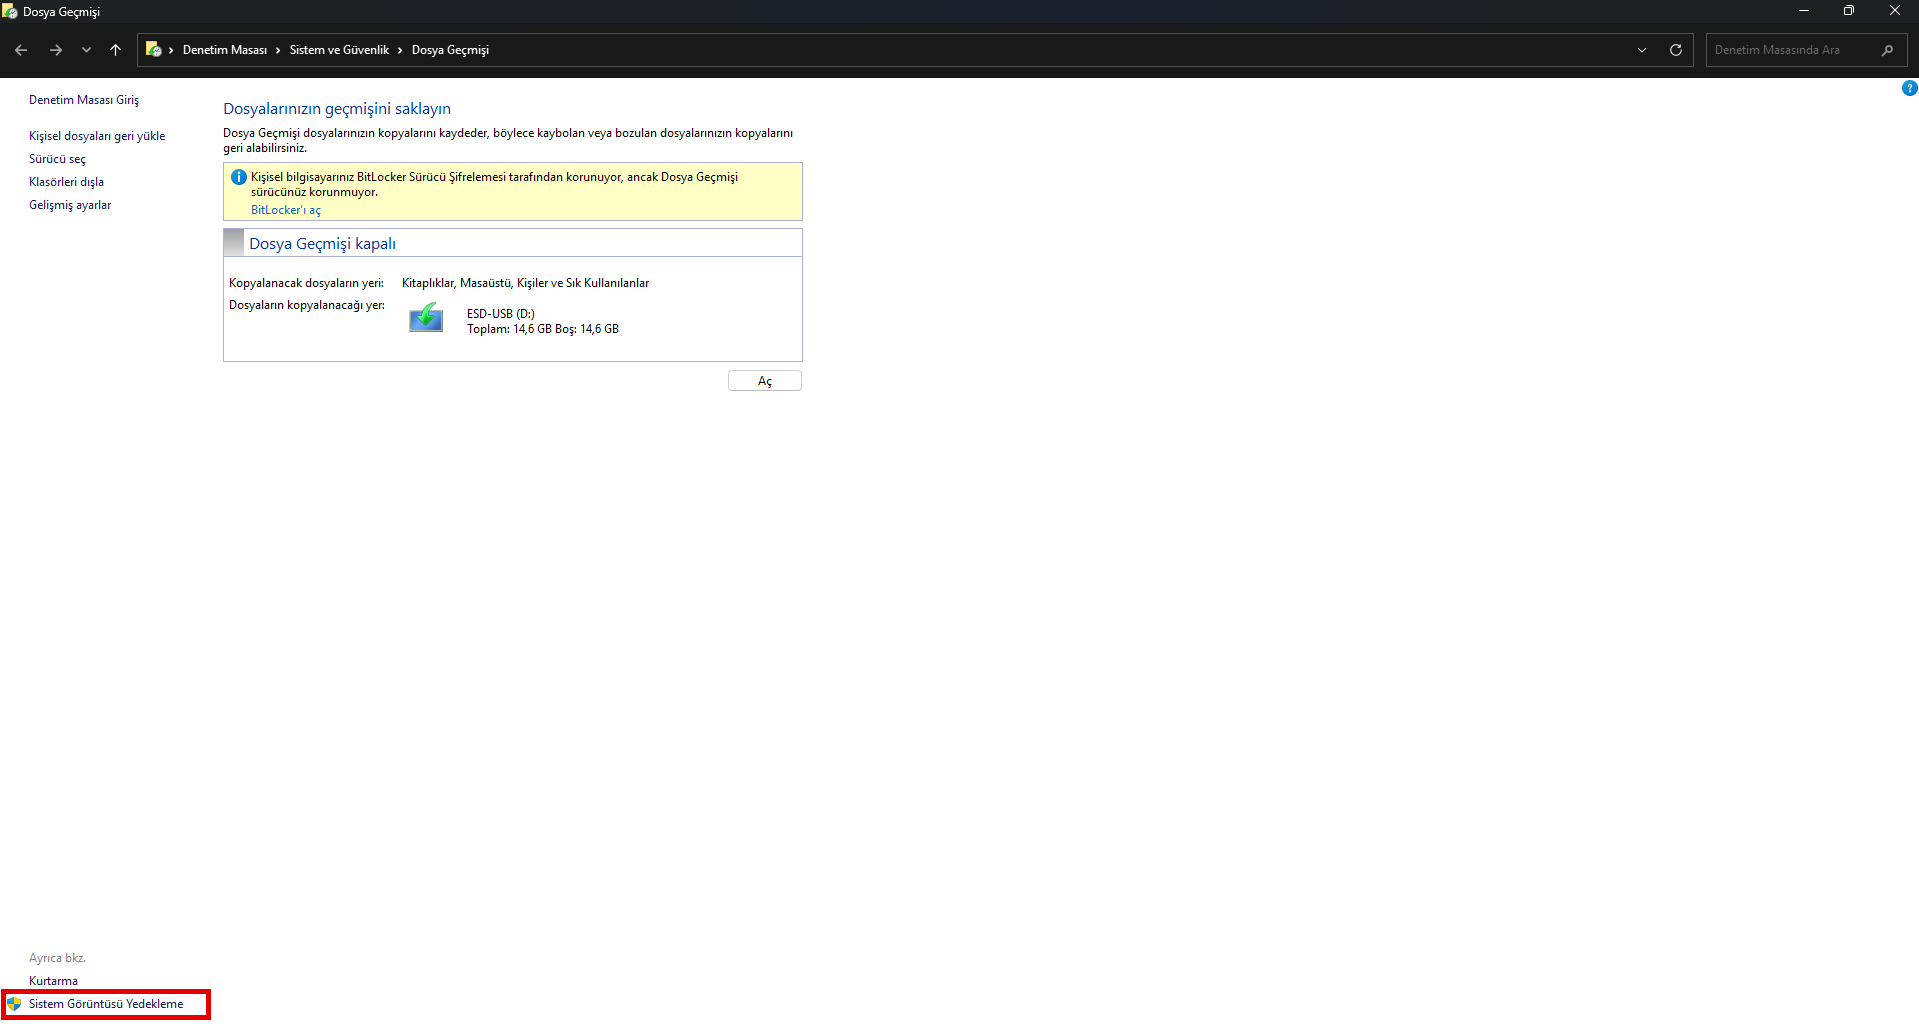
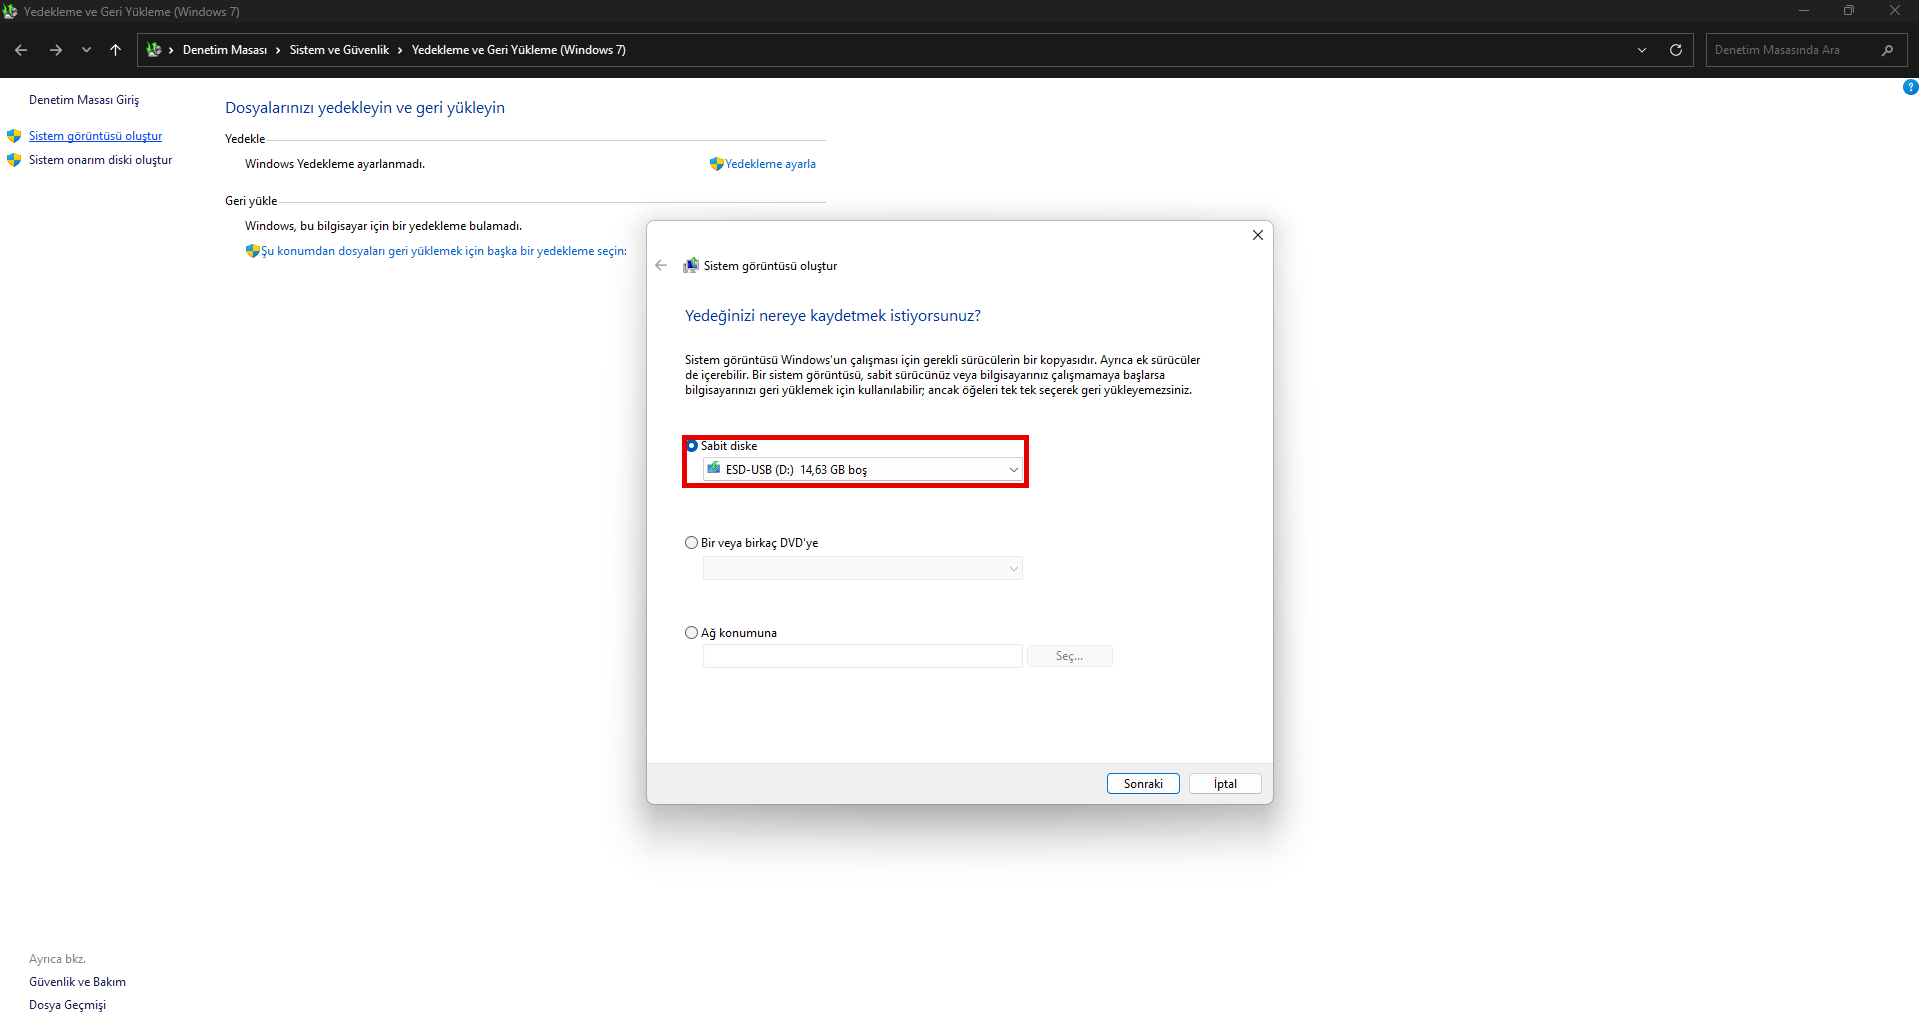
File History screen — the “System Image Backup” link in the bottom-left corner - Click Create a system image in the left menu. A window will appear asking where you want to save the backup: a hard disk, one or more DVDs, or a network location.
- Make your choice and click Next. For security, it is important to keep the backup on a physically different drive (for example, an external disk) than the one you are backing up.
Choosing where to save the system image: hard disk, DVD or network location - Confirm which drives will be backed up. The C drive where the operating system resides and the system partitions are selected automatically.
- Review the settings and click the Start backup button. Depending on how full your disk is, the process can take from a few minutes to several hours.
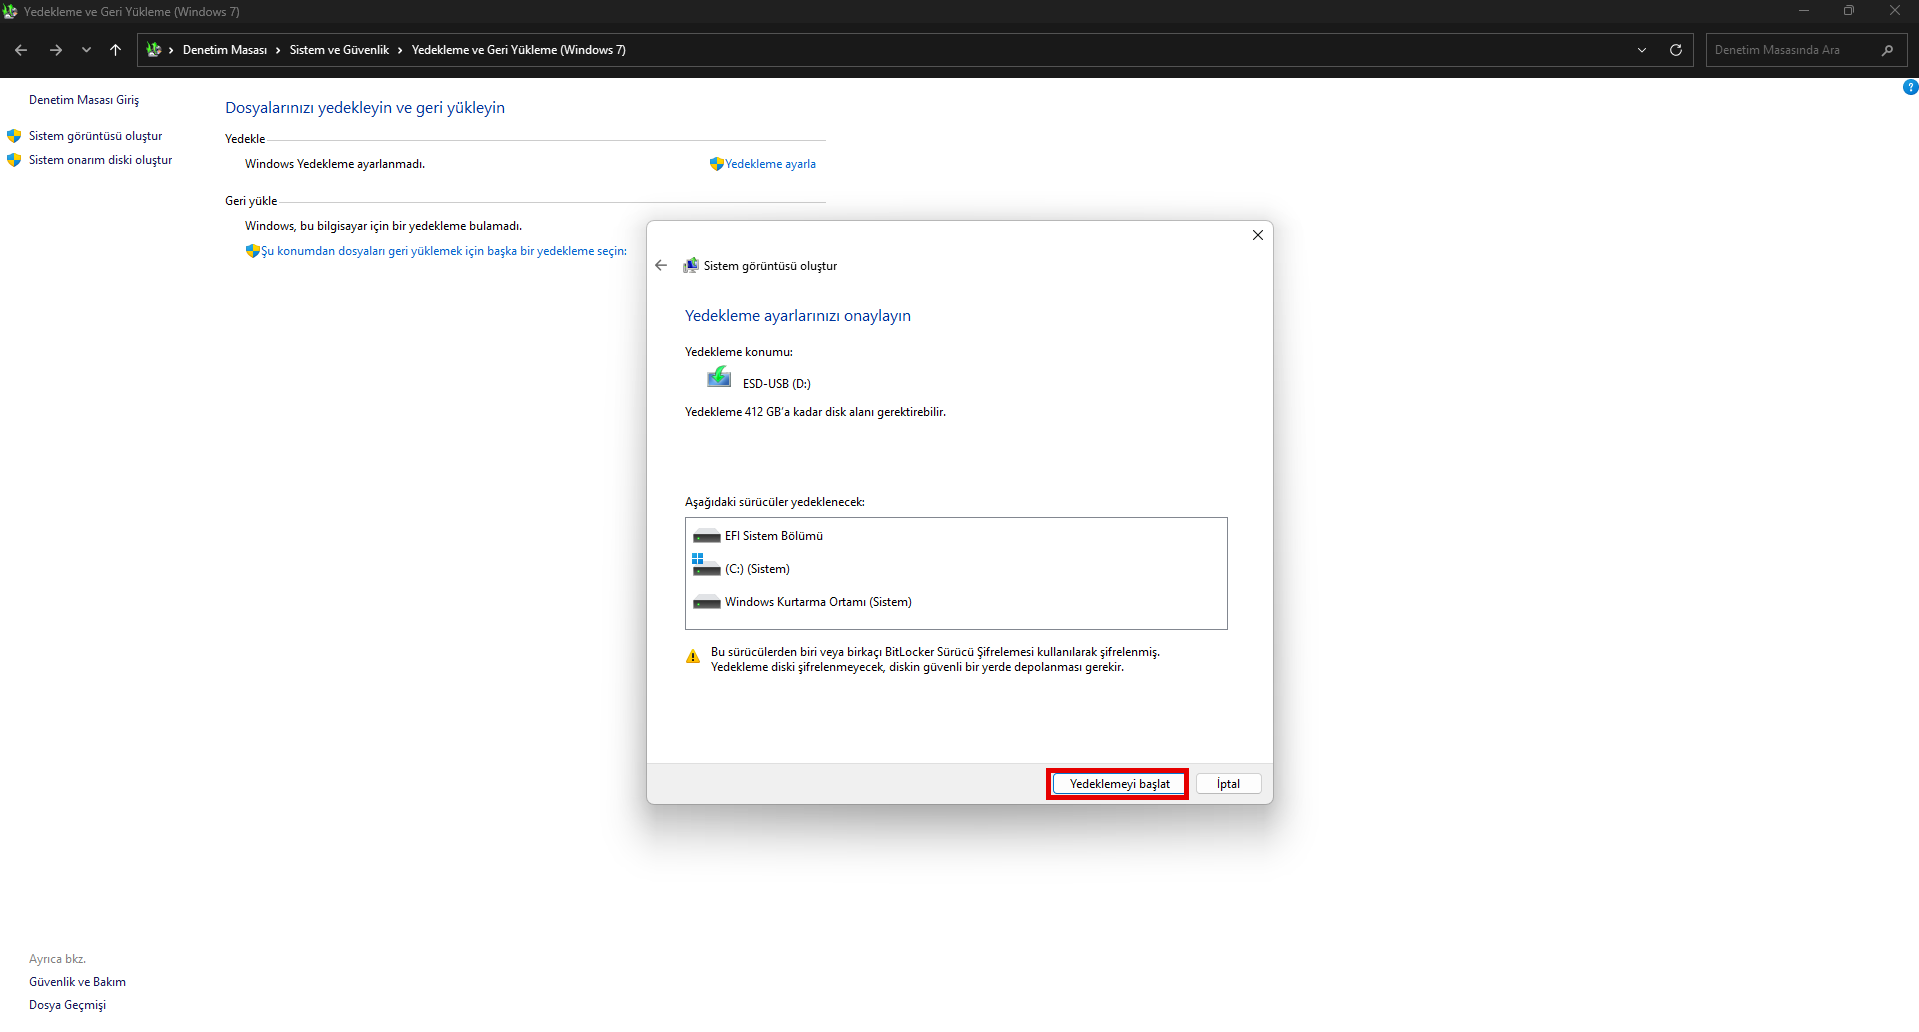
Reviewing the backup settings and the “Start backup” step
Once the process is complete, you can use this image whenever needed to restore your system to its previous state.
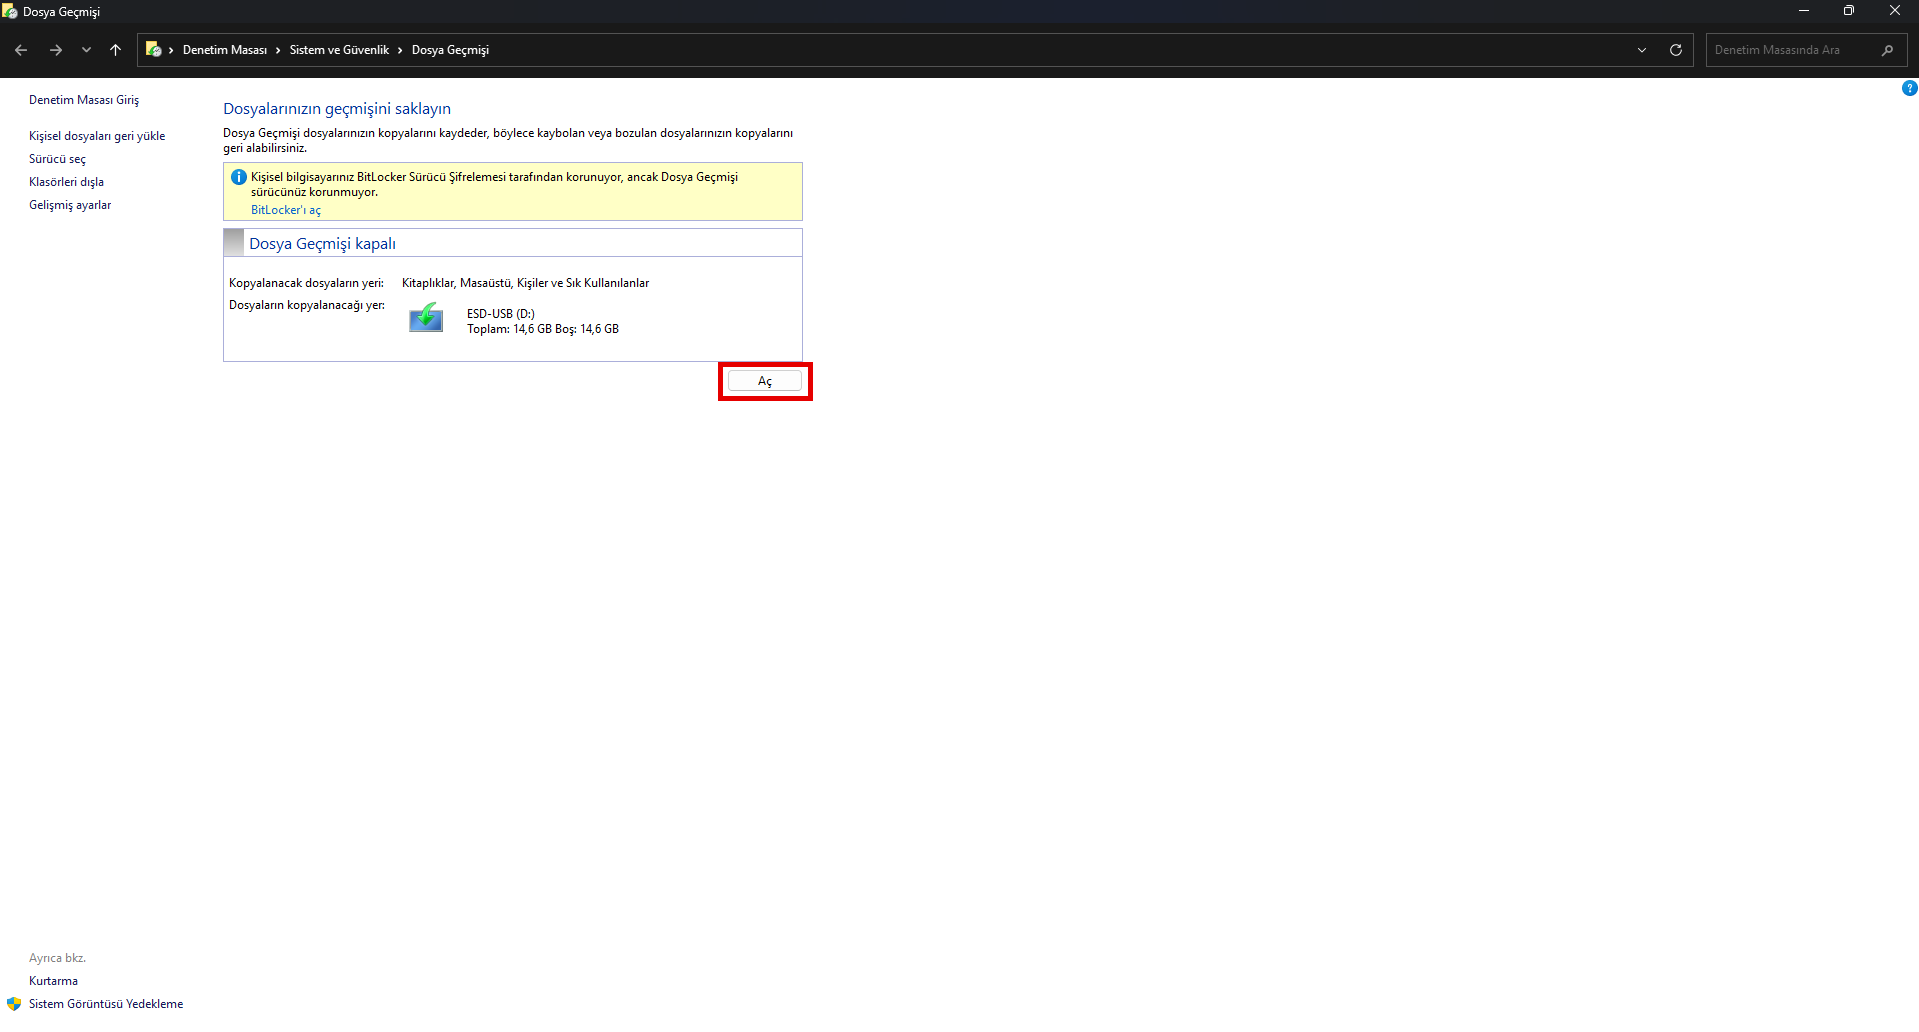
Method 2: Backing Up Files with File History
File History protects not the entire system but only your personal files. By default, it backs up the Desktop, Documents, Pictures, Music and Videos folders to an external disk at regular intervals.
The greatest strength of this method is that it keeps a version history: it stores not only the latest version of your files but also their previous versions. You can bring back a file you accidentally deleted or overwrote from an earlier date. This feature makes it especially valuable for users who edit files frequently.
Steps
- Go to Control Panel > System and Security > File History.
- If File History is off, you will be asked to select the external disk or network location where backups will be stored. Click Add a drive to set the target and enable the feature.
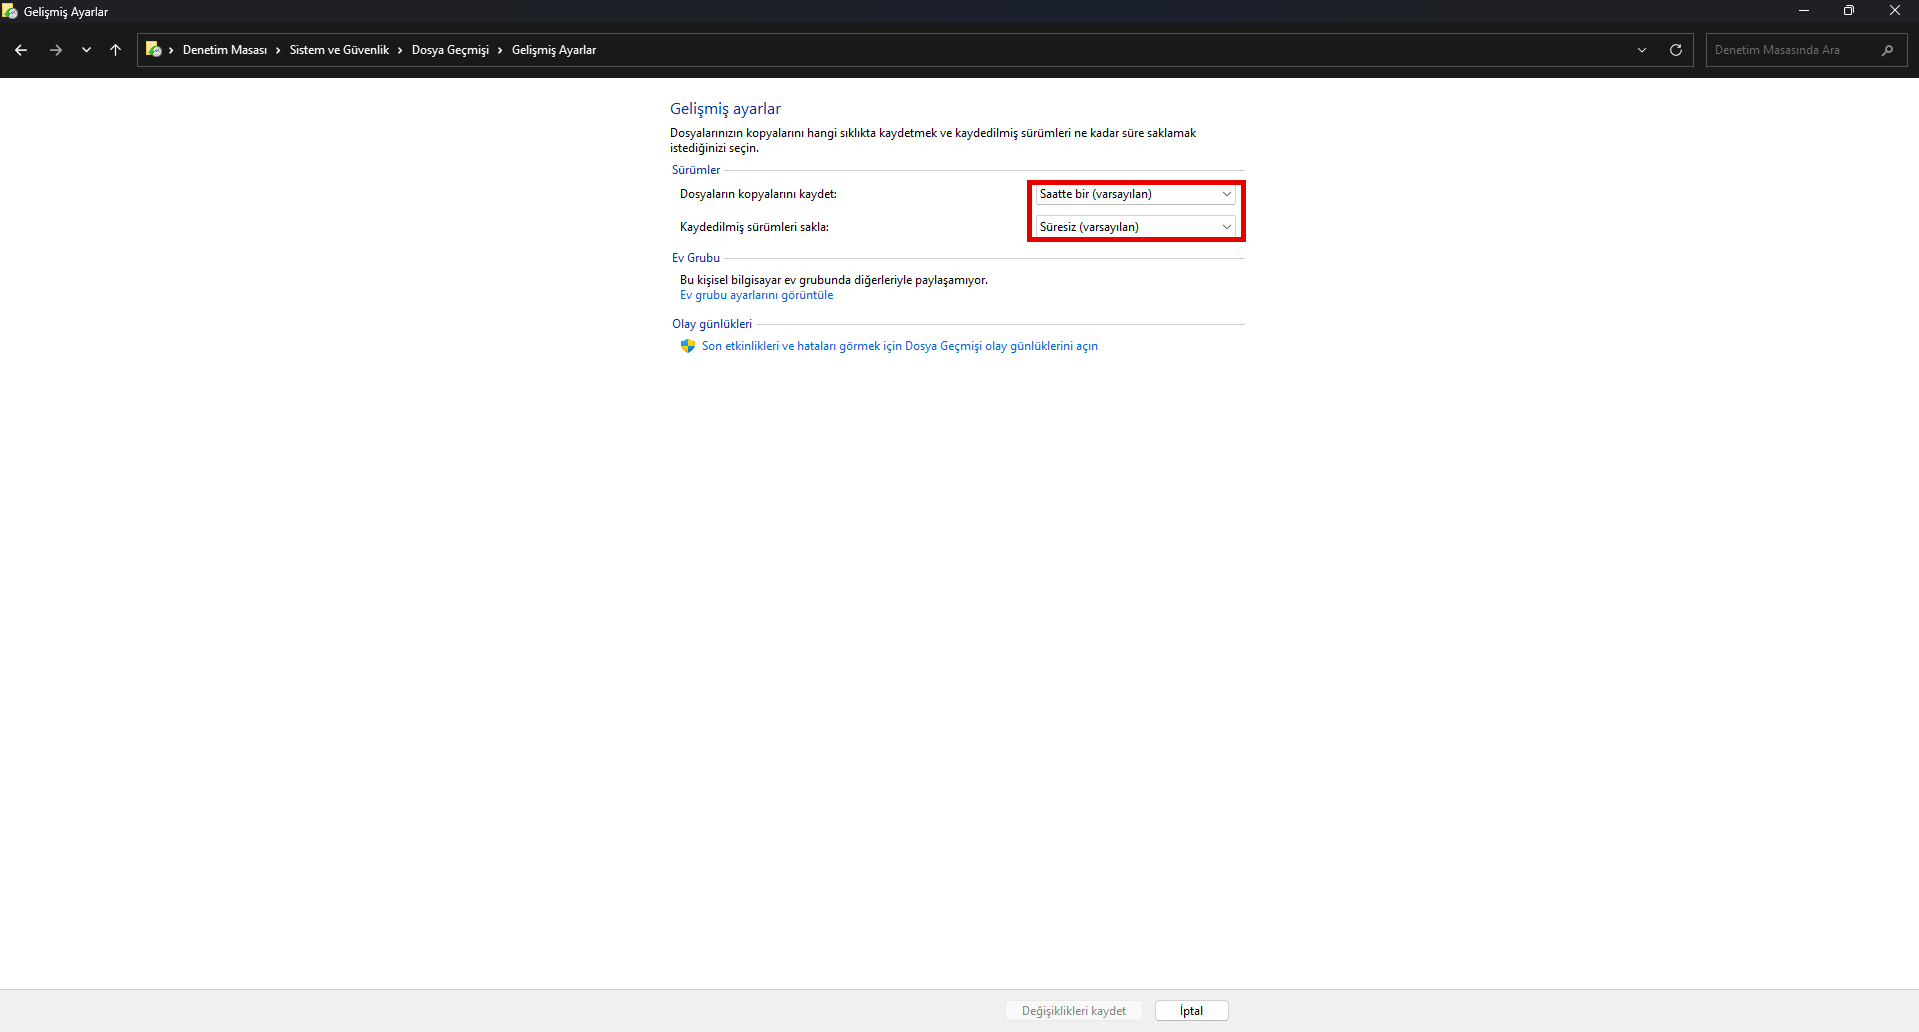
File History screen — the “Turn on” button to enable the feature - From the Advanced settings section in the left menu, you can configure how often backups are taken (for example, every hour) and how long old versions are kept.
Advanced settings: backup frequency and version retention period - To restore a file, use the Restore personal files option on the File History screen. In the window that opens, browse between dates, select the version you want and recover it with the green restore button.
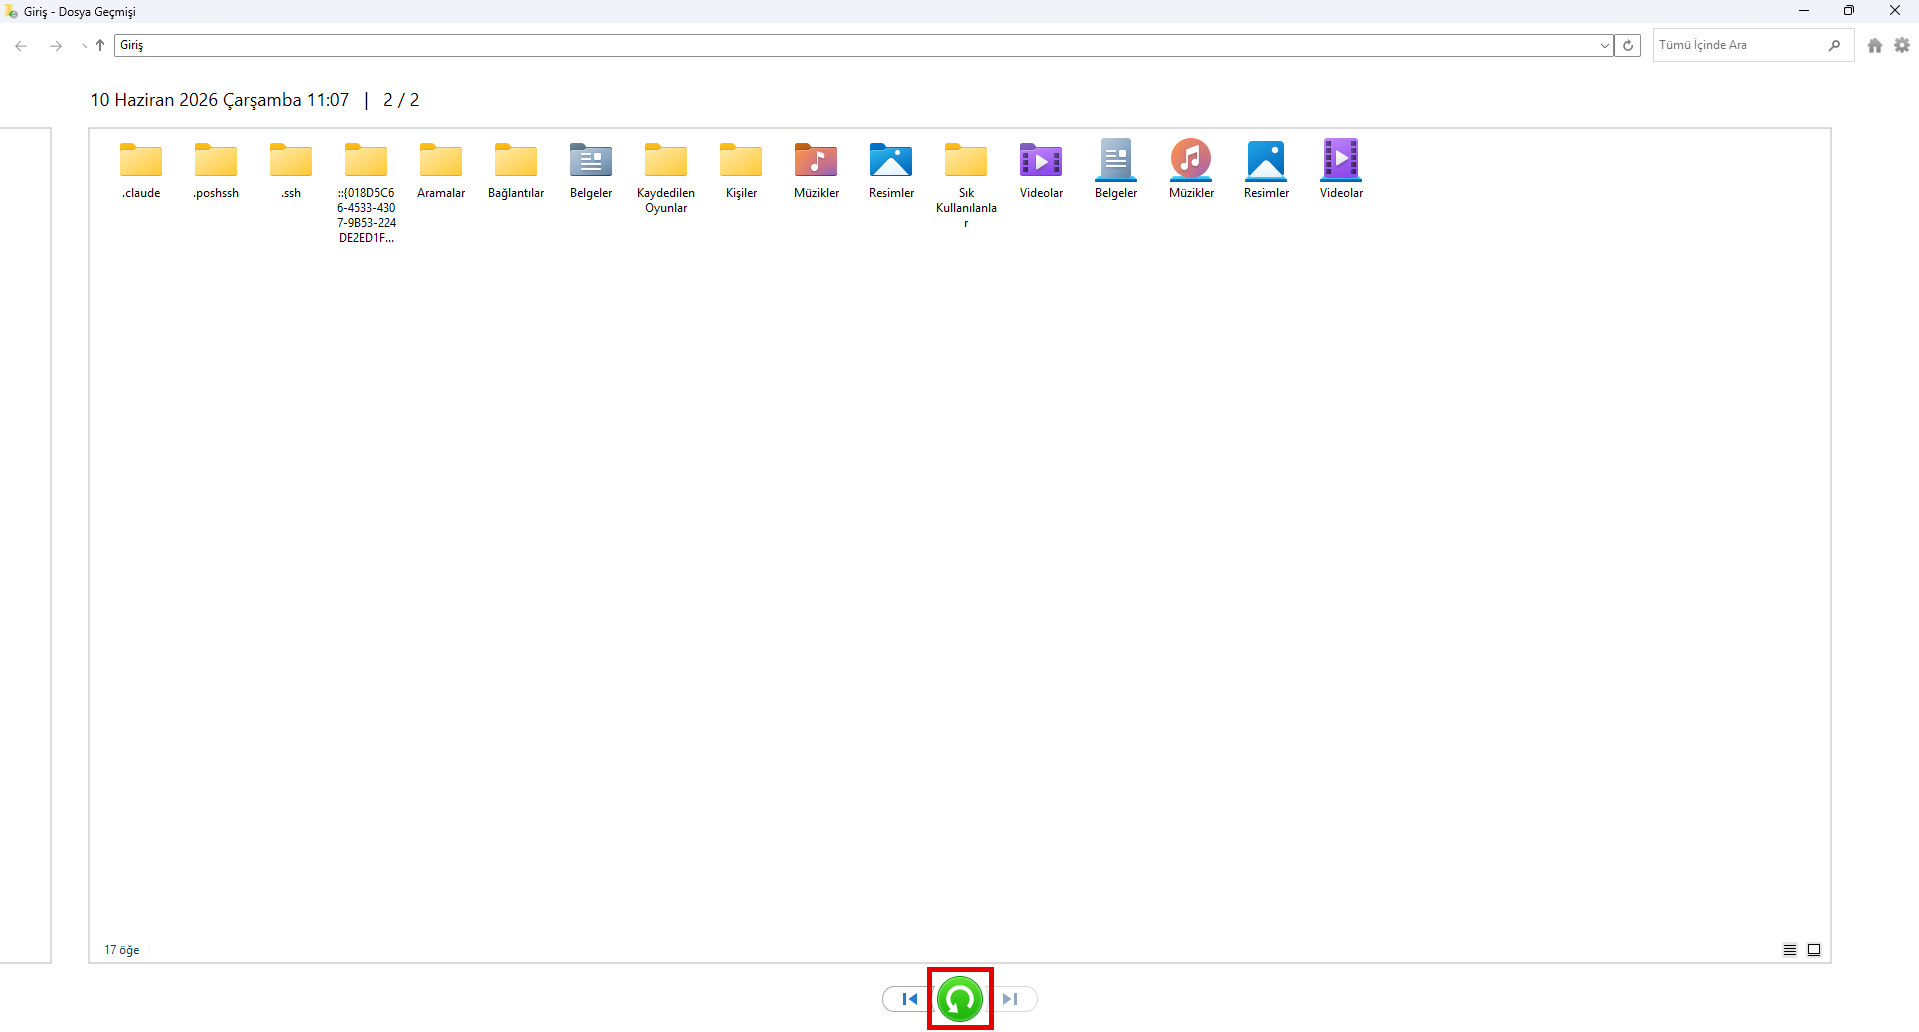
Restoring personal files: browse between dates and recover with the green button
As long as the external disk stays connected, File History continues backing up automatically according to the schedule you set.
Method 3: Creating a Recovery Drive
A recovery drive is technically not a “data backup”; it is a USB recovery disk that lets you reinstall or repair Windows 11 when a serious problem occurs with your operating system. Microsoft recommends keeping this drive ready against possible system failures. Used together with your system image backup, it forms a powerful recovery combination.
Steps
- Type Create a recovery drive in the Start menu and open the tool.
- Insert an empty USB stick with at least 16 GB capacity (make sure it is empty, as its contents will be erased).

Recovery drive wizard — the “Back up system files to the recovery drive” option - Check the Back up system files to the recovery drive option, select the USB drive to use, and complete the wizard.
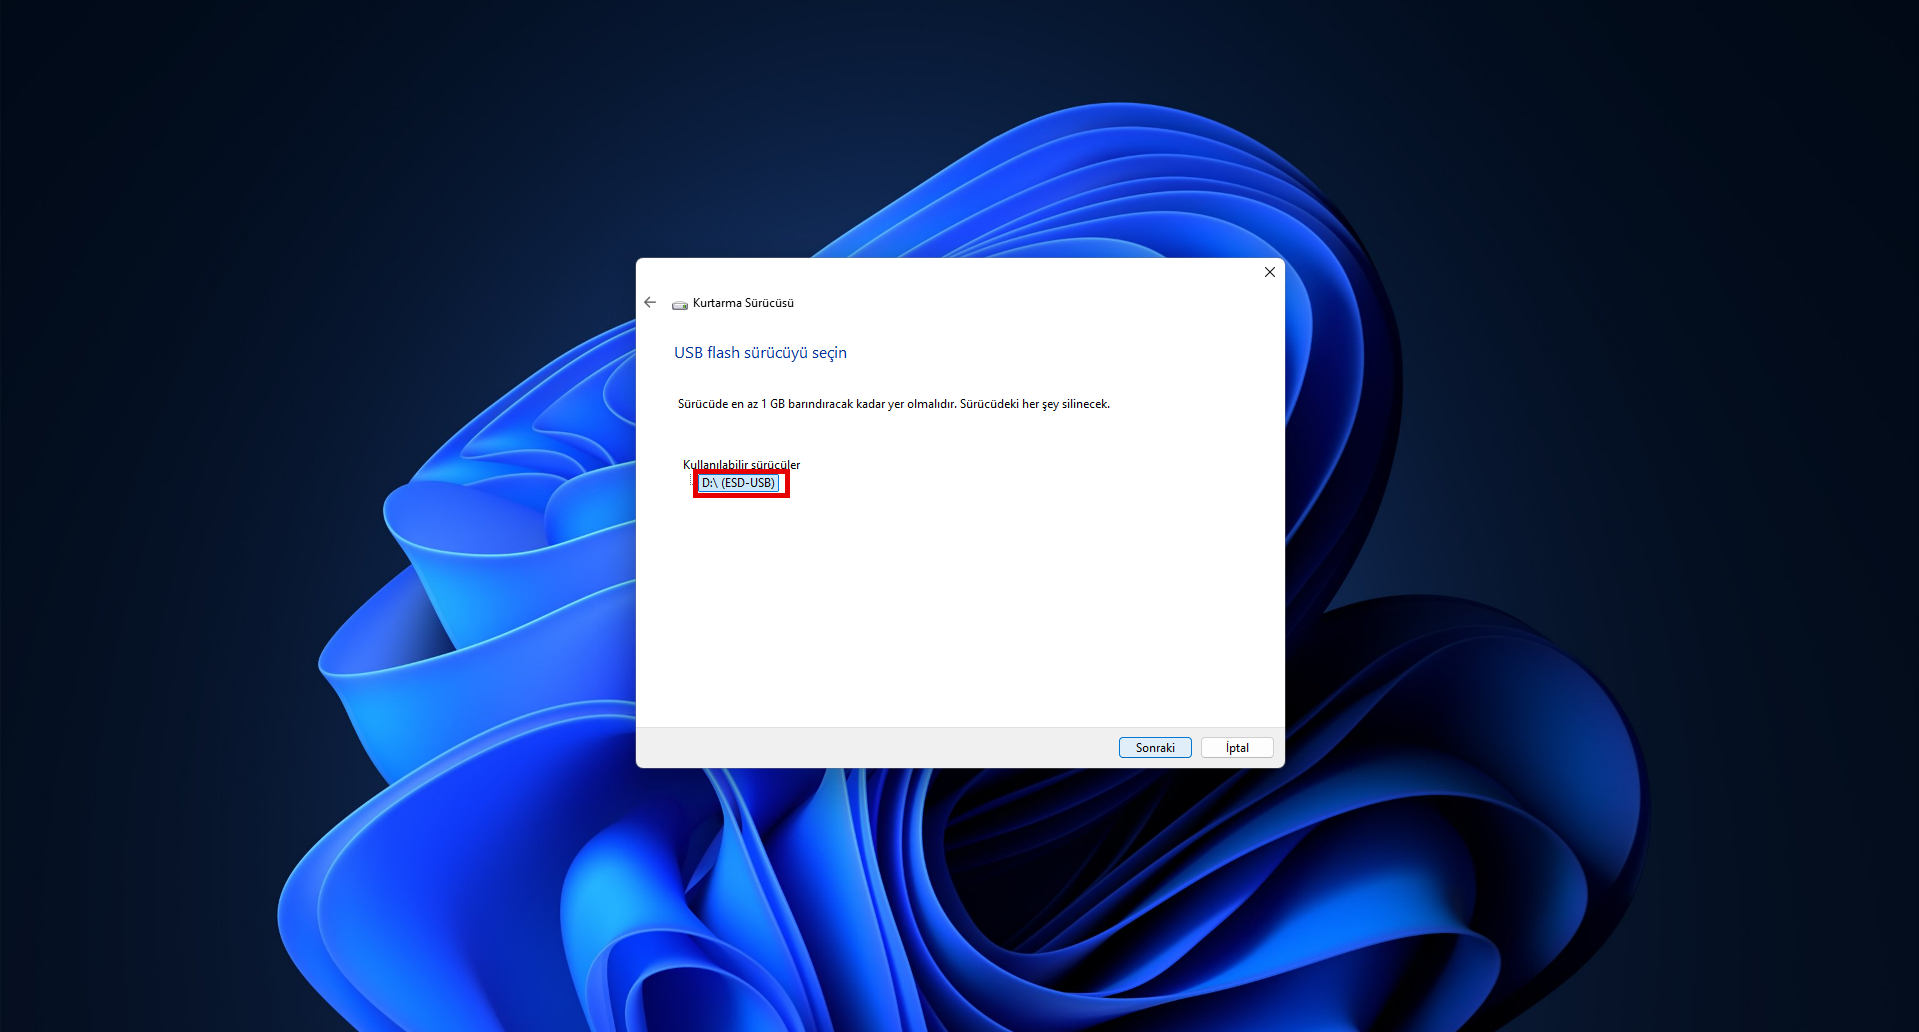
Selecting the USB flash drive to use
For Advanced Users: The Command-Line Option
In addition to the graphical interface methods above, Windows 11 also offers command-line based options for advanced users and system administrators. For example, the wbadmin command lets you take a full system backup in a single line and set up scheduled automatic backups:
wbadmin start backup -backupTarget:E: -include:C: -allCritical -quietSimilarly, Robocopy — short for “Robust File Copy” — is frequently used to copy large folders in bulk with advanced options:
robocopy C:\Data E:\Backup /MIRThese commands are a practical alternative for those who want to set up automated backup scenarios by embedding them in scripts. For detailed usage, refer to Microsoft’s official documentation.
Comparing the Methods
| Method | What Does It Back Up? | Single-File Recovery | Cloud Support | Ideal For |
|---|---|---|---|---|
| System Image | The entire system (OS + programs + files) | No | No | Those wanting full disaster recovery |
| File History | Personal files | Yes (with version history) | No | Those wanting protection against file loss |
| Recovery Drive | System repair tools | No | No | Those preparing for system failure |
Limits of Built-in Tools and the 3-2-1 Rule
While Windows 11’s built-in tools meet basic needs, they have some important limitations. They do not offer a built-in option to back up files directly to the cloud, and it is hard to easily apply the industry’s gold standard, the 3-2-1 backup rule.
It is also worth remembering that most of these tools are now marked as “legacy” by Microsoft and are no longer actively updated. When critical business data is involved, an automatic, version-controlled and geographically distributed backup strategy becomes increasingly necessary.
Backup from a PDPL and Data Security Perspective
Backup is not only a technical measure but also a legal responsibility. Turkey’s Personal Data Protection Law No. 6698 (PDPL) requires organizations that process personal data to take the necessary technical and administrative measures to ensure the security of that data. Personal data that becomes inaccessible as a result of data loss or a cyberattack can mean not just an operational loss but also a serious compliance violation.
For this reason, especially for businesses that hold customer data, financial records or personnel information, backup must be considered together with the questions of where the data is kept, who accesses it and how long it is retained. Backups being encrypted and access-controlled is also an inseparable part of PDPL compliance.
Conclusion: Put Your Data Under Professional Protection
Windows 11’s built-in tools are a good starting point for individual users. However, in corporate environments where business continuity is critical, an automatic, centrally manageable, encrypted and cloud-based backup solution puts both operational security and PDPL compliance on much stronger ground.
Don’t Leave Your Data to Chance
Narbulut Easy Image Backup was designed for exactly this need. With its domestic, PDPL-compliant cloud infrastructure, it automatically backs up the full disk image of your operating systems and your files; stores your data in encrypted form in data centers located in Turkey, and offers restore within minutes in the event of a disaster. It lets you apply the 3-2-1 rule without any manual effort.
Explore the Easy Image Backup Solution